Ana içeriğe geç

Olympus Stylus Tough-8010 Motherboard/Flash Component Replacement

Neye ihtiyacın var

  1. Olympus Stylus Tough-8010 Motherboard/Flash Component Replacement, Camera Casing: adım 1, 3 resimden 1. Olympus Stylus Tough-8010 Motherboard/Flash Component Replacement, Camera Casing: adım 1, 3 resimden 2. Olympus Stylus Tough-8010 Motherboard/Flash Component Replacement, Camera Casing: adım 1, 3 resimden 3.
    • Remove the front three screws (3.2mm) using a type T-6 head screwdriver.

    • Take off smaller front cover.

    • Carefully remove larger front cover.

  2. Olympus Stylus Tough-8010 Motherboard/Flash Component Replacement: adım 2, 3 resimden 1. Olympus Stylus Tough-8010 Motherboard/Flash Component Replacement: adım 2, 3 resimden 2. Olympus Stylus Tough-8010 Motherboard/Flash Component Replacement: adım 2, 3 resimden 3.
    • Remove two screws (4.1mm) on the top of the camera using a #000 Phillips head screwdriver.

    • Using a #000 Phillips head screwdriver remove two screws (7.9mm) near the control panel and set aside the metal connector.

    • Although the third photo shows the side panel casing being removed, it is normally secured by a screw under the front framework. You'll need to follow the next two steps to remove the framework and access the screw before you can remove the side casing as shown here.

  3. Olympus Stylus Tough-8010 Motherboard/Flash Component Replacement: adım 3, 3 resimden 1. Olympus Stylus Tough-8010 Motherboard/Flash Component Replacement: adım 3, 3 resimden 2. Olympus Stylus Tough-8010 Motherboard/Flash Component Replacement: adım 3, 3 resimden 3.
    • Using a #000 Philips head screwdriver remove the two screws (4.1mm) on the right side of the camera.

    • Remove two screws (4.1mm) on the bottom of the camera using a #000 head Phillips screwdriver.

    • Remove the single screw (3.2mm) on the front of the camera using a #000 Phillips head.

  4. Olympus Stylus Tough-8010 Motherboard/Flash Component Replacement: adım 4, 2 resimden 1. Olympus Stylus Tough-8010 Motherboard/Flash Component Replacement: adım 4, 2 resimden 2.
    • Carefully remove the font panel piece from the rest of the camera.

    • Carefully remove the top/side plastic piece.

    • If the the camera and flash buttons fall out of their slots set them aside.

    • If you haven't already done so, remove the side casing as mentioned in Step 3. It is secured by a single screw near the bottom corner.

  5. Olympus Stylus Tough-8010 Motherboard/Flash Component Replacement: adım 5, 3 resimden 1. Olympus Stylus Tough-8010 Motherboard/Flash Component Replacement: adım 5, 3 resimden 2. Olympus Stylus Tough-8010 Motherboard/Flash Component Replacement: adım 5, 3 resimden 3.
    • Remove four screws (9.4mm) on the front of the camera using a Phillips #000

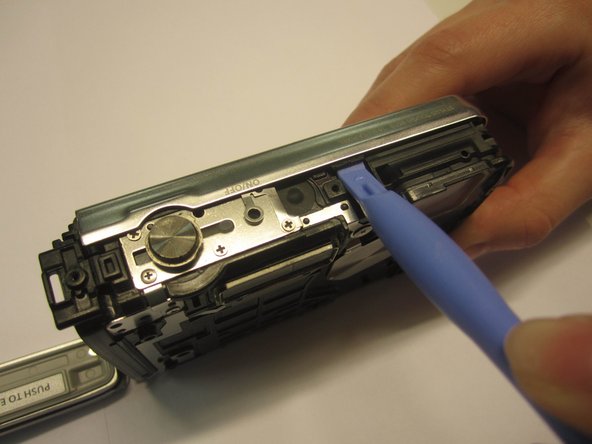
    • Use the plastic opening tool to release the holding clip.

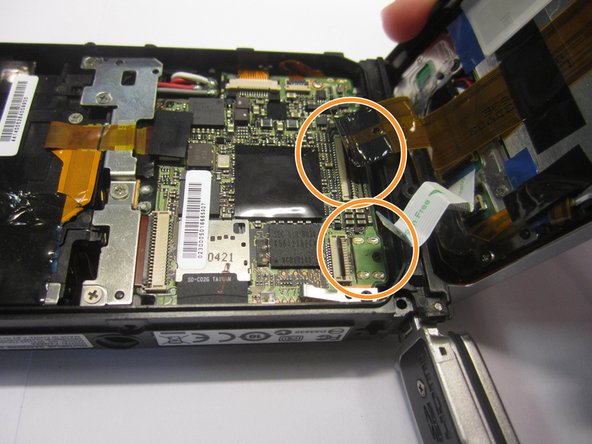
    • Using tweezers separate the plastic strips from their connectors located on the main circuit board by lifting the small, black flaps on the connectors and pulling on the ribbons.

  6. Olympus Stylus Tough-8010 Motherboard/Flash Component Replacement, Lens: adım 6, 2 resimden 1. Olympus Stylus Tough-8010 Motherboard/Flash Component Replacement, Lens: adım 6, 2 resimden 2.
    • Remove any tape on the flash component on the left.

    • Using tweezers, disconnect the plastic strip from its connector on the motherboard by lifting the plastic black flap on the connector and pulling the ribbon.

    • Using a #000 Philips head screwdriver remove four screws (4.1mm) on the metal plate.

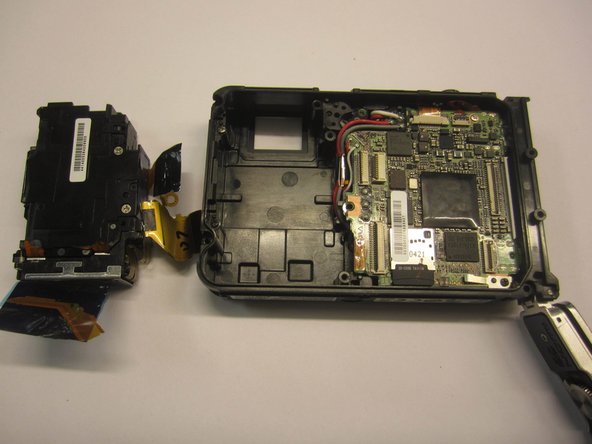
    • Gently lift the flash components out of the camera casing.

  7. Olympus Stylus Tough-8010 Motherboard/Flash Component Replacement, Motherboard/Flash Component: adım 7, 3 resimden 1. Olympus Stylus Tough-8010 Motherboard/Flash Component Replacement, Motherboard/Flash Component: adım 7, 3 resimden 2. Olympus Stylus Tough-8010 Motherboard/Flash Component Replacement, Motherboard/Flash Component: adım 7, 3 resimden 3.
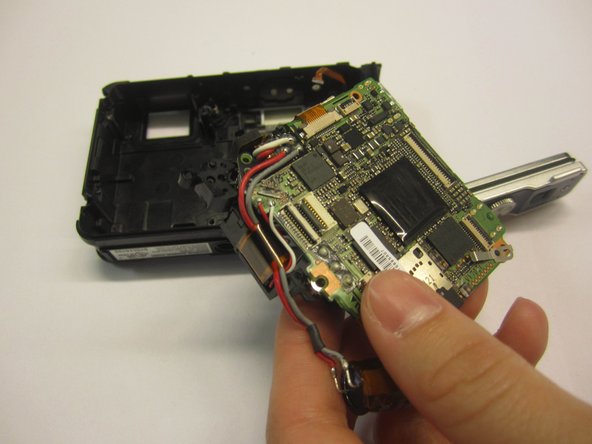
    • Remove the three screws (7.9mm) connected to the motherboard with a #000 Phillips head screwdriver.

    • Using tweezers disconnect the plastic strip in the top right corner of the motherboard with tweezers by lifting the small plastic flap and then pulling the ribbon from its connecter.

    • Remove the motherboard/lens component.

Sonuç

To reassemble your device, follow these instructions in reverse order.

Bir başkası bu kılavuzu tamamladı.

Luke Visser

Üyelik tarihi: 03/23/15

476 İtibar

4 adet Kılavuz yazıldı

Ekip

Baylor, Team 7-15, Williams Spring 2015 Baylor, Team 7-15, Williams Spring 2015 üyesi

BU-WILLIAMS-S15S7G15

3 Üyeler

12 adet Kılavuz yazıldı

2 Yorum

howdy,

Before I get into checking or replacing the motherboard/ flash component I wanted to make sure this is my problem. The battery works fine (and so do the new batteries I bought) so I don't believe that is my problem. With the fully charged battery the orange light on top (by the turn on button) comes on and stays, on with occasional off and on. The view finder remains black. What could be the problem? Any assistance you may render will be appreciated.

Bob

Qigon4me2@gamil.com

ming tong - Yanıt

OMG , my olympus stylus tough 3 waterproof digital camera has just done the same ming tong. I took it into a camera repair shop in Perth Australia & he thinks its the motherboard or the lens without opening it. Does anyone know whats going on with these cameras?

Roger Ynohu - Yanıt

Yorum Ekle

İstatistikleri Görüntüle:

Son 24 Saat: 1

Son 7 gün: 4

Son 30 gün: 13

Her zaman: 1,346