Giriş
The guide will show you how to replace the micro USB charging port located on the bottom edge of the phone.
Neye ihtiyacın var
-
-
Power off the phone by pressing the button on the right side of the phone, it will be the smaller button.
-
Press and hold the button down for a few seconds, until the option "Power Off" appears on the screen.
-
Select "Power Off" on the screen to turn off the phone.
-
-
-
Insert a SIM card removal tool into the small hole located on the top right corner of the phone, just above the volume buttons.
-
Push the removal tool into the hole and the tray should pop out.
-
Remove the SIM tray from the phone.
There is absolutely no reason to remove the sim tray, we're not removing the motherboard.
-
-
-
Using a heat gun, apply slow and even heat to the edges of the back panel.
-
While heating the back panel, use a Jimmy to test if the adhesive is soft enough to allow the panel to separate from the device.
-
Carefully detach the back panel, using opening picks to hold the panel apart from the device.
-
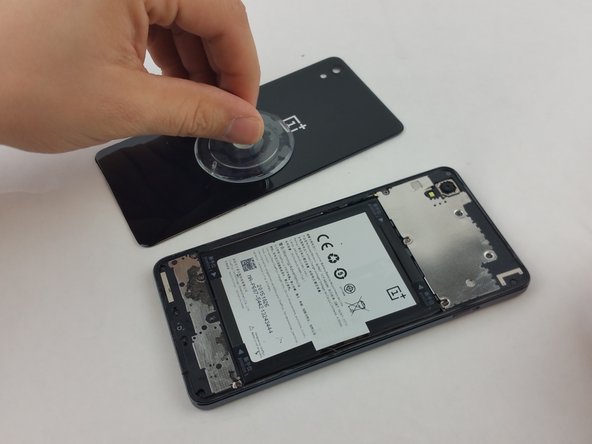
Once most of the edges are separated from the device, attach a suction cup to the back panel.
-
-
-
Press the suction cup to the back panel to secure it.
-
With the help of the suction cup, pull up on the panel to completely detach it from the device.
It can't be stressed enough to do this very carefully. I did it very carefully, but not carefully enough. Cracked a corner. Also not just the edges, there's extra adhesive on the lower 2-3 cm's of the back.
Another remark, get in between the black bezel and the back cover, this is a bit unclear on the first picture. Same goes for the front, get in between the bezel and the front assembly.
-
-
-
-
Using a PH000 screwdriver, remove the following seven screws circled with red and orange:
-
Four (longer) PH000 screws
-
Three shorter PH000 screws
-
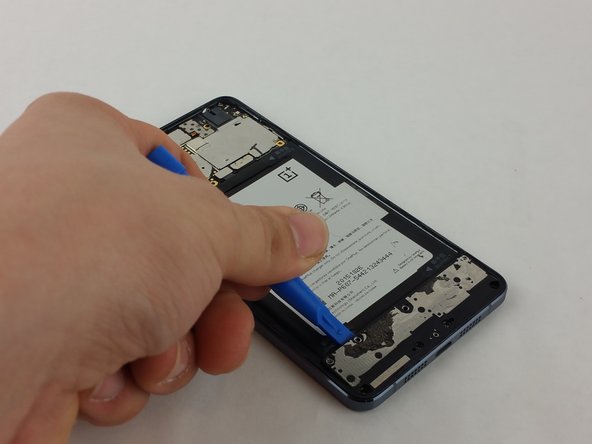
Once all of the screws are removed, proceed to using a plastic spudger to pry the metal cover off.
-
There are two clips near the bottom, right above the battery, so start by prying on the bottom edge of the plate.
Check http://imgur.com/wqD9Dis. Orange circles are the smaller screws (3 out of 7 are smaller than the other 4).
-
-
-
On the battery, locate a clear tab. This will be used to pull the battery out.
-
Firmly grasp the clear tab and pull up and away from the phone to remove the battery.
-
Continue to pull slowly on the battery, until it is completely free from the phone.
Strictly speaking, you don't need to remove the battery at all. The connector to the front assembly is underneath the speaker assembly.
I agree it's nearly impossible to remove the battery without damaging it. Even a tiny little bending can lower the capacity. And if you heat it up too much to soften the glue it can explode. Also never use metal tools on the battery in case u break through the protection foil it won't catch fire.
The instructions on the pull tab itself are pretty clear and contradict what's said here!
"Tear from position 1, and then pull out the battery from position 2."
The battery sits in a kind of a black "vest", which is the thing glued to the phone (not the battery itself).
This vest can be "unbuttoned" from the top and bottom sides (position 1, visible on some of the previous pictures).
After that the battery would pop out with much less effort (there is some adhesive in the "vest", but it's much less robust).
What is being depicted here is quite dangerous and unnecessary, as it makes the battery bend heavily.
-
-
-
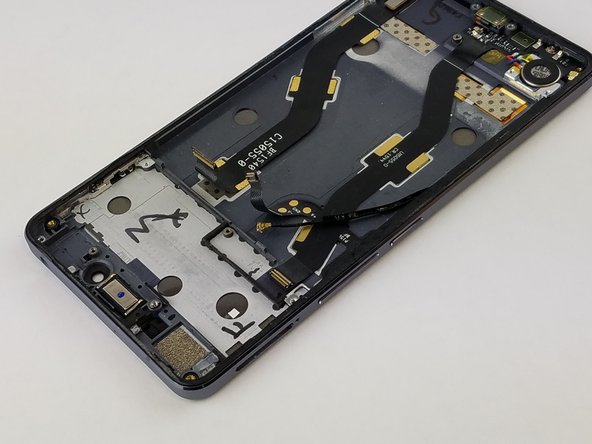
Using a PH #000 screwdriver, remove the 8 screws from the motherboard, circled red in the diagram.
-
Once all the screws have been removed, use the plastic spudger to pry the metal cover off.
-
-
-
Using the plastic opening tool pry the upper motherboard. Carefully pry it up until you can safely remove the upper motherboard completely.
-
On the bottom left hand side of the phone, you will see a small screw. Use the PH #000 to remove that screw.
Switch back to the plastic spudger and start to pry at the upper logic board. Carefully pry it up until you can safely remove completely.
This should not been done from the top but from the bottom, just as the metal cover from step one.
And before starting, make sure the three state button is in the top position.
-
-
-
After removing the Phillips head screw, you will need to remove a black wire. Use a spudger to unclip the cable first.
-
Pull back on the ribbon-cable as shown in the image. This is connected to both the charging port and the vibration module (which is similar to a small watch battery).
-
Gently pry the vibration module out with a plastic opening tool. Be gentle, for it is adhered to the phone.
-


To reassemble your device, follow these instructions in reverse order.
To reassemble your device, follow these instructions in reverse order.
İptal et: Bu kılavuzu tamamlamadım.
15 farklı kişi bu kılavuzu tamamladı.
Ekip

USF Tampa, Team 3-6, Wollert Spring 2016 USF Tampa, Team 3-6, Wollert Spring 2016 üyesi
USFT-WOLLERT-S16S3G6
2 Üyeler
10 adet Kılavuz yazıldı
7 Yorum
I had to reuse the vibration motor de- and solder it back on, because it is not included in the spare part.
Watch for the silence switch when you reasamble the phone. I had to unscrew the upper bord again because i didn't payed atention to it and it was locked. Also the mic is covered on the replacement part. Don't forget to remove the yellow "flag" there.
I replaced USB flex port, now working, but now phone dont recognize SIM card..what i must check? Thanks for any help
What is the price of charging port with vibrator module
Good Instructions
In the upper right Corner is one more Screw
where the Logic-board is screwed directly.
That was not mentioned!
Also, you should pay attention that you do not pry where the PCP goes around the Camera.
I break off the Corner, fortunately it's only connected to the Status-LED.
Otherwise everything works.
Thank for the instructions, this came in very handy!
I agree with all the above remarks:
- The screw in the upper right corner
- Battery comes out difficult, but you can listen the sealant come loose, so don’t force it!
- As well, don’t pry to much on the logic board, it’s being hold down by little ‘clips’ on the phone edge. Gently ply the edge toward the outside and it will click loose.
After reinstalling everything, all works perfectly! (saving me a lot of money !)
Thank you!
i did not try this out, since everything is ok with my phone (I was looking for polarity of the contacts of the battery connector actually), but this instructions seem very weird to me (as they are now): if you want to change the micro USB port, WHY on earth would you have to remove the logic board??? they are on opposing sides of the device and connected with a flex-cable, I don’t see the necessity.