Ana içeriğe geç

Onkyo R-21 Laser Cleaning

Neye ihtiyacın var

  1. Onkyo R-21 Laser Cleaning, Remove plug and cover: adım 1, 3 resimden 1. Onkyo R-21 Laser Cleaning, Remove plug and cover: adım 1, 3 resimden 2. Onkyo R-21 Laser Cleaning, Remove plug and cover: adım 1, 3 resimden 3.
    • Remove the data cable from the amplifier by pulling during pressing the plug on both sides

    • Remove the 4 crews on the sides and the 3 screws on the back to remove the cover

  2. Onkyo R-21 Laser Cleaning: adım 2, 3 resimden 1. Onkyo R-21 Laser Cleaning: adım 2, 3 resimden 2. Onkyo R-21 Laser Cleaning: adım 2, 3 resimden 3.
    • The laser is located under the laser protection shield

    • You can move it closer by turning the white gear to get better access to clean it

  3. Onkyo R-21 Laser Cleaning, Clean the lense: adım 3, 3 resimden 1. Onkyo R-21 Laser Cleaning, Clean the lense: adım 3, 3 resimden 2. Onkyo R-21 Laser Cleaning, Clean the lense: adım 3, 3 resimden 3.
    Bu adımda kullanılan alet:
    Microfiber Cleaning Cloths
    $3.99
    Satın Al
    • Take a microfiber cloth or any clean cloth which is lint-free

    • Wrap it around a flat screwdriver and soak it with high-percentage cleaning alcohol. I used 80% alcohol and it worked fine

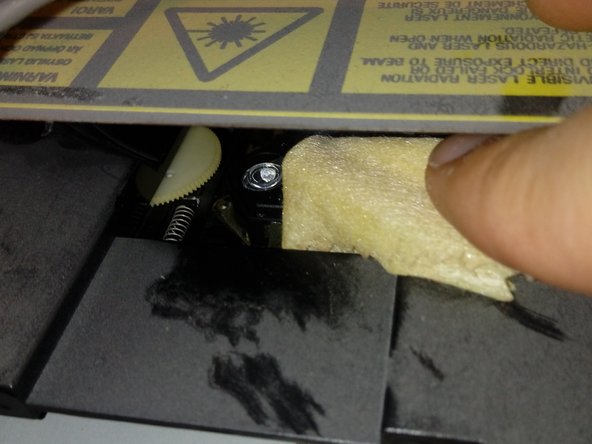
    • Clean gently and carefully the lense

    • Turn the laser back to its standard position with the gearwheel

Sonuç

To reassemble your device, follow these instructions in reverse order.

Chris Müller

Üyelik tarihi: 09/25/18

367 İtibar

3 adet Kılavuz yazıldı

0 Yorum

Yorum Ekle

İstatistikleri Görüntüle:

Son 24 Saat: 0

Son 7 gün: 1

Son 30 gün: 5

Her zaman: 200