Ana içeriğe geç

Opening Procedure

Salt Önkoşul
Bu kılavuz yalnızca diğer kılavuzlar için bir ön koşul olarak kullanılmak üzere tasarlanmıştır. Tek başına eksiktir.

Neye ihtiyacın var

  1. Opening Procedure, Pentalobe Screws: adım 1, 1 resimden 1.
    • Before you begin, discharge your iPhone battery below 25%. A charged lithium-ion battery can catch fire and/or explode if accidentally punctured.

    • Power off your iPhone before beginning disassembly.

    • Remove the two 3.4 mm pentalobe screws at the bottom edge of the iPhone.

    • Opening the iPhone's display will compromise its waterproof seals. Have replacement seals ready before you proceed past this step, or take care to avoid liquid exposure if you reassemble your iPhone without replacing the seals.

  2. Opening Procedure, iOpener Heating: adım 2, 2 resimden 1. Opening Procedure, iOpener Heating: adım 2, 2 resimden 2.
    • We recommend that you clean your microwave before proceeding, as any nasty gunk on the bottom may end up stuck to the iOpener.

    • Place the iOpener in the center of the microwave.

    • For carousel microwaves: Make sure the plate spins freely. If your iOpener gets stuck, it may overheat and burn.

  3. Opening Procedure: adım 3, 1 resimden 1.
    • Heat the iOpener for thirty seconds.

    • Throughout the repair procedure, as the iOpener cools, reheat it in the microwave for an additional thirty seconds at a time.

    • Be careful not to overheat the iOpener during the repair. Overheating may cause the iOpener to burst. Do not attempt to heat over 100˚C (212˚F).

    • Never touch the iOpener if it appears swollen.

    • If the iOpener is still too hot in the middle to touch, continue using it while waiting for it to cool down some more before reheating. A properly heated iOpener should stay warm for up to 10 minutes.

  4. Opening Procedure: adım 4, 1 resimden 1.
    • Remove the iOpener from the microwave, holding it by one of the two flat ends to avoid the hot center.

    • The iOpener will be very hot, so be careful when handling it. Use an oven mitt if necessary.

  5. Opening Procedure, Alternate iOpener heating method: adım 5, 2 resimden 1. Opening Procedure, Alternate iOpener heating method: adım 5, 2 resimden 2.
    • If you don't have a microwave, follow this step to heat your iOpener in boiling water.

    • Fill a pot or pan with enough water to fully submerge an iOpener.

    • Heat the water to a boil. Turn off the heat.

    • Place an iOpener into the hot water for 2-3 minutes. Make sure the iOpener is fully submerged in the water.

    • Use tongs to extract the heated iOpener from the hot water.

    • Thoroughly dry the iOpener with a towel.

    • The iOpener will be very hot, so be careful to hold it only by the end tabs.

    • Your iOpener is ready for use! If you need to reheat the iOpener, heat the water to a boil, turn off the heat, and place the iOpener in the water for 2-3 minutes.

  6. Opening Procedure, Opening Procedure: adım 6, 1 resimden 1.
    • Heating the lower edge of the iPhone will help soften the adhesive securing the display, making it easier to open.

    • Use a hairdryer or prepare an iOpener and apply it to the lower edge of the iPhone for about a minute in order to soften up the adhesive underneath.

  7. Opening Procedure: adım 7, 2 resimden 1. Opening Procedure: adım 7, 2 resimden 2.
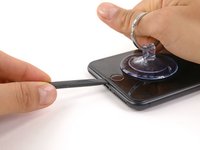
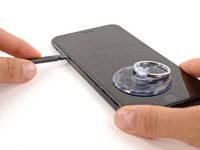
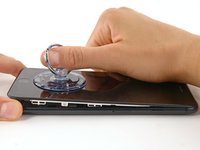
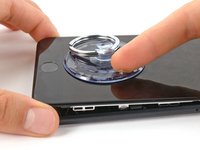
    • Apply a suction cup to the lower half of the front panel, just above the home button.

    • Be sure the suction cup does not overlap with the home button, as this will prevent a seal from forming between the suction cup and front glass.

    • If your display is badly cracked, covering it with a layer of clear packing tape may allow the suction cup to adhere. Alternatively, very strong tape may be used instead of the suction cup. If all else fails, you can superglue the suction cup to the broken screen.

  8. Opening Procedure: adım 8, 3 resimden 1. Opening Procedure: adım 8, 3 resimden 2. Opening Procedure: adım 8, 3 resimden 3.
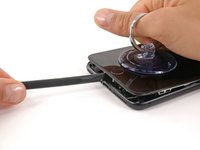
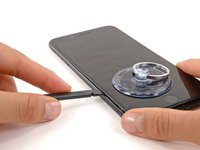
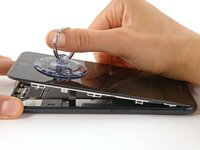
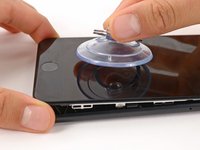
    • Pull up on the suction cup with firm, constant pressure to create a slight gap between the front panel and rear case.

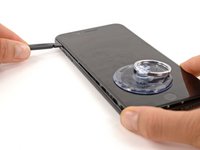
    • Insert the flat end of a spudger into the gap.

    • The watertight adhesive holding the display in place is very strong; creating this initial gap takes a significant amount of force. If you're having a hard time opening a gap, rock the screen up and down to weaken the adhesive until you can fit a spudger inside.

    • While pulling up on the suction cup, twist the spudger to widen the opening between the screen and rear case.

  9. Opening Procedure: adım 9, 3 resimden 1. Opening Procedure: adım 9, 3 resimden 2. Opening Procedure: adım 9, 3 resimden 3.
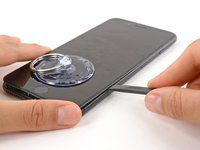
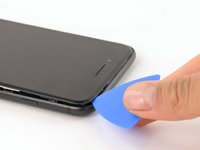
    • Insert the flat end of the spudger between the front panel and the rear case at the lower left edge of the iPhone.

    • Slide the spudger up the left edge of the phone starting at the lower edge and moving towards the volume control buttons and silent switch, breaking up the adhesive holding the display in place.

    • Do not try to pry the top edge of the display away from the rear case, as it is held in place by plastic clips that may break.

  10. Opening Procedure: adım 10, 2 resimden 1. Opening Procedure: adım 10, 2 resimden 2.
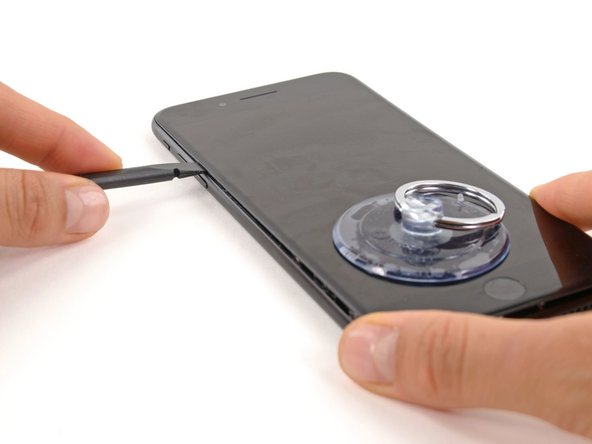
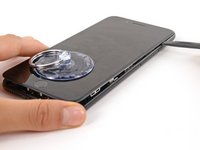
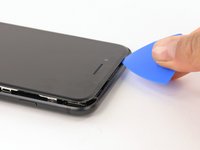
    • Remove the spudger from the left side of the phone and insert the flat end into the bottom right corner.

    • Slide the spudger up the right edge of the phone to the top corner, breaking up the adhesive holding the display in place.

  11. Opening Procedure: adım 11, 2 resimden 1. Opening Procedure: adım 11, 2 resimden 2.
    • Pull up on the suction cup to lift up the display and open the iPhone.

    • Do not raise the display more than 10º as there are delicate ribbon cables along the right edge of the device connecting the display to the logic board.

  12. Opening Procedure: adım 12, 2 resimden 1. Opening Procedure: adım 12, 2 resimden 2.
    • Pull up on the small nub on the suction cup to remove it from the front panel.

  13. Opening Procedure: adım 13, 2 resimden 1. Opening Procedure: adım 13, 2 resimden 2.
    • Slide an opening pick underneath the display along the top edge of the phone to loosen the last of the adhesive.

  14. Opening Procedure: adım 14, 3 resimden 1. Opening Procedure: adım 14, 3 resimden 2. Opening Procedure: adım 14, 3 resimden 3.
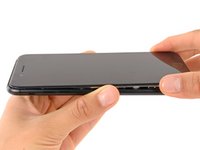
    • Pull the display assembly slightly away from the top edge of the phone to disengage the clips holding it to the rear case.

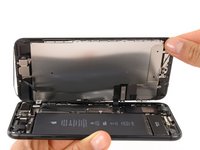
    • Open the iPhone by swinging the display up from the left side, like the back cover of a book.

    • Don't try to fully separate the display yet, as several fragile ribbon cables still connect it to the iPhone's logic board.

Sonuç

To reassemble your device, follow these instructions in reverse order.

7 farklı kişi bu kılavuzu tamamladı.

Evan Noronha

Üyelik tarihi: 02/05/15

223.163 İtibar

168 adet Kılavuz yazıldı

0 Yorum

Yorum Ekle

İstatistikleri Görüntüle:

Son 24 Saat: 0

Son 7 gün: 0

Son 30 gün: 4

Her zaman: 1,742