Ana içeriğe geç

Oral-B Vitality Battery Replacement

Neye ihtiyacın var

  1. Oral-B Vitality Battery Replacement, Battery: adım 1, 3 resimden 1. Oral-B Vitality Battery Replacement, Battery: adım 1, 3 resimden 2. Oral-B Vitality Battery Replacement, Battery: adım 1, 3 resimden 3.
    • Pull off head, and use pliers to remove the white cap. Pull out the circuit core.

  2. Oral-B Vitality Battery Replacement: adım 2, 2 resimden 1. Oral-B Vitality Battery Replacement: adım 2, 2 resimden 2.
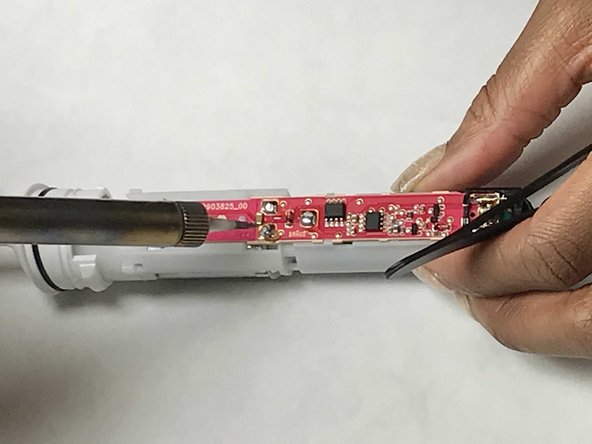
    • De-solder in these four (4) locations.

    • The two (2) motor connections

    • The Positive (+) side of the battery

    • The Negative (-) side of the battery

  3. Oral-B Vitality Battery Replacement: adım 3, 2 resimden 1. Oral-B Vitality Battery Replacement: adım 3, 2 resimden 2.
    • De-Solder lower battery connection terminal. Bend back battery terminal to clear circuit board.

  4. Oral-B Vitality Battery Replacement: adım 4, 1 resimden 1.
    • De-Solder the three (3) upper terminals from the circuit board.

  5. Oral-B Vitality Battery Replacement: adım 5, 1 resimden 1.
    • Use plastic prying tools to carefully pry off the circuit board. (Utilize metal spedger as a last resort)

    • There is a white tab that goes through the board, be careful when removing the circuit board.

  6. Oral-B Vitality Battery Replacement: adım 6, 2 resimden 1. Oral-B Vitality Battery Replacement: adım 6, 2 resimden 2.
    • Pull the circuit board and battery assembly out. Then proceed to remove the battery from the circuit board

  7. Oral-B Vitality Battery Replacement: adım 7, 1 resimden 1.
    • When re-installing battery, remember to bend down lower terminal. And the negative (-) terminal is closest to the copper wires

    • Ensure you recharge the toothbrush after the repair. Even if the replacement battery is already fully charged, the toothbrush will fail to power on if you don’t recharge the toothbrush.

Sonuç

To reassemble your device, follow these instructions in reverse order. Remember to apply just enough solder to re-attach the terminals.

15 farklı kişi bu kılavuzu tamamladı.

Miles Gunty

Üyelik tarihi: 11/07/17

492 İtibar

1 Kılavuz yazıldı

Ekip

IUPUI, Team S2-G1, Harley Fall 2017 IUPUI, Team S2-G1, Harley Fall 2017 üyesi

IUPUI-HARLEY-F17S2G1

3 Üyeler

8 adet Kılavuz yazıldı

8 Yorum

This is very easy to do. I had no problems following your instructions.

Ian Bowker - Yanıt

Thanks.

Is this a regular rechargeable AA?

Thanks again.

Stephen Shaw - Yanıt

The original battery is a NiCd with tabs. I just spot welded tabs onto a standard AA NiMH battery and it worked fine.

T C -

Thanks.

I did fix an Oral B Braun PRO timer (2022) and the only part that is different is the head. It has two nail presses inside, one at the switch side and the other at the opposite side, that are very difficult to lose.

Peter M. - Yanıt

Yorum Ekle

İstatistikleri Görüntüle:

Son 24 Saat: 18

Son 7 gün: 202

Son 30 gün: 736

Her zaman: 43,967