Ana içeriğe geç

Outer Shell Disassembly

Neye ihtiyacın var

  1. Outer Shell Disassembly, Outer Shell Disassembly: adım 1, 2 resimden 1. Outer Shell Disassembly, Outer Shell Disassembly: adım 1, 2 resimden 2.
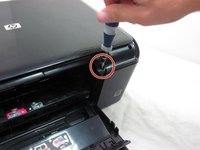
    • Unplug the device from any energy sources.

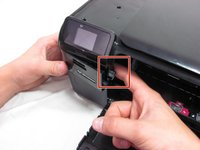
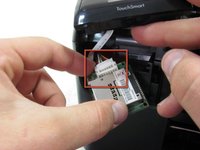
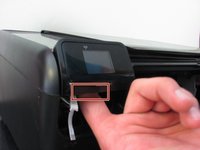
    • Lift the top cover of the scanner.

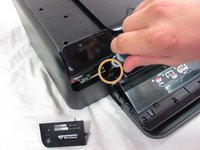
    • Use a plastic opening tool to remove the plastic frame surrounding the glass.

  2. Outer Shell Disassembly: adım 2, 1 resimden 1.
    • Carefully pull the frame away from the glass.

    • If it doesn't remove easily, use the iFixit Opening Tool again to pry stuck sections.

  3. Outer Shell Disassembly: adım 3, 1 resimden 1.
    • Use a T10 screwdriver to unscrew the two screws that fasten the frame to the printer hood.

  4. Outer Shell Disassembly: adım 4, 2 resimden 1. Outer Shell Disassembly: adım 4, 2 resimden 2.
    • Put your finger behind the panel with the power button.

    • Then, pull the piece outwards.

  5. Outer Shell Disassembly: adım 5, 2 resimden 1. Outer Shell Disassembly: adım 5, 2 resimden 2.
    • Unscrew the screw inside the power button panel space.

    • Then, unscrew the screw that is across the printer slider.

  6. Outer Shell Disassembly: adım 6, 1 resimden 1.
    • Pull the white circuit board outwards which is located under the small screen.

    • Unplug the small ribbon cable from the circuit board.

    • Be careful when you unplug the ribbon cable not to use too much force. Using too much force may damage or rip the cable.

    • Unplug the small ribbon cable from the circuit board. Be careful when you unplug the ribbon cable not to use too much force. Using too much force may damage or rip the cable.

  7. Outer Shell Disassembly: adım 8, 2 resimden 1. Outer Shell Disassembly: adım 8, 2 resimden 2.
    • Pull the memory card reader's circuit board out.

    • Detach the white wiring connector from the back of the circuit board.

    • You may need to use a finger nail or a plastic opening tool to detach the white wiring connector from the circuit board.

  8. Outer Shell Disassembly: adım 9, 2 resimden 1. Outer Shell Disassembly: adım 9, 2 resimden 2.
    • Put your finger behind the small screen.

    • Then, pull it up.

    • Do not hesitate to use force to remove the TouchSmart panel.

    • Disconnect the ribbon cable from the small screen.

  9. Outer Shell Disassembly: adım 10, 1 resimden 1.
    • Pull the printer hood upward.

Sonuç

To reassemble, simply follow the steps in reverse order.

8 farklı kişi bu kılavuzu tamamladı.

Renee Lamb

Üyelik tarihi: 09/26/12

235 İtibar

3 adet Kılavuz yazıldı

Ekip

Cal Poly, Team 2-11, Propen Fall 2012 Cal Poly, Team 2-11, Propen Fall 2012 üyesi

CPSU-PROPEN-F12S2G11

4 Üyeler

6 adet Kılavuz yazıldı

Bir Yorum

Excellent helpful easy to follow instructions. Thanks.

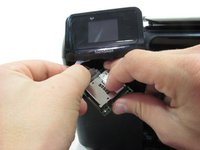
In step 7, removal of the Touch Pad, I was not able to locate the release clip. Feeling around, what I thought was the latch was a ribbon cable that I distorted but didn't destroy. The top came off without the Touch Pad removal. Once the top was off, I located a latch on the back right of the Touch Pad, but once released, it didn't help to free up the Touch Pad. I couldn't get the Touch Pad off.

Ken - Yanıt

Yorum Ekle

İstatistikleri Görüntüle:

Son 24 Saat: 0

Son 7 gün: 0

Son 30 gün: 5

Her zaman: 9,644