Giriş
Note::: taking apart your device may void the warranty on the device, please proceed with caution and consider having it sent in first if possible to be worked on by the company. This guide may be longer then the rest but, as long as you take your time and you are careful you should be able to complete the replacement process.
Neye ihtiyacın var
-
-
All 6.35mm screws were removed using a J00 bit from the iFixit pro toolkit.
-
There are four screws on the back of the device, remove them as shown.
-
-
-
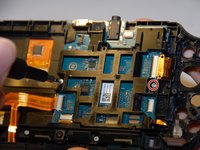
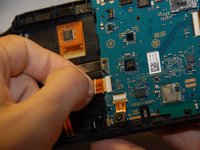
The next step is to take the ribbon off of the green casing on the left.
-
Then simply unscrew the two screws holding down the green casing using a J00 bit from the iFixit pro toolkit, they should both be 6.35 mm .
-
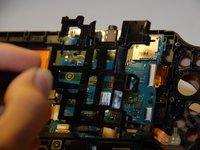
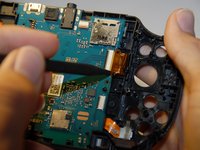
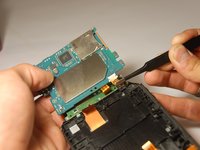
Now simply raise the last restraint, a metal bar that is holding the casing down. Once it has been removed you can take off the green casing.
-
-
-
-
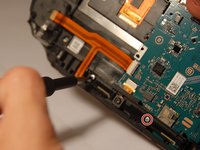
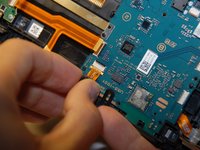
There are 3 ribbons holding the section together. Remove them carefully.
-
Next unscrew the two screws holding down the casing. They will both still be 6.35 mm screws and will be able to be taken out by a J00 bit from the iFixit pro toolkit.
-
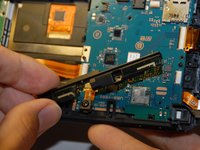
Now carefully left the metal piece holding down the green casing, it will be the last resistance. Lift out the green casing now.
-
-
-
Once the casing has been removed there will be one more screw to be removed. It will be a 6.35 mm screws that requires a J00 screwdriver from the iFixit pro toolkit.
-
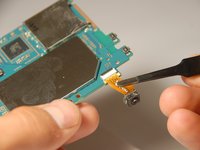
Now simply and carefully take out the joystick out.
-
With the joystick taken out you can now do what is needed on the left joystick, or even replace it.
-
-
-
Once the casing is off, there will only be one more screw to take off. It will also be a 6.35 mm screw that uses the J00 bit from the iFixit pro toolkit.
-
Now simply remove the joystick from the device .
-
Once the joystick is removed you can do what is needed to the right joystick part, or even replace it if needed.
-
-
-
Remove the two screws that are holding the casing down. These will be 6.35 mm screws that are to be removed using the J00 bit from the iFixit pro toolkit.
-
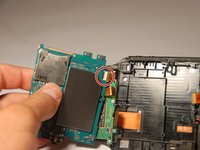
Once the screws are removed, carefully lift the case out of the system.
-


To reassemble your device, follow these instructions in reverse order.
To reassemble your device, follow these instructions in reverse order.
İptal et: Bu kılavuzu tamamlamadım.
17 farklı kişi bu kılavuzu tamamladı.
Ekip

Arkansas State University, Team S1-G2, Chamberlain Fall 2017 Arkansas State University, Team S1-G2, Chamberlain Fall 2017 üyesi
ARSU-CHAMBERLAIN-F17S1G2
4 Üyeler
33 adet Kılavuz yazıldı
4 Yorum
Any instructions on replacing the screen for a non-black case without replacing the whole front? It’s not the easy way but since they don’t sell the blue front with new screen, it’s the only way.
I couldn't find an answer anywhere else so here you go (3 years after you asked).
Take a heat gun or hair dryer and gently heat the border of the screen to soften the glue. Gently twist the front shell to help separate the screen.
Repeat as needed until a corner becomes raised/separated from the shell.
Take a rounded tip metal spudger (flat metal pry tool) and carefully slide it between the shell and the screen. Apply more heat and begin slowly working your way round the edge of the screen. I found it best to use two spudgers, one to twist and separate the screen, the other to slide as flat as possible under the screen.
The screen is recessed under a top glass cover which is where the glue is. I found if you push the spudger in between the cover and shell, it will separate the glue and stop it hits the screen.
Continue to slowly work your way round the edge of the screen until it comes off.
i didnt need to remove the motherboard etc, i just heated the screen from the front and unplugged it from the motherboard and it popped off easily. Saves time.