Ana içeriğe geç

PSP 300x Button Pad Replacement

Neye ihtiyacın var

  1. PSP 300x Button Pad Replacement, Battery: adım 1, 3 resimden 1. PSP 300x Button Pad Replacement, Battery: adım 1, 3 resimden 2. PSP 300x Button Pad Replacement, Battery: adım 1, 3 resimden 3.
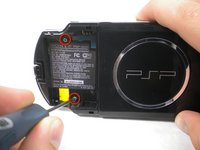
    • Place the PSP face down and locate the battery cover on the left side of the device.

    • Lift and remove the battery cover to reveal the battery.

    • Remove the battery.

  2. PSP 300x Button Pad Replacement, Casing: adım 2, 1 resimden 1.
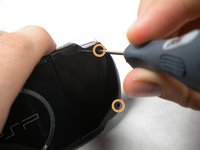
    • Peel back the warranty sticker that is behind the battery with a spudger or your fingernail.

  3. PSP 300x Button Pad Replacement: adım 3, 2 resimden 1. PSP 300x Button Pad Replacement: adım 3, 2 resimden 2.
    • Unscrew all four screws from the back of the PSP with the Phillips #00 Screwdriver.

    • Two are located behind the battery's warranty sticker.

    • Two are located on the right side of the PSP.

  4. PSP 300x Button Pad Replacement: adım 4, 1 resimden 1.
    • Next, unscrew the two screws located at the top of the PSP.

  5. PSP 300x Button Pad Replacement: adım 5, 1 resimden 1.
    • Then, remove the single screw from the bottom edge of the PSP (which is positioned next to the barcode).

  6. PSP 300x Button Pad Replacement: adım 6, 2 resimden 1. PSP 300x Button Pad Replacement: adım 6, 2 resimden 2.
    • Slide the spudger in between the outer casing of the PSP, beginning at the "R" shoulder button, and gently pry off the casing.


    • Remove the front casing completely.

  7. PSP 300x Button Pad Replacement, LCD Screen: adım 7, 2 resimden 1. PSP 300x Button Pad Replacement, LCD Screen: adım 7, 2 resimden 2.
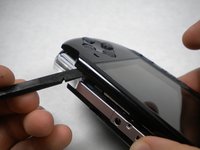
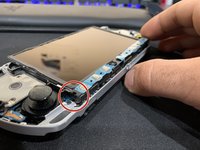
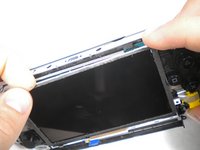
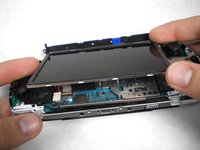
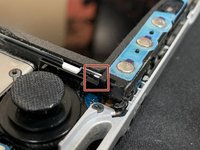
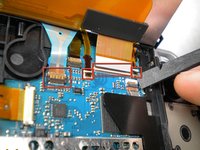
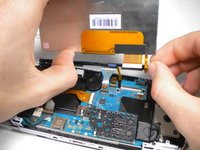
    • Push the homebar to the right to release the tab located on the right side of the LCD screen.

    • DO NOT completely remove the homebar, as it is still connected by ribbon cables.

  8. PSP 300x Button Pad Replacement: adım 8, 3 resimden 1. PSP 300x Button Pad Replacement: adım 8, 3 resimden 2. PSP 300x Button Pad Replacement: adım 8, 3 resimden 3.
    • Slowly lift the LCD screen off the PSP starting at the top edge corner.

    • Again, the LCD screen is attached by ribbon cables, so do not remove it completely.

    • Orientation of PSP is flipped in photo.

  9. PSP 300x Button Pad Replacement: adım 9, 2 resimden 1. PSP 300x Button Pad Replacement: adım 9, 2 resimden 2.
    • Flip the small brown locks on the four ribbon cable connectors up using a spudger or fingernail.

    • Pull all four ribbon cables out.

    • Now remove the LCD screen and homebar from the PSP.

  10. PSP 300x Button Pad Replacement: adım 10, 1 resimden 1.
    • Remove the metal tab that lies above the LCD screen.

    • Upon reassembly, make note that the stamped lettering faces down, and the large tab fits just above the motherboard to the right hand side of the left trigger.

  11. PSP 300x Button Pad Replacement, Button Pad: adım 11, 1 resimden 1.
    • After removing the LCD Screen, the Button Pad should be easy to remove.

Sonuç

To reassemble your device, follow these instructions in reverse order.

7 farklı kişi bu kılavuzu tamamladı.

mbnewsom

Üyelik tarihi: 10/28/09

3.103 İtibar

11 adet Kılavuz yazıldı

0 Yorum

Yorum Ekle

İstatistikleri Görüntüle:

Son 24 Saat: 19

Son 7 gün: 111

Son 30 gün: 537

Her zaman: 18,104