Giriş
Is your camera still not turning on even with a working battery? Are your pictures not storing properly? Is your screen working, but still not displaying pictures? These problems may be due to a broken or faulty motherboard.
Neye ihtiyacın var
-
-
Looking at the bottom of the camera, slide the OPEN/LOCK switch to the left into the OPEN position.
-
-
-
Grip the edge of the battery and pull it out.
How to take off the battery housing door? Is it necessary to take the front cover off in order to do it?
Hello, how to take the battery housing door off on lx100? Is taking the front cover off necessary? The whole tutorial is great but the most common part that breaks often is not covered.
-
-
-
Use a Phillips #000 screwdriver to remove the five 4.5 mm screws located on the bottom of the camera and the top one on the left side, with the lens facing you.
-
Use a Phillips #000 screwdriver to remove the two 3.5 mm screws, one below the lens and one on the left side.
-
Use a Phillips #000 screwdriver to remove the 7.1 mm screw from the right side of the camera.
Only the screw below the lens was 3.5 mm. Both screws on the left side were 4.5 mm
-
-
-
Use a Phillips #000 screwdriver to remove the 2.5 mm screw underneath the viewfinder.
-
Pull the black plastic piece off of the viewfinder.
This was a 4.5 mm screw.
This screw has a coarser thread pitch than the others
-
-
-
-
Pry off the back of the camera using a spudger starting from the top right side of the LCD screen.
The top right is stuck that i cannot pry off the back plate, is there a screw or some adhesive ?
there's a screw that mount the 4-way scroll wheel to the back plate, DO NOT try to pry off the back plate as shown in the photo by force.
You should pry off the back plate with the scroll wheel, and then detach the flat cable on the camera.
My device had a additional screw underneath the rubber piece. I had to remove the rubber piece partially and then I could remove the screw (silver one with a big, flat head). Now I could continue to remove the back. Also the 4-way scroll wheel and buttons are screwed to the back plate, so two screws this guide doesnt show.
Agree with the comments above. The screw pictured in Step 9 is behind the rubber thumb rest in step 8 and must be removed before the back can be taken off. Also, the buttons are attached to the back plate by a screw, so will come off with the back plate. They are attached to the motherboard with a ribbon cable that must be disconnected.
I think this is the difference between the LX100 and the LX100S versions. I had the same challenges above.
I also had a screw under the rubber thumb pad. And the rubber thumb pad should not be completely removed as it was attached to the back plate via a small screw from the inside of the back of the camera.
Looking at the back of the camera, only remove the left (thinner) side of the rubber thumb pad in order to get access to the hidden screw. This screw needs to be completely removed before prying the back off the camera.
for the ZIF cable connectors, DO NOT LIFT ON THE WHITE PART. The ZIF connectors here have a black bar on the back that you left up on.
again , screw behind thumbrest needs to be removed , certainly on the LX100 mk 1 variant , otherwise a really helpful article !
-
-
-
Use a Phillips #000 screwdriver to remove the 7.5mm screw on the top right of the back of the camera that holds the metal backing in place.
I agree with Rincewind. This screw was hidden under the thin part of the rubber thumb pad on the back of the camera and it needed to be removed in the previous step.
same with me, please update this step, otherwise some users might strip the screw forcefully
It’s documented in the service manual that you have to remove this screw before you take off the back cover, It can be accessed by lifting the left side of the rubber thumb rest. There’s some adhesive beneath that rubber.
Do you have a copy of service manual? I only need the part regarding tightening those torx screws. Thx
Zao Pao -
I also needed to remove this screw before opening the case. The navigation buttons across the right back-side of the camera, as well as the top row of buttons (fn2, fn3, etc) were all connected to the back panel. Be careful not to tear that ribbon cable when removing the back. Lift slowly. — On a side note. I could really use another one of theses screws (the one in this step) as mine has stripped after a few removals. Anyone know how or where I could get one of these?
-
-
-
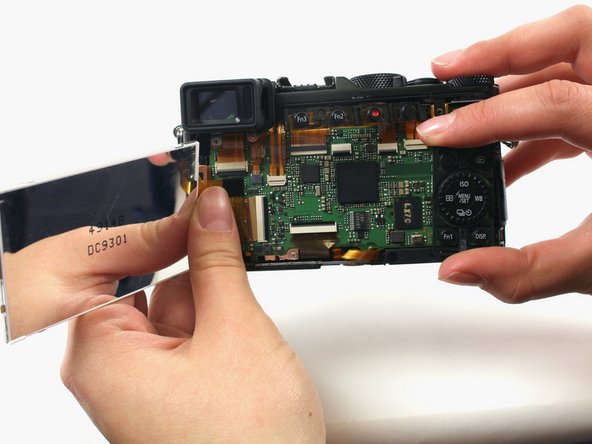
Lift the LCD screen away from the device.
-
Pry off the silver metal backing with a spudger.
-
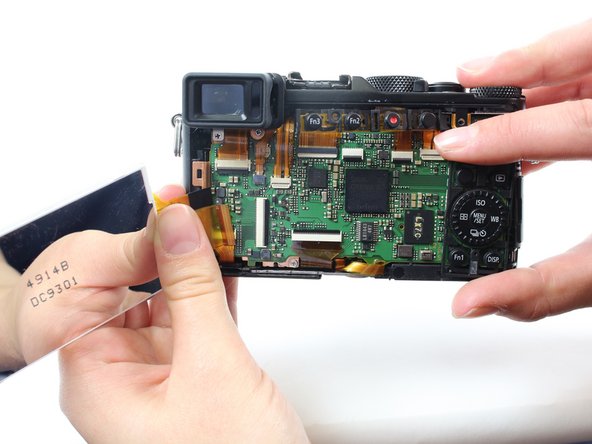
Pull out the ribbon cable that attaches the LCD screen to the motherboard.
-
Remove the LCD screen.
If you want to replace the broken battery door, you proceed until this step and then you are able to do it.
I pulled out the connector and try to push it back in and was too tight. It did not work, there is black bar on the backside that had to be clicked up from the back for release to put the lcd connector back in easier. This would prob be better to do before removing the connector to loosen it first. Camera is fixed and working now. Did not replace lcd but reconnected which fixed the grey pixelated screen.
-
-
-
Disconnect the nine visible ribbon cables/ZIF connectors by flipping the black bars up and pulling the ribbon straight out of the connector.
-
Disconnect two more cables in the upper left corner of the board, hidden behind the visible cables.
All of these connectors have a backflip mechanism (a bar is flipped up to allow insertion or removal of the ribbon cable) except the smallest two. One is pictured in this photo second from left on top, and the other is hidden on the top underneath other cables. These two connectors have no locking mechanism. The cable is simply pulled directly out.
The step is fine but doesn't underline an important deal: when you have to put the cables back it's a nightmare. Be very very carefull putting them back in the original position. The most difficult are the second from left to the top as mentioned by Damon Schreiber in the former comment and another not underlined in the foto that is right close to the top of just mentioned.
-
-
-
Use a Phillips #000 screwdriver to remove the two 4.5 mm screws.
-
Use a Phillips #000 screwdriver to remove the 2.5 mm screw.
The lengths shown for the screws didn’t match my camera. The upper two screws were shorter than the bottom screw in this step. The bottom screw had a coarser thread pitch since it’s screwed into plastic and the top two are screwed into metal.
I experienced the same thing as Nick Marshall
-
-
-
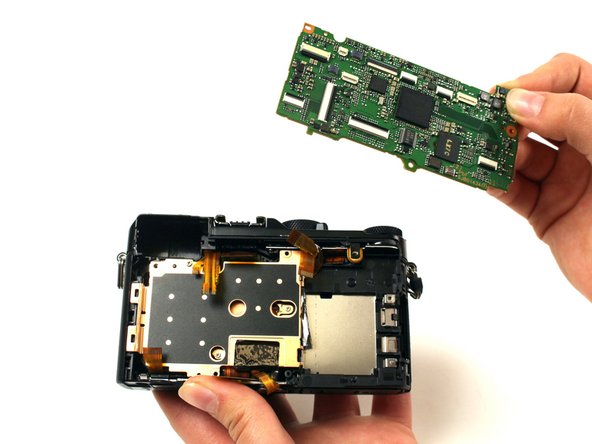
Start at the top of the camera and use the plastic spudger to pry the motherboard out of the camera.
on my model i had to pop out the plastic frame surround holding the flip out hdmi cover - until that was popped out the motherboard would not come - after though - easy as pie...
Yes, I would flip open the AV and HDMI cover and look at how the connectors sit. One is flush and one is a little below the surface. The plastic frame has tabs on the sides that lock into the camera shell. It’s probably best to pull the frame out with the motherboard.
-


To reassemble your device, follow these instructions in reverse order.
To reassemble your device, follow these instructions in reverse order.
İptal et: Bu kılavuzu tamamlamadım.
3 farklı kişi bu kılavuzu tamamladı.

Ekip

Cal Poly, Team 70-4, Forte Winter 2016 Cal Poly, Team 70-4, Forte Winter 2016 üyesi
CPSU-FORTE-W16S70G4
4 Üyeler
9 adet Kılavuz yazıldı
2 Yorum
This camera is a true dust harvester.
Thanks to this guide I have dared to clean the sensor successfully.
I know that I will have to return to the task in a few months but now I am more sure of the process.
Thanks a lot
Just a quick question! After replacing the motherboard, the camera works just fine or is it needed a software intervention?