Ana içeriğe geç

Bu kılavuzda güncel değişiklikler var. En son onaylanmamış sürüme geçin.

Panasonic Lumix DMC-F7 Back Case Replacement

Neye ihtiyacın var

  1. Panasonic Lumix DMC-F7 Back Case Replacement, Battery: adım 1, 1 resimden 1.
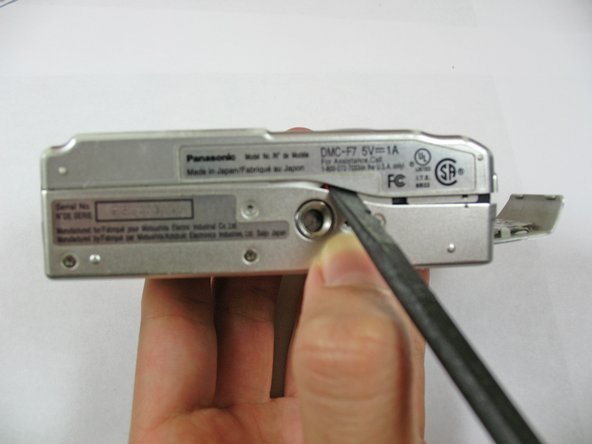
    • Slide the lock switch to the right so that it is in the unlocked position.

    • Use your finger to slide the battery hatch in the direction of the downward arrow so that the hatch is open.

    • Both battery and memory card should now be visible.

  2. Panasonic Lumix DMC-F7 Back Case Replacement: adım 2, 1 resimden 1.
    • Open the battery hatch and then the black cover to expose the battery compartment.

    • The camera used to create these repair guides did not have a battery and memory card.

    • Remove the battery.

    • When installing the new battery, ensure it is in the same orientation as before.

  3. Panasonic Lumix DMC-F7 Back Case Replacement, Back Case: adım 3, 1 resimden 1.
    • Remove the two 2.8 mm Phillips screws.

  4. Panasonic Lumix DMC-F7 Back Case Replacement: adım 4, 1 resimden 1.
    • Use a Phillips screwdriver to remove the three 2.8 mm screws on the bottom of the camera.

  5. Panasonic Lumix DMC-F7 Back Case Replacement: adım 5, 1 resimden 1.
    • Remove the two 2.8 mm Phillips screws on the side of the camera as shown in picture.

  6. Panasonic Lumix DMC-F7 Back Case Replacement: adım 6, 2 resimden 1. Panasonic Lumix DMC-F7 Back Case Replacement: adım 6, 2 resimden 2.
    • Use a spudger to pry open the case from all sides.

  7. Panasonic Lumix DMC-F7 Back Case Replacement: adım 7, 2 resimden 1. Panasonic Lumix DMC-F7 Back Case Replacement: adım 7, 2 resimden 2.
    • Beware of the ribbon cable that is still attached when opening.

    • Use your fingers to carefully pry off the back casing from the camera assembly.

  8. Panasonic Lumix DMC-F7 Back Case Replacement: adım 8, 1 resimden 1.
    • Lay the camera on its front side. Use the spudger to open the film strip locking mechanism and remove strip.

    • Hold down on the camera's metal casing with one hand. Use your other hand to completely lift the back case off the rest of the camera, making sure the film strip separates.

Sonuç

To reassemble your device, follow these instructions in reverse order.

Bir başkası bu kılavuzu tamamladı.

Alex Penman

Üyelik tarihi: 01/28/11

463 İtibar

4 adet Kılavuz yazıldı

Ekip

Cal Poly, Team 7-35, Regan Winter 2011 Cal Poly, Team 7-35, Regan Winter 2011 üyesi

CPSU-REGAN-W11S7G35

4 Üyeler

10 adet Kılavuz yazıldı

0 Yorum

Yorum Ekle

İstatistikleri Görüntüle:

Son 24 Saat: 0

Son 7 gün: 1

Son 30 gün: 5

Her zaman: 896