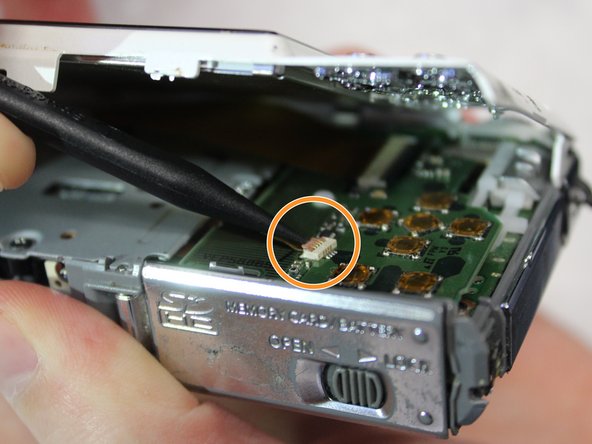
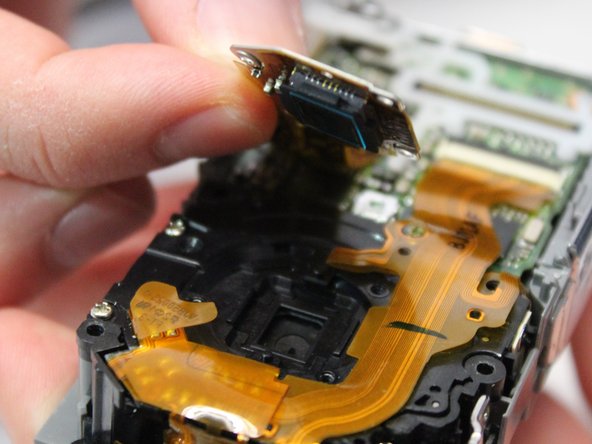
Ana içeriğe geç

Panasonic Lumix DMC-FX37 Photoreceptor Replacement

Neye ihtiyacın var

  1. Panasonic Lumix DMC-FX37 Photoreceptor Replacement, Panasonic Lumix DMC-FX37 Disassembly: adım 1, 2 resimden 1. Panasonic Lumix DMC-FX37 Photoreceptor Replacement, Panasonic Lumix DMC-FX37 Disassembly: adım 1, 2 resimden 2.
    • Remove both of the 3 mm screws on the bottom of the camera connected to the side panel.

  2. Panasonic Lumix DMC-FX37 Photoreceptor Replacement: adım 2, 2 resimden 1. Panasonic Lumix DMC-FX37 Photoreceptor Replacement: adım 2, 2 resimden 2.
    • Remove the remaining 3 mm screw holding on the side panel and remove the panel entirely.

  3. Panasonic Lumix DMC-FX37 Photoreceptor Replacement: adım 3, 2 resimden 1. Panasonic Lumix DMC-FX37 Photoreceptor Replacement: adım 3, 2 resimden 2.
    • On the opposite side of the camera, remove the two 3 mm screws.

    • Remove the bottom side panel and place it with its respective 3 mm screw.

  4. Panasonic Lumix DMC-FX37 Photoreceptor Replacement: adım 4, 3 resimden 1. Panasonic Lumix DMC-FX37 Photoreceptor Replacement: adım 4, 3 resimden 2. Panasonic Lumix DMC-FX37 Photoreceptor Replacement: adım 4, 3 resimden 3.
    • Remove the front panel (the panel around the lens casing) from the camera.

    • Remove the two ribbon cables connected to the back panel (the panel this the LCD screen) by lifting up on their respective tabs and gently pulling out the cord.

    • Caution: When removing the back panel, the two ribbon cables are relatively delicate and must both be disconnected before the panel can be entirely removed.

    • Remove the back panel from the camera.

  5. Panasonic Lumix DMC-FX37 Photoreceptor Replacement: adım 5, 1 resimden 1.
    • Remove the top control panel (connected to the flash battery) from the camera.

    • The top control panel is connected to the rest of the camera by a delicate multi-pin plug. Be careful as to not bend the pins!

  6. Panasonic Lumix DMC-FX37 Photoreceptor Replacement, Photoreceptor: adım 6, 2 resimden 1. Panasonic Lumix DMC-FX37 Photoreceptor Replacement, Photoreceptor: adım 6, 2 resimden 2.
    • Locate and remove the silver 2mm screw on the protection panel.

    • Remove the three black 8mm screws that remain.

    • Be sure to remember which length of screw goes to which slot. Failing to do so could damage your device.

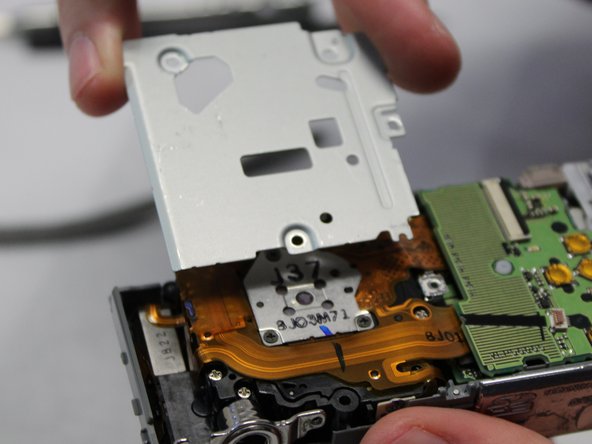
    • Proceed to remove the protection panel entirely.

  7. Panasonic Lumix DMC-FX37 Photoreceptor Replacement: adım 7, 1 resimden 1.
    • Insert the flat end of a plastic spudger underneath the motherboard and twist. This will disconnect the board from the device and allow it to be removed.

  8. Panasonic Lumix DMC-FX37 Photoreceptor Replacement: adım 8, 1 resimden 1.
    • Use the pointed end of the spudger to lift the black tabs holding the ribbon cable connected to the photoreceptor in place.

    • Before pulling the cable free, be sure to complete the next step (removing the screws) as the ribbon cables are delicate and must be handled with care.

  9. Panasonic Lumix DMC-FX37 Photoreceptor Replacement: adım 9, 2 resimden 1. Panasonic Lumix DMC-FX37 Photoreceptor Replacement: adım 9, 2 resimden 2.
    • Remove the three 3mm screws holding the photoreceptor in place.

    • Carefully lift the photoreceptor, disconnecting the ribbon cable and remove the photoreceptor from the device.

Sonuç

To reassemble your device, follow these instructions in reverse order.

Bir başkası bu kılavuzu tamamladı.

Zhentao

Üyelik tarihi: 01/30/18

247 İtibar

2 adet Kılavuz yazıldı

Ekip

Baylor, Team S2-G3, Johnson Spring 2018 Baylor, Team S2-G3, Johnson Spring 2018 üyesi

BU-JOHNSON-S18S2G3

3 Üyeler

6 adet Kılavuz yazıldı

0 Yorum

Yorum Ekle

İstatistikleri Görüntüle:

Son 24 Saat: 0

Son 7 gün: 1

Son 30 gün: 3

Her zaman: 264