Ana içeriğe geç

Philips Norelco BG2040/34 BodyGroom 7100 Battery Replacement

Neye ihtiyacın var

  1. Philips Norelco BG2040/34 BodyGroom 7100 Battery Replacement, Open Trimmer Head: adım 1, 3 resimden 1. Philips Norelco BG2040/34 BodyGroom 7100 Battery Replacement, Open Trimmer Head: adım 1, 3 resimden 2. Philips Norelco BG2040/34 BodyGroom 7100 Battery Replacement, Open Trimmer Head: adım 1, 3 resimden 3.
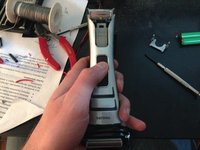
    • Pushing with your thumb, pop the trimmer blade open it on its hinge.

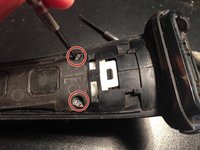
    • Remove the two steel screws.

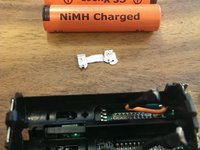
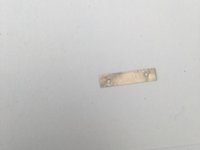
    • The metal clip can now be levered off using a thin screwdriver.

  2. Philips Norelco BG2040/34 BodyGroom 7100 Battery Replacement, Remove Trimmer Assembly: adım 2, 1 resimden 1.
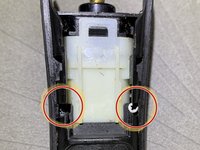
    • With the screws out and the metal bracket removed, pushing with a screwdriver, the trimmer assembly will slide out. In most cases you can also just push gently with your thumbs.

  3. Philips Norelco BG2040/34 BodyGroom 7100 Battery Replacement, Remove Plastic Chrome Panels: adım 3, 2 resimden 1. Philips Norelco BG2040/34 BodyGroom 7100 Battery Replacement, Remove Plastic Chrome Panels: adım 3, 2 resimden 2.
    • Hold the bodygroom in one hand, buttons up, foil end towards you, with your thumb on the rubber buttons.

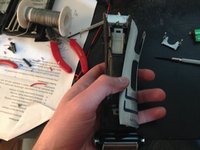
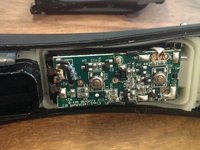
    • Push forward with your thumb and the chrome plastic front panel will slide forward 3mm easily. You can now take it off.

    • The second chrome panel on the opposite side also slides off in the same way.

  4. Philips Norelco BG2040/34 BodyGroom 7100 Battery Replacement, Remove Rubber Cover: adım 4, 2 resimden 1. Philips Norelco BG2040/34 BodyGroom 7100 Battery Replacement, Remove Rubber Cover: adım 4, 2 resimden 2.
    • Remove the 4 Phillips screws and pull off the plastic cover.

    • The 2 bottom screws can be a little difficult to see at first.

    • The spudger/iSesamo is useful to pull off the cover. (Start from the top.)

  5. Philips Norelco BG2040/34 BodyGroom 7100 Battery Replacement, Remove Electronics: adım 5, 2 resimden 1. Philips Norelco BG2040/34 BodyGroom 7100 Battery Replacement, Remove Electronics: adım 5, 2 resimden 2.
    Bu adımda kullanılan alet:
    iFixit Opening Picks (Set of 6)
    $4.99
    Satın Al
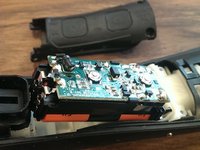
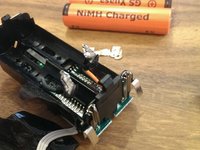
    • Carefully remove the circuit board and battery assembly.

    • One technique is to use the blue opening picks by inserting one on each long side, the pressure and low friction makes it pop out without any damage.

    • The spudger/iSesamo is useful here too.

  6. Philips Norelco BG2040/34 BodyGroom 7100 Battery Replacement, Remove LED Board: adım 6, 2 resimden 1. Philips Norelco BG2040/34 BodyGroom 7100 Battery Replacement, Remove LED Board: adım 6, 2 resimden 2.
    Bu adımda kullanılan alet:
    iFixit Opening Picks (Set of 6)
    $4.99
    Satın Al
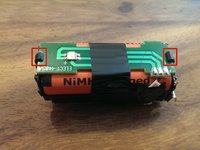
    • Remove the tape that holds the LED board. The LED board is taped to the battery assembly.

    • Three wires or a ribbon cable connect this board - be careful not to bend these wires - they break easily and it's almost impossible to get to them. I suggest you tape where they join to the main board while you work on it so they don't keep bending back and forth.

    • You can use the blue opening picks again both to help peel the tape back some and to push in between the circuit board and the black plastic snap hooks.

  7. Philips Norelco BG2040/34 BodyGroom 7100 Battery Replacement: adım 7, 1 resimden 1.
    • Finding a battery is tough. I'm not sure which ones work. This one specially made up by BatteryWorld (Melbourne Australia) for $26 FAILED later. If you find a better solution let me know.

    • Phillips has designed their product with a battery enclosure that is approx 1mm too short to fit the standard size AAA batteries. In my opinion, designing with built-in obsolescence like this should be a criminal offense.

    • You're looking for two Ni-MH AAA-sized batteries with at least 750 mAh each. Eneloop and Eneloop Pro work well and can be found on Amazon.

  8. Philips Norelco BG2040/34 BodyGroom 7100 Battery Replacement, Remove Batteries: adım 8, 3 resimden 1. Philips Norelco BG2040/34 BodyGroom 7100 Battery Replacement, Remove Batteries: adım 8, 3 resimden 2. Philips Norelco BG2040/34 BodyGroom 7100 Battery Replacement, Remove Batteries: adım 8, 3 resimden 3.
    • This part requires skill and care.

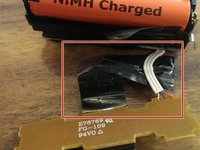
    • Using needle nose pliers, pry off the wires and metal tabs carefully.

    • Be careful to not damage the metal tabs/connectors! They will be reused.

    • If you're having trouble prying off the wires, you may try drilling out the welds that secure the wires. Note that it's easy to permanently damage components when drilling, so only attempt this procedure if you're confident.

  9. Philips Norelco BG2040/34 BodyGroom 7100 Battery Replacement, Swap Batteries: adım 9, 2 resimden 1. Philips Norelco BG2040/34 BodyGroom 7100 Battery Replacement, Swap Batteries: adım 9, 2 resimden 2.
    • Replacing the batteries is difficult. The wires must be as in this picture - there is simply no room for them to be anywhere on the outside of the housing.

    • My unit did not fit AAA, but some pics suggest that some units do fit AAA. If yours fits AAA then you can use AAA Ni-MH rechargeable batteries. Chopping the nipples off to make the batteries shorter is a bad idea because the battery quickly becomes useless when the air seal is broken.

    • Be extremely careful not to damage the red and black wires. If you mess around too much they will break and you will have to find another way to solder them back on. Work out where they connect to now so if you do break them you have a hope of putting them back on.

    • Make sure to correctly align the polarity of the batteries, as noted on the housing! If your batteries get hot all of a sudden, it is because you are shorting them or have wired them wrongly.

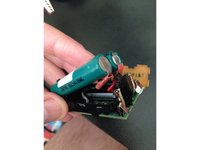
    • Cut 5mm of heat shrink and put on wires before soldering to tabs. Use a clamp to hold the unit when soldering. Get a good join. This unit generates serious vibration and any dodgy join will soon break. Red to positive, Black to Negative.

  10. Philips Norelco BG2040/34 BodyGroom 7100 Battery Replacement: adım 10, 1 resimden 1.
    • This is what it should look like when you are done soldering.

    • Note there are no wires in the way of the motor terminals.

    • Clip in the LED board and apply a neat piece of electrical tape to help hold it in place.

  11. Philips Norelco BG2040/34 BodyGroom 7100 Battery Replacement, Make contact!: adım 11, 1 resimden 1.
    • Align the battery housing and circuit board.

    • Take note of where the spring contacts will connect to the charging pins, where the grooves will connect to the motor contacts at each end.

    • With all wires clear it should push and pop in quite easily. If it is at all difficult something is in the way. Do not force - take it out and have a look.

    • It is important to test everything now while you still have access to the board:

    • Put the unit in charging cradle and see if it charges.

    • If the unit does not charge properly, the battery holder may not be making contact with the charging pins that can be seen on the sides of the unit. Ensure that the battery compartment is seated completely and that the two metal pins/arms are clean and making a solid connection.

    • If either the trimmer or shaver does not come on, it may be that the batteries need charging OR the metal contacts are bent causing them to not connect. Take electronics out, inspect contacts and try again.

  12. Philips Norelco BG2040/34 BodyGroom 7100 Battery Replacement, Reassembly: adım 13, 1 resimden 1.
    • Reassemble starting with the black cover. This pops in pretty easily if you help it bit by bit with a small screwdriver on each side as in picture.

    • Then put screws back.

    • Put on both chrome covers and slide them back into place snugly.

    • Slide on trimmer assembly

    • Put steel spring clip back on. Screw in steel screws. Pop trimmer closed and put black plastic guard back on.

    • Congratulations on replacing the batteries despite the manufacturer being environmentally unfriendly, designing a product that makes battery replacement nearly impossible.

Sonuç

To reassemble your device, follow these instructions in reverse order.

137 farklı kişi bu kılavuzu tamamladı.

Tim

Üyelik tarihi: 03/12/12

2.163 İtibar

2 adet Kılavuz yazıldı

122 Yorum

Can I charge newly installed Eneloop batteries via the same Norelco Bodygroom charger-stand?

Andy - Yanıt

Absolutely! Just charge as normal.

Tim -

I replaced the stock battery with a 1000nAH battery. I believe the stock batteries were 600mAH. It runs fine, but when charging it continuously blinks. It never proceeds to a solid light & then off. I have not yet run it down completely, so I don’t know it it is charging completely.

Kevin Step -

thanks for posting this tutorial with photos. I just completed this job successfully, thanks.

jason keim - Yanıt

Been looking to do this for a while. Caution on the "optional" step to solder the battery tabs. They were originally spot welded to the battery so you have to somewhat mangle them to pull them off. When I tried to solder them to the new batteries, they overheated and ruptured. Be very careful.

tydupp - Yanıt

Yorum Ekle

İstatistikleri Görüntüle:

Son 24 Saat: 21

Son 7 gün: 147

Son 30 gün: 631

Her zaman: 124,474