Giriş
Replace the laser assembly in your optical disc drive. Replacing the laser requires you to have or purchase a new laser.
Neye ihtiyacın var
-
-
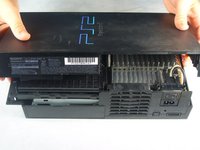
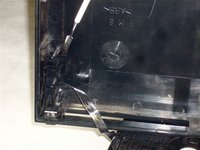
Use the flat edge of a metal spudger to pry the eight flat screw covers out.
-
Remove the following eight screws securing the top cover to the bottom case:
-
Four 55.4 mm Philips screws
-
Four 18.0 mm Phillips screws
-
-
-
-
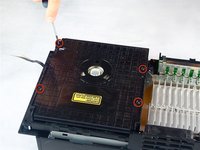
Remove the four 6.4 mm Phillips screws securing the top lid of the optical disc drive.
-
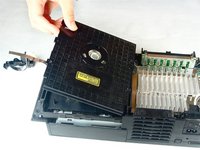
Lift and remove the lid from the optical disc drive.
-


To reassemble your device, follow these instructions in reverse order.
To reassemble your device, follow these instructions in reverse order.
İptal et: Bu kılavuzu tamamlamadım.
35 farklı kişi bu kılavuzu tamamladı.

Ekip

Cal Poly, Team 19-1, Maness Fall 2009 Cal Poly, Team 19-1, Maness Fall 2009 üyesi
CPSU-MANESS-F09S19G1
4 Üyeler
35 adet Kılavuz yazıldı
8Kılavuz Yorumları
just did the laser replacement, however the playstation still identifies "no data" when game is inserted. it says "reading disk" for a few seconds then nothing else happens. thought?
Have you removed the security solder blob? All new Lenses have this somewhere in the circuitry.
I noticed that many times when you replace a lens it throws of the rotary motor. Some ps2 consoles have only 1 hex adjustment yet others have 2. If you have the covers off and just replaced the lenses you should always plug it back in w/ the top off still and adjust it until you see the disc spinning rapidly and laser is moving back and forth. Another way for calibrating is to remove said disc and if lens and ribbon move all the way forward and all the way back 3 or more times then you are almost done. At that point plug in tv chord and place in a disc if the PlayStation 2 logo comes on and disappears in less than 3 seconds carefully replace all parts and your good to go.
Could you please add the parts you would need to replace this to the parts portion.
Nice guide by the way.