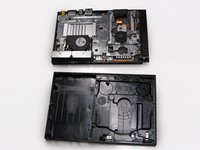
Ana içeriğe geç

PlayStation 2 Slimline IR Sensor Replacement

Neye ihtiyacın var

  1. PlayStation 2 Slimline IR Sensor Replacement, Outer Shell: adım 1, 1 resimden 1.
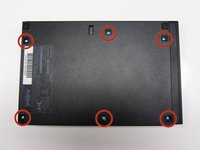
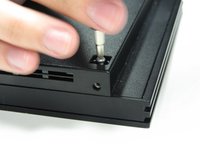
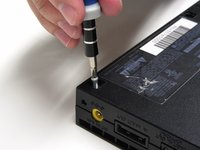
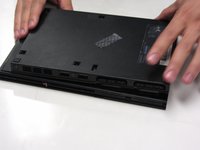
    • Disconnect all cables from the console and flip the unit over to reveal its base.

  2. PlayStation 2 Slimline IR Sensor Replacement: adım 2, 3 resimden 1. PlayStation 2 Slimline IR Sensor Replacement: adım 2, 3 resimden 2. PlayStation 2 Slimline IR Sensor Replacement: adım 2, 3 resimden 3.
    • Locate the 6 feet on the base of the unit. Pry them off using a spudger to reveal the screws.

    • Note: One of the feet is located under the sticker shown in the photo. Removing this sticker will void any warranty with Sony.

  3. PlayStation 2 Slimline IR Sensor Replacement: adım 3, 3 resimden 1. PlayStation 2 Slimline IR Sensor Replacement: adım 3, 3 resimden 2. PlayStation 2 Slimline IR Sensor Replacement: adım 3, 3 resimden 3.
    • Remove all six 4.0 mm screws from the base of the unit using a #1 Phillips screwdriver.

  4. PlayStation 2 Slimline IR Sensor Replacement: adım 4, 3 resimden 1. PlayStation 2 Slimline IR Sensor Replacement: adım 4, 3 resimden 2. PlayStation 2 Slimline IR Sensor Replacement: adım 4, 3 resimden 3.
    • Starting at the corner at which the power and Ethernet ports are located, pry open the outer shell using a spudger and continue around the entire unit.

    • Note: You may use your hands for additional force to separate the two pieces of the outer shell.

  5. PlayStation 2 Slimline IR Sensor Replacement, IR Sensor: adım 5, 1 resimden 1.
    • Locate the IR sensor at the front, right corner of the unit.

  6. PlayStation 2 Slimline IR Sensor Replacement: adım 6, 1 resimden 1.
    • Gently detach the ribbon cable connecting the IR sensor to the motherboard.

    • Caution: Always remove ribbon cables by the plastic handles located on either end. Gripping a ribbon cable anywhere but the provided handles can damage the cable and render the component useless.

  7. PlayStation 2 Slimline IR Sensor Replacement: adım 7, 1 resimden 1.
    • Gently lift and remove the IR Sensor from its designated slot.

Sonuç

To reassemble your device, follow these instructions in reverse order.

8 farklı kişi bu kılavuzu tamamladı.

Thomas Sullivan

Üyelik tarihi: 10/23/13

3.927 İtibar

6 adet Kılavuz yazıldı

0 Yorum

Yorum Ekle

İstatistikleri Görüntüle:

Son 24 Saat: 3

Son 7 gün: 17

Son 30 gün: 99

Her zaman: 6,829