Bu sürüm, hatalı düzenlemeler içerebilir. En son doğrulanmış bellek kopyası dönün.
Neye ihtiyacın var
-
Bu adım çevrilmemiş. Çevrilmesine yardım edin
-
Use the tip of a spudger to remove the black rubber screw cover from the side of the PS3.
-
-
Bu adım çevrilmemiş. Çevrilmesine yardım edin
-
Remove the single 8.5 mm T10 Security Torx screw from the smart plate.
-
-
Bu adım çevrilmemiş. Çevrilmesine yardım edin
-
Pull the smart plate toward the hard drive bay, then lift it off the body of the PS3.
-
-
-
Bu adım çevrilmemiş. Çevrilmesine yardım edin
-
Remove the following seven screws:
-
Six 52 mm Phillips screws
-
One 30 mm Phillips screw
-
-
Bu adım çevrilmemiş. Çevrilmesine yardım edin
-
Lift the top cover from its rear edge and rotate it toward the front of the PS3.
-
Remove the top cover.
-
There is a plastic hook located in a hole on the top back right hand side corner. Carefully push the plastic hook a bit from the rear of the machine with a spudger to release the rear right of the casing.
-
-
Bu adım çevrilmemiş. Çevrilmesine yardım edin
-
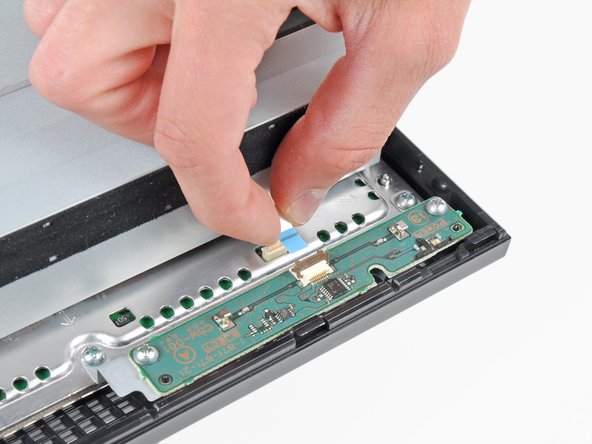
Use your fingernail to flip up the retaining flap on the control board ribbon cable socket.
-
Pull the control board ribbon cable out of its socket.
-
-
Bu adım çevrilmemiş. Çevrilmesine yardım edin
-
Remove the two 12 mm Phillips screws securing the control board to the lower case.
-


İptal et: Bu kılavuzu tamamlamadım.
17 farklı kişi bu kılavuzu tamamladı.

2 Yorum
Could anyone tell me if they would have the connection pin of this board, as I would like to fit it into a motherboard.