Ana içeriğe geç

PlayStation 3 Slim Top Shield Assembly Replacement

Salt Önkoşul
Bu kılavuz yalnızca diğer kılavuzlar için bir ön koşul olarak kullanılmak üzere tasarlanmıştır. Tek başına eksiktir.

Neye ihtiyacın var

  1. PlayStation 3 Slim Top Shield Assembly Replacement, Top Shield Assembly: adım 1, 1 resimden 1.
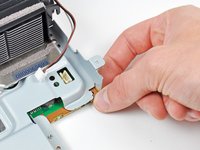
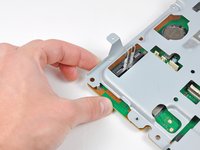
    • Disconnect the DC-In and Blu-ray power cables from the motherboard.

    • Pull the cables straight upward to lift the connectors up and out of their sockets on the motherboard.

  2. PlayStation 3 Slim Top Shield Assembly Replacement: adım 2, 1 resimden 1.
    • Pull the fan cables straight up to lift the fan connector up and out of its socket on the motherboard.

  3. PlayStation 3 Slim Top Shield Assembly Replacement: adım 3, 1 resimden 1.
    • Remove the following nine screws holding the motherboard assembly together:

    • Four 14.8 mm shouldered Phillips

    • Five 9.5 mm Phillips

  4. PlayStation 3 Slim Top Shield Assembly Replacement: adım 4, 1 resimden 1.
    • Remove the two heat sink clamps from the bottom of the motherboard assembly.

  5. PlayStation 3 Slim Top Shield Assembly Replacement: adım 5, 1 resimden 1.
    • If necessary, gently pry the motherboard off the top shield near the heat sink and its shroud.

  6. PlayStation 3 Slim Top Shield Assembly Replacement: adım 6, 2 resimden 1. PlayStation 3 Slim Top Shield Assembly Replacement: adım 6, 2 resimden 2.
    • Gently press the board away from the top shield assembly near the fan connector and the corner of the board near the wireless sockets.

  7. PlayStation 3 Slim Top Shield Assembly Replacement: adım 7, 1 resimden 1.
    • Lift the top shield assembly off the motherboard from its front edge.

    • Be careful not to damage the sockets as you rotate the top shield assembly away from the motherboard.

Sonuç

To reassemble your device, follow these instructions in reverse order.

0Kılavuz Yorumları

Yorum Ekle

İstatistikleri Görüntüle:

Son 24 Saat: 0

Son 7 gün: 1

Son 30 gün: 17

Her zaman: 1,777