Bu sürüm, hatalı düzenlemeler içerebilir. En son doğrulanmış bellek kopyası dönün.
Neye ihtiyacın var
-
Bu adım çevrilmemiş. Çevrilmesine yardım edin
-
Grip the PS4 with both hands along the gap in the top cover.
-
Push the glossy side of the top cover with your thumbs until it pops to the side.
-
Lift the glossy top cover up and back to remove it from the PS4.
-
-
Bu adım çevrilmemiş. Çevrilmesine yardım edin
-
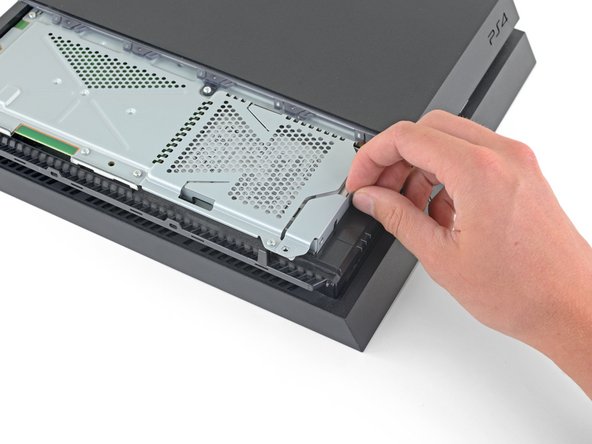
Use a Phillips screwdriver to remove the 6.5 mm screw securing the hard drive bracket to the enclosure.
-
-
Bu adım çevrilmemiş. Çevrilmesine yardım edin
-
Flip the PS4 upside-down with the back side facing towards you.
-
-
Bu adım çevrilmemiş. Çevrilmesine yardım edin
-
Use tweezers to remove the two stickers in the center of the back of the PS4 exposing two case screws.
-
-
Bu adım çevrilmemiş. Çevrilmesine yardım edin
-
Use tweezers to carefully remove the plastic screw covers in each corner, exposing two more case screws.
-
-
Bu adım çevrilmemiş. Çevrilmesine yardım edin
-
Remove the four 7.2 mm Torx security screws on the back of the PS4.
-
-
Bu adım çevrilmemiş. Çevrilmesine yardım edin
-
Use your thumbs to lift the lower case up and off the PS4.
-
-
Bu adım çevrilmemiş. Çevrilmesine yardım edin
-
Use a pair of tweezers to pull the power supply cable straight out and disconnect the power supply unit from the motherboard.
-
-
Bu adım çevrilmemiş. Çevrilmesine yardım edin
-
Remove three 9.7 mm Torx security screws.
-
Remove two 41 mm Phillips screws and brackets.
-
-
-
Bu adım çevrilmemiş. Çevrilmesine yardım edin
-
Use the tip of a spudger to disconnect the antenna cable from the motherboard.
-
-
Bu adım çevrilmemiş. Çevrilmesine yardım edin
-
Use a pair of tweezers or your fingers to grab the antenna cable and move it out from the cable guides.
-
-
Bu adım çevrilmemiş. Çevrilmesine yardım edin
-
Use a pair of tweezers or your fingers to thread the antenna cable out from underneath the optical drive cable.
-
-
Bu adım çevrilmemiş. Çevrilmesine yardım edin
-
Remove the 9.7 mm Torx security screw securing the antenna.
-
-
Bu adım çevrilmemiş. Çevrilmesine yardım edin
-
Use your fingernail to press down on the metal release lever of the ribbon cable on top of the optical drive.
-
Use your fingers or a pair of tweezers to disconnect the ribbon cable by pulling on the black tab.
-
-
Bu adım çevrilmemiş. Çevrilmesine yardım edin
-
Use your fingernail to press down the metal release lever for the ribbon cable connected to the motherboard.
-
Use your fingers or a pair of tweezers to disconnect the ribbon cable by pulling on the black tab.
-
Set the ribbon cable aside for reassembly.
-
-
Bu adım çevrilmemiş. Çevrilmesine yardım edin
-
Use your fingers or a pair of tweezers to disconnect the optical drive cable from the motherboard.
-
-
Bu adım çevrilmemiş. Çevrilmesine yardım edin
-
Use your fingers or a pair of tweezers to remove the optical drive cable from the cable guides that hold it in place.
-
-
Bu adım çevrilmemiş. Çevrilmesine yardım edin
-
Remove the four screws securing the optical drive.
-
Three 9.7 mm Torx screws
-
One 6.2 mm Phillips screw
-
-
Bu adım çevrilmemiş. Çevrilmesine yardım edin
-
Lift the optical drive straight up and out of the PS4.
-
-
Bu adım çevrilmemiş. Çevrilmesine yardım edin
-
Remove the two 9.7 mm Torx screws securing the upper case.
-
-
Bu adım çevrilmemiş. Çevrilmesine yardım edin
-
Lift the upper case up and back to remove it from the PS4.
-
-
Bu adım çevrilmemiş. Çevrilmesine yardım edin
-
Remove the twelve 9.7 mm Torx screws securing the upper EMI shield.
-
-
Bu adım çevrilmemiş. Çevrilmesine yardım edin
-
Remove the two 15.6 mm Phillips screws.
-
Gradually unscrew the pressure plate by turning each screw one half turn at a time.
-
Alternate between the two screws to maintain even pressure on the pressure plate.
-
-
Bu adım çevrilmemiş. Çevrilmesine yardım edin
-
Insert the flat end of a spudger in between the fan cable and the motherboard.
-
Twist the spudger to lift the connector straight up and disconnect it from the motherboard.
-
-
Bu adım çevrilmemiş. Çevrilmesine yardım edin
-
Grab the edge of the motherboard on the front of the PS4.
-
Lift the motherboard until the USB ports clear the PS4 case.
-
İptal et: Bu kılavuzu tamamlamadım.
195 farklı kişi bu kılavuzu tamamladı.
17 Yorum
Regarding the three wire plug in step 20 - is there a good way to repair this piece if, say, you pulled the wires out of the connector by accident? is there a place to get a replacement part?
I have tried to replace the hdmi port however being somewhat of an idiot I slipped and knocked off onto the little black squares just behind the port on the left hand side. Does anyone know what these are?
contacts of the motherboard
You may be talking about capacitors that are critically important for the unit to function.
South30 -


