Giriş
This guide takes you through replacing the battery on the PlayStation Vita.
Neye ihtiyacın var
-
-
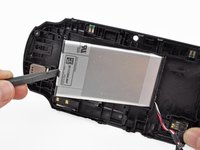
Using a Phillips #00 screwdriver, remove the four 6.4mm screws on the back casing.
-
-
-
-
Gently separate the two cases, minding the battery and the touch screen controller connectors holding the two cases together.
-
-
-
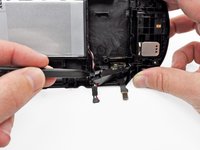
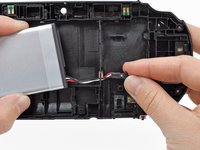
Free the battery cable by gently prying up on the connection with a spudger.
Any idea what type of pcb header is on the board for the battery? I have a motherboard with a broken header but I cant source a replacement
This is where I screwed up so I recommend extra caution for other newbies. Only the black part is supposed to come off. Don't be an idiot like me and pry off too much...
Yea I messed up there too. Is there a way to fix it?
This component was far more stubborn than the screen connector when it came to removal. I opted for a smaller tool than the spudger (small flat-head) and managed to disconnect it after determining the best bit size for the job. Screwdriver is metal, obviously, so being gentle helps to avoid damaging anything.
broke the white part
-
-
-
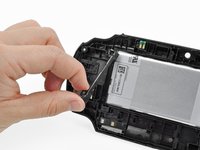
With the help of a spudger, gently pry off and remove the battery cable retainer on the back casing assembly.
Using the tabs (I could really only see one) on the side of the retainer proved essential for me to remove it and release the cable. Unless that happened that cable retainer was not moving for me at all. It did come out once the tabs were pressed though they did prove somewhat uncooperative with clicking back into place once I had installed the new battery. Also, watch that the battery’s cable isn’t pinched when you’re putting everything back in place.
-
-
-
Using a Phillips #00 screwdriver, remove the two 5.0mm blue battery case screws.
-
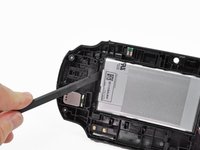
Remove the plastic battery retaining bar.
When reinstalling the battery retaining bar, be sure to insert the bottom end (as shown in the photo) into the slot before driving in the screws. If you just lay it on top, you will crack the bar.
-


To reassemble your device, follow these instructions in reverse order.
To reassemble your device, follow these instructions in reverse order.
İptal et: Bu kılavuzu tamamlamadım.
139 farklı kişi bu kılavuzu tamamladı.


29 Yorum
Great guide. Only problem is this takes very steady hands (something i do not have)
Jewon today we have a hack for psvita 3.60 version ONLY !! this allow u download a VPK file that says how much persent your battery is at
With your Vita connected to your PC and the Content manager application running, on windows right click on the vita and then properties and the battery percentage will show up.
weeelll I think I have a broken Vita now. Make sure you're not an idiot like me who doesn't know which parts to pull in which direction when trying to free the battery cable.
Well. Didn't take out the memory card after removing battery Aaannndddd now the vita says its not in there.
I had the same issue do you think you just need a new memory card? I'm hoping that's all it is even though they aren't cheap it's cheaper than a whole mother vita...
Yeah, I’d seen warnings about that online. Apparently, when you install a new battery there is a surge of power as everything is reconnected. Removing any cards in any of the slots is advised to prevent damage to them.
klung -
Thank you! My son's PS Vita alive again :)
My PS vita phat is only displaying PlayStation. Logo then shutdown I can't even go through the recovery mode.. Tried most charging method... I tried removing my battery and putting it to a different PS vita unit and it worked fine... Is my battery faulty?
So I replaced the battery on my PS Vita 1000. When I try turning it on, an orange light shows up on the PS logo but the device does not turn on. Should I let the new battery charge for a bit before trying again?
The iFixit info on the Vita battery product page stated to calibrate the battery before use. Not sure if that has to do with the complications you’re facing but worth considering.
klung -
Are there alternatives to the Spudger and/or Opening Tools that one might already have available from home?
Worked perfect. Great guide. Thanks!
My version is different i can’t for the life of me get back panel touch foil into the connector it is really short
Try to hold the back panela at a closer angle with the console and use a spudger to or tweezers to reach the cable if necessary.
The socket on the motherboard is different and smaller than on the replacement seems to big and I can't get it to fit
I had the same issue. The connector on the new battery is too big for the socket on the motherboard. I've reached out to customer service for support.
My nine-year-old Vita still worked, but its original battery was not in the best condition. I obtained a replacement battery from iFixit and used this guide to install it. It may look daunting at first, but if you study the guide, take your time, and follow the steps carefully, it’s actually pretty straightforward. Having a spudger definitely helps.
Do you know if this will get rid of your jailbreak on your vita?
nope it wont just gotta rebuild database insert and remove the sd2vita multiple times trial and error.
Chip -
Ok for the most part but way to vague overall with the position of the clips, specially step 7 and 9 which are about basically useless as these are not the most common attachment positions so I had to figure them out, the direction and clip lock points by myself with risk of damaging these critical small connectors and pieces;
Please consider adding red indicators and a glossary of clip lock types and along with it's own release mechanism and clip points.
Thank you
While I'm at it, for step 7: the battery connector disconnected upwards instead of sideways, and the release/locks of the clips are on the sides towards the cable side not the connectors;
And for step 9: the plastic piece holding down the battery and rear touchpad connectors in place, the release clips are too the 2 sides right below each little hole, push in from each side from the outside of the piece itself inwards to unclip
(Can be a bit hard to tell since they are so small and being all black)
It's late but I hope you could consider adding such info in in a clearer manner
ionX -
What batteries can be used instead of sp65x?
thanks! all worked