Ana içeriğe geç

PlayStation Vita Wi-Fi Antenna Replacement

Neye ihtiyacın var

  1. PlayStation Vita Wi-Fi Antenna Replacement, Case Separation: adım 1, 2 resimden 1. PlayStation Vita Wi-Fi Antenna Replacement, Case Separation: adım 1, 2 resimden 2.
    • Power off and remove the memory card.

    • Using a Phillips #00 screwdriver, remove the four 6.4mm screws on the back casing.

  2. PlayStation Vita Wi-Fi Antenna Replacement: adım 2, 3 resimden 1. PlayStation Vita Wi-Fi Antenna Replacement: adım 2, 3 resimden 2. PlayStation Vita Wi-Fi Antenna Replacement: adım 2, 3 resimden 3.
    • Using your fingernail or a spudger, pry open the accessory port cover on the top of the device.

    • Using a Phillips #00 screwdriver, remove the two 5.4mm screws hidden beneath the accessory port cover.

  3. PlayStation Vita Wi-Fi Antenna Replacement: adım 3, 2 resimden 1. PlayStation Vita Wi-Fi Antenna Replacement: adım 3, 2 resimden 2.
    • Remove the two 5.4mm Phillips #00 screws on the bottom of the device near the charging port.

  4. PlayStation Vita Wi-Fi Antenna Replacement: adım 4, 3 resimden 1. PlayStation Vita Wi-Fi Antenna Replacement: adım 4, 3 resimden 2. PlayStation Vita Wi-Fi Antenna Replacement: adım 4, 3 resimden 3.
    • Beginning at the sides of the device, use a plastic opening tool to separate the front and rear cases.

    • Continue working your way around the device gently prying it open.

    • There are still wires holding the front and rear cases together. You may damage the connections if you yank the cases completely apart.

  5. PlayStation Vita Wi-Fi Antenna Replacement: adım 5, 2 resimden 1. PlayStation Vita Wi-Fi Antenna Replacement: adım 5, 2 resimden 2.
    • Gently separate the two cases, minding the battery and the touch screen controller connectors holding the two cases together.

  6. PlayStation Vita Wi-Fi Antenna Replacement: adım 6, 1 resimden 1.
    • Using a spudger, free the touch screen controller flex cable by gently prying up the connection.

  7. PlayStation Vita Wi-Fi Antenna Replacement: adım 7, 1 resimden 1.
    • Free the battery cable by gently prying up on the connection with a spudger.

  8. PlayStation Vita Wi-Fi Antenna Replacement: adım 8, 1 resimden 1.
    • Separate the front and rear cases.

  9. PlayStation Vita Wi-Fi Antenna Replacement, Wi-Fi Antenna: adım 9, 2 resimden 1. PlayStation Vita Wi-Fi Antenna Replacement, Wi-Fi Antenna: adım 9, 2 resimden 2.
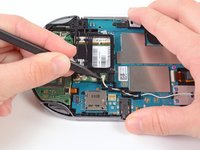
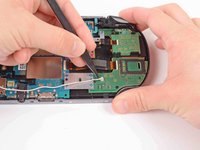
    • Using the pointy end of a spudger, gently pry the white Wi-Fi antenna cable connecotr off of the wireless card.

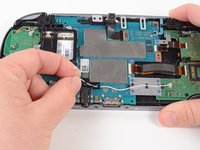
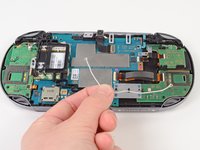
    • Deroute the Wi-Fi antenna cable out of the black plastic casing.

  10. PlayStation Vita Wi-Fi Antenna Replacement: adım 10, 2 resimden 1. PlayStation Vita Wi-Fi Antenna Replacement: adım 10, 2 resimden 2.
    • Using the pointy end of the spudger, gently pry the Wi-Fi antenna cable connector off of the left button board at the connection.

    • Remove the Wi-Fi antenna cable.

Sonuç

To reassemble your device, follow these instructions in reverse order.

Brittany McCrigler

Üyelik tarihi: 03/05/12

88.898 İtibar

131 adet Kılavuz yazıldı

Ekip

iFixit iFixit üyesi

Staff

136 Üyeler

16.560 adet Kılavuz yazıldı

4 Yorum

what about the ps vita slim 2000 model? ive got no wifi at all but cant see a teardown to find the wifi module

Keegan - Yanıt

Is WiFi / 3G antenna cable: UFL/IPEX to UFL/IPEX 1.3mm? What is the white cable length?

samohvalov2010 - Yanıt

Yeah this is not a Wifi antenna cable. The "wireless card" only does 3G and GPS/Glonass. Wifi controller is on the mainboard itself.

computer1up - Yanıt

^ okay that explains a lot, i thought i was missing parts in my PSV1000 wifi

Bronson - Yanıt

Yorum Ekle

İstatistikleri Görüntüle:

Son 24 Saat: 3

Son 7 gün: 13

Son 30 gün: 61

Her zaman: 8,279