Ana içeriğe geç

Polaroid i533 Button Replacement

Neye ihtiyacın var

  1. Polaroid i533 Button Replacement, Button: adım 1, 3 resimden 1. Polaroid i533 Button Replacement, Button: adım 1, 3 resimden 2. Polaroid i533 Button Replacement, Button: adım 1, 3 resimden 3.
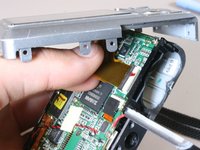
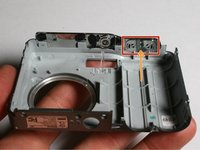
    • Using a #00 screw driver, remove all of the screws on the body of the camera. There are 9 screws total on the face of the camera

    • All of the screws used in the Polaroid i533 are the same size

    • Be sure to not misplace any screws as you will need them to put the camera back together.

  2. Polaroid i533 Button Replacement: adım 2, 2 resimden 1. Polaroid i533 Button Replacement: adım 2, 2 resimden 2.
    • Slide open the battery door, then using the plastic opening tool, slightly open the side of the camera case.

    • Gently pull apart the cover from the body of the camera.

    • Do not pull the cover off completely because it is still attached to the logic board.

  3. Polaroid i533 Button Replacement: adım 3, 3 resimden 1. Polaroid i533 Button Replacement: adım 3, 3 resimden 2. Polaroid i533 Button Replacement: adım 3, 3 resimden 3.
    • Locate the black tab where the LCD screen ribbon is attached to the logic board.

    • Using the plastic opening tool, flip the black tab towards the ribbon.

    • Gently pull the ribbon away from the logic board.

  4. Polaroid i533 Button Replacement: adım 4, 1 resimden 1.
    • The back half of the camera with the LCD screen should now be separated from the front casing.

    • If you are experiencing problems with your menu buttons, you must replace the entire back half of the outer case (Not including the screen). move on to step 5.

    • If you are experiencing problems only with your snap button (the one that you push to take pictures), skip ahead to step 7.

  5. Polaroid i533 Button Replacement: adım 5, 1 resimden 1.
    • Using a #00 screwdriver, remove the four screws located at each corner of the LCD screen.

  6. Polaroid i533 Button Replacement: adım 6, 1 resimden 1.
    • Remove the LCD screen from the old casing.

    • attach the LCD screen to the new casing using the screws removed in step 5.

  7. Polaroid i533 Button Replacement: adım 7, 2 resimden 1. Polaroid i533 Button Replacement: adım 7, 2 resimden 2.
    • Using a #00 screw driver, remove the screw on the bottom of the logic board just above the tripod attachment.

    • Gently pull the front of the case away from the insides of the camera.

  8. Polaroid i533 Button Replacement: adım 8, 2 resimden 1. Polaroid i533 Button Replacement: adım 8, 2 resimden 2.
    • Locate the button that will be removed.

    • To remove: gently push outward on the button from the inside of the casing.

  9. Polaroid i533 Button Replacement: adım 9, 1 resimden 1.
    • Remove spring from bottom of broken button.

    • Remove and replace defective button.

    • Do not lose spring as it is needed for replacement button.

Sonuç

To reassemble your device, follow these instructions in reverse order.

Terichael Office

Üyelik tarihi: 06/24/10

9 İtibar

2 adet Kılavuz yazıldı

Ekip

Cal Poly, Team 3-4, Johann Summer 2010 Cal Poly, Team 3-4, Johann Summer 2010 üyesi

CPSU-JOHANN-R10S3G4

4 Üyeler

8 adet Kılavuz yazıldı

0 Yorum

Yorum Ekle

İstatistikleri Görüntüle:

Son 24 Saat: 0

Son 7 gün: 1

Son 30 gün: 3

Her zaman: 2,356