Bu sürüm, hatalı düzenlemeler içerebilir. En son doğrulanmış bellek kopyası dönün.
Neye ihtiyacın var
-
Bu adım çevrilmemiş. Çevrilmesine yardım edin
-
Remove the four 3mm screws from the left-hand side of the camera screen.
-
On the right-hand side of the camera screen, unscrew and remove the two 3mm screws.
-
On the bottom of the camera, unscrew and remove the three 3mm screws.
-
-
Bu adım çevrilmemiş. Çevrilmesine yardım edin
-
Slide the battery door open and slightly open the side of the case with a plastic opening tool.
-
-
Bu adım çevrilmemiş. Çevrilmesine yardım edin
-
Gently pull the cover away from the rest of the camera. Do not separate the pieces completely.
-
-
-
Bu adım çevrilmemiş. Çevrilmesine yardım edin
-
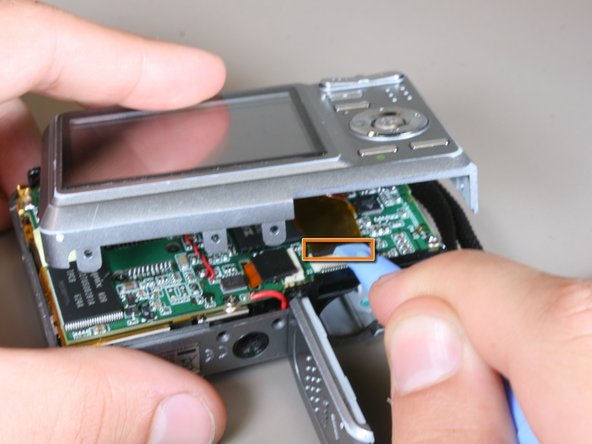
Locate where the LCD screen ribbon is attached to the logic board.
-
Using the iFixit plastic opening tool, flip up the black tab that connects the LCD screen ribbon to the motherboard.
-
-
Bu adım çevrilmemiş. Çevrilmesine yardım edin
-
Gently pull the ribbon away from the motherboard. This will allow the cover to separate from the rest of the camera.
-
-
Bu adım çevrilmemiş. Çevrilmesine yardım edin
-
Locate the four screws in each corner of the LCD screen and carefully remove them. After they have been removed, ensure the screws stay separate from the 3mm case screws.
-
-
Bu adım çevrilmemiş. Çevrilmesine yardım edin
-
Remove the LCD screen from the remaining casing of the camera.
-


İptal et: Bu kılavuzu tamamlamadım.
Bir başkası bu kılavuzu tamamladı.
Ekip

Cal Poly, Team 3-4, Johann Summer 2010 Cal Poly, Team 3-4, Johann Summer 2010 üyesi
CPSU-JOHANN-R10S3G4
4 Üyeler
8 adet Kılavuz yazıldı