Bu sürüm, hatalı düzenlemeler içerebilir. En son doğrulanmış bellek kopyası dönün.
Neye ihtiyacın var
-
Bu adım çevrilmemiş. Çevrilmesine yardım edin
-
The Power Mac G4 MDD: the last, and the fastest G4-based Mac. This computer boasted up to a Dual 1.42GHz PowerPC G4 CPU (though I have a single 1.25GHz).
-
Two USB 1.1 Ports
-
Assorted Audio
-
Video (ADC & DVI)
-
Networking (RJ-45 Ethernet/56k Modem)
-
Some later model MDD's (such as the dual 1.42GHz) Have a FireWire 800 Port Here:
-
-
Bu adım çevrilmemiş. Çevrilmesine yardım edin
-
Unplug the computer.
-
Unplug the power supply and all external connections from the computer.
-
Pull on the side lever and lower the side of the case.
-
-
Bu adım çevrilmemiş. Çevrilmesine yardım edin
-
Cage 1
-
Start by removing this screw.
-
Remove the ATA-66/ IDE ribbon cable from the motherboard.
-
-
Bu adım çevrilmemiş. Çevrilmesine yardım edin
-
Push this tab down, and pull the cage toward you.
-
Now, you can set cage 1 aside.
-
-
-
Bu adım çevrilmemiş. Çevrilmesine yardım edin
-
Cage 2:
-
Remove this Phillips screw:
-
Disconnect this IDE ribbon cable from the logic board.
-
-
Bu adım çevrilmemiş. Çevrilmesine yardım edin
-
It's likely that there is a cable clip holding the ribbon cable to the case.
-
To remove it, push the end, and it should pop up.
-
-
Bu adım çevrilmemiş. Çevrilmesine yardım edin
-
With the ribbon cable clip free, pull this tab towards you, slide the cage up until it hits the platform under the power supply, and pull it away.
-
Now, set the cage on top of the CPU, and remove the power connectors.
-
-
Bu adım çevrilmemiş. Çevrilmesine yardım edin
-
Once the cables are free, set the drive cage aside.
-
To remove the hard drives from the cages, remove the four screws on the sides of the cage that are connected to the drives, then slide the drives out.
-
The two cages are cross compatible and can be put in either location.
-
The MDD does not have a 128GB drive limit like older Macs. My MDD has 3 drives (a 400GB Hitatchi Deskstar, 40GB Seagate Barracuda 7200.7, and a 30GB Quantum Fireball LCT).
-
Note the ID jumpers on the two drive set. One is set to Master, the other to slave. A single drive can be set to Cable Select.
-
-
Bu adım çevrilmemiş. Çevrilmesine yardım edin
-
Start removing the optical drive cage by removing its back cover.
-
-
Bu adım çevrilmemiş. Çevrilmesine yardım edin
-
Remove these two Phillips screws:
-
Pull the cage away from the front until it is free.
-
Slide the cage towards you, and out of the Mac.
-
-
Bu adım çevrilmemiş. Çevrilmesine yardım edin
-
To remove the drive(s) from the cage, remove the two screws on each side of the drive(s), then pull the drive out of the cage.
-
My MDD has a 3rd party 22X SuperDrive, for burning DVD's in Leopard (Thank You Generic Drive Support!)
-
-
Bu adım çevrilmemiş. Çevrilmesine yardım edin
-
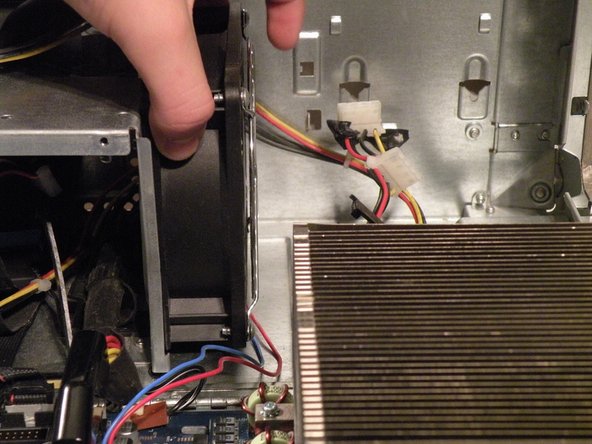
You may find removing the system fan is unnecessary to remove the power supply cable from behind it, but if you're unfamiliar with how the power supply cable is situated behind the fan, this step is useful in seeing this.
-
Disconnect the optical drive IDE/ATA-33 cable from the logic board.
-
Disconnect the system fan 2-wire power cable connector from the logic board.
-
-
Bu adım çevrilmemiş. Çevrilmesine yardım edin
-
Grab the system fan by its sides and pull it up and out. The system fan is very large and loud, compared to standard sized fans.
-


İptal et: Bu kılavuzu tamamlamadım.
11 farklı kişi bu kılavuzu tamamladı.

Ekip
