Giriş
This guide describes how to replace the Puritan Bennett 840 Re/X800 Expiratory Bacterial Filter.
The expiratory filter is responsible for filtering out impurities and particulates from the gas or airflow within the ventilator, and redirects said impurities into the collector vial.
Before completing the replacement, it is important that you are familiarized with the expiratory filter and collector vial system. Please ensure that all safety measures are followed to replace the filter successfully.
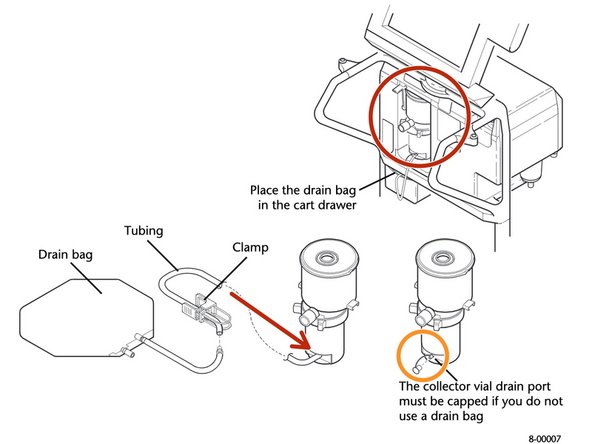
There are two types of expiratory filters–reusable filters and single-use filters. Single-use filters must be discarded each time the collector vial must be emptied. Reusable filters must be sterilized using a steam autoclave. These instructions are applicable to both types of filters, providing that the user understands how to use autoclaves.
For more information on replacing the expiratory filter, please refer to page 8-76 (section 8.15.9.1) in the service manual.
Neye ihtiyacın var
-
-
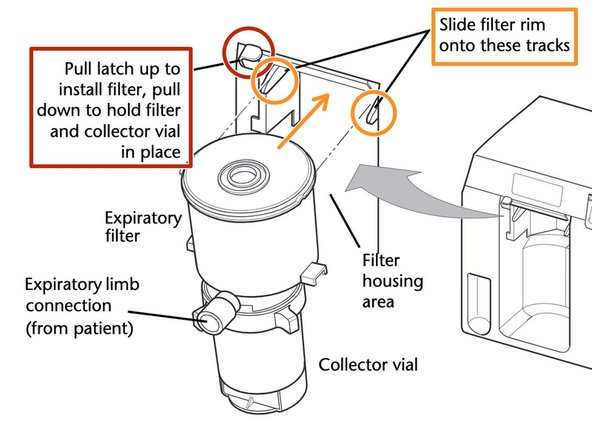
Locate the expiratory filter system inside the patient circuit. It is a cylindrical object that sits inside the housing as shown.
-


Once all steps are completed and the filter has been replaced, run an SST circuit leak test to ensure that the expiratory limb tubing, drain bag tubing, or any other components are sealed tightly. A circuit leak test should be conducted each time the filter is replaced.
Once all steps are completed and the filter has been replaced, run an SST circuit leak test to ensure that the expiratory limb tubing, drain bag tubing, or any other components are sealed tightly. A circuit leak test should be conducted each time the filter is replaced.
İptal et: Bu kılavuzu tamamlamadım.
Bir başkası bu kılavuzu tamamladı.

Ekip

Cal Poly, Team S7-G4, Paton Spring 2020 Cal Poly, Team S7-G4, Paton Spring 2020 üyesi
CPSU-PATON-S20S7G4
3 Üyeler
3 adet Kılavuz yazıldı