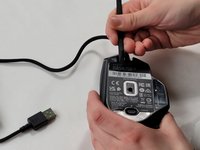
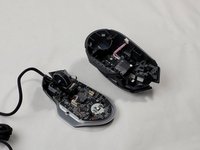
Ana içeriğe geç

Razer Basilisk V3 Backplate Replacement

Neye ihtiyacın var

  1. Razer Basilisk V3 Backplate Replacement, Skates: adım 1, 1 resimden 1.
    • Locate each of the skates.

  2. Razer Basilisk V3 Backplate Replacement: adım 2, 3 resimden 1. Razer Basilisk V3 Backplate Replacement: adım 2, 3 resimden 2. Razer Basilisk V3 Backplate Replacement: adım 2, 3 resimden 3.
    • Heat the skate using a heat gun or hair dryer.

    • Using the pointy end of the spudger pry away a corner of the skate.

    • If the adhesive does not pull away easily, heat the skate more.

    • Once the corner of the skate comes free use the flat end of the spudger to peel off the rest of the skate.

    • Repeat these steps for each of the skates.

  3. Razer Basilisk V3 Backplate Replacement, Backplate: adım 3, 1 resimden 1.
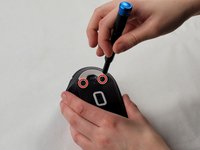
    • Remove two 4.8 mm screws that were hidden under the skates using a JIS #1 screwdriver.

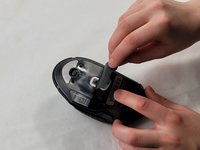
    • Remove the single 4 mm screw beneath the thumb grip using a JIS #1 screwdriver.

  4. Razer Basilisk V3 Backplate Replacement: adım 4, 3 resimden 1. Razer Basilisk V3 Backplate Replacement: adım 4, 3 resimden 2. Razer Basilisk V3 Backplate Replacement: adım 4, 3 resimden 3.
    • Heat the label gently with a heat gun or hair dryer.

    • Once the adhesive is loosened, use a spudger to peel off the label carefully, revealing two additional screws.

    • Remove the two 4.8 mm screws using a JIS #1 screwdriver.

  5. Razer Basilisk V3 Backplate Replacement: adım 5, 3 resimden 1. Razer Basilisk V3 Backplate Replacement: adım 5, 3 resimden 2. Razer Basilisk V3 Backplate Replacement: adım 5, 3 resimden 3.
    • Carefully pry apart the mouse's top and bottom halves. Using the iFixit opening tool, start at one corner and work around the edge.

    • Be cautious of the clips that may break during this process.

    • Using a plastic opening tool, gently pry the connector apart by moving side to side to avoid bending the pins.

    • When reassembling, be mindful that the connector only fits one way, as shown in the pictures.

Sonuç

To reassemble your device, follow these instructions in reverse order.

Brendin Costa

Üyelik tarihi: 03/18/24

402 İtibar

4 adet Kılavuz yazıldı

Ekip

UMass Dartmouth, Team 1-2, Santin Spring 2024 UMass Dartmouth, Team 1-2, Santin Spring 2024 üyesi

UMASSD-SANTIN-S24S1G2

3 Üyeler

11 adet Kılavuz yazıldı

0 Yorum

Yorum Ekle

İstatistikleri Görüntüle:

Son 24 Saat: 6

Son 7 gün: 63

Son 30 gün: 178

Her zaman: 976