Ana içeriğe geç

Removing the HP Elitebook 6930p Switch Cover

Neye ihtiyacın var

  1. Removing the HP Elitebook 6930p Switch Cover, Battery Removal: adım 1, 3 resimden 1. Removing the HP Elitebook 6930p Switch Cover, Battery Removal: adım 1, 3 resimden 2. Removing the HP Elitebook 6930p Switch Cover, Battery Removal: adım 1, 3 resimden 3.
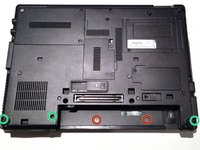
    • Flip laptop over and locate the battery release button

    • Push release button to the left to release battery and gently pull battery from the laptop

  2. Removing the HP Elitebook 6930p Switch Cover, Keyboard: adım 2, 3 resimden 1. Removing the HP Elitebook 6930p Switch Cover, Keyboard: adım 2, 3 resimden 2. Removing the HP Elitebook 6930p Switch Cover, Keyboard: adım 2, 3 resimden 3.
    • Loosen the three Phillips 2.5×9.0 captive screws that secure the keyboard to the laptop

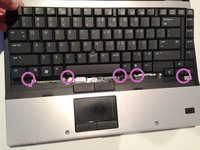
    • Turn the laptop so the keyboard is facing up and locate the 4 retention tabs along the back edge of the keyboard

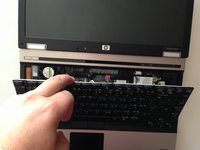
    • Slide the retention clips toward the keyboard to release the keyboard

  3. Removing the HP Elitebook 6930p Switch Cover: adım 3, 3 resimden 1. Removing the HP Elitebook 6930p Switch Cover: adım 3, 3 resimden 2. Removing the HP Elitebook 6930p Switch Cover: adım 3, 3 resimden 3.
    • Use a plastic pry tool to lift the rear edge of the keyboard.

    • Pull the keyboard slightly towards the display to disengage the tabs along the front of the keyboard from the laptop palm rest.

    • Lift the keyboard up to reveal the ribbon connectors

  4. Removing the HP Elitebook 6930p Switch Cover: adım 4, 3 resimden 1. Removing the HP Elitebook 6930p Switch Cover: adım 4, 3 resimden 2. Removing the HP Elitebook 6930p Switch Cover: adım 4, 3 resimden 3.
    • Release the larger ribbon cable by flipping the brown retainer up so it is parallel with the ribbon cable

    • Release the smaller ribbon cable by lifting up the white retainer

    • I found it easier to reinstall both cables with the new keyboard resting on the back edge

  5. Removing the HP Elitebook 6930p Switch Cover, Switch Cover: adım 5, 3 resimden 1. Removing the HP Elitebook 6930p Switch Cover, Switch Cover: adım 5, 3 resimden 2. Removing the HP Elitebook 6930p Switch Cover, Switch Cover: adım 5, 3 resimden 3.
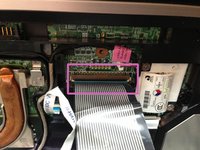
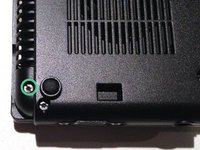
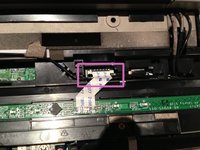
    • Remove the two M2.0×4.0 broad-head screws.

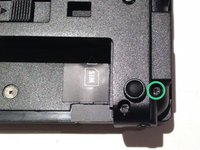
    • Remove the three Torx T8 M2.5×7.0 screws.

  6. Removing the HP Elitebook 6930p Switch Cover: adım 6, 3 resimden 1. Removing the HP Elitebook 6930p Switch Cover: adım 6, 3 resimden 2. Removing the HP Elitebook 6930p Switch Cover: adım 6, 3 resimden 3.
    • Turn the computer over with the front toward you and the open the computer as far as possible.

    • Release the ZIF connector for the power button board cable.

    • Remove the switch cover by lifting it straight up and flip it forward.

    • Release the ZIF connector for the LED board cable.

Sonuç

To reassemble your device, follow these instructions in reverse order.

4 farklı kişi bu kılavuzu tamamladı.

Richdave

Üyelik tarihi: 04/09/10

32.018 İtibar

30 adet Kılavuz yazıldı

Ekip

Master Techs Master Techs üyesi

Community

322 Üyeler

2.506 adet Kılavuz yazıldı

0 Yorum

Yorum Ekle

İstatistikleri Görüntüle:

Son 24 Saat: 0

Son 7 gün: 0

Son 30 gün: 6

Her zaman: 1,941