Giriş
Bij de Metabo-boormachine (SB E 800/2 S-R+L Impuls) kan het gebeuren dat het toerental en het vermogen zeer laag zijn. Hiervoor is de vermogenselektronica verantwoordelijk, die eenvoudig te repareren is.
Neye ihtiyacın var
-
-
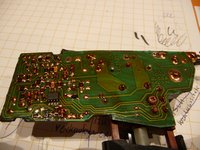
Verwijder de beschermlaag voorzichtig met een kleine scalpel of een kleine scherpe schroevendraaier.
-
Controleer de instelpotentiometer op de juiste weerstandswaarde (bijv. 100 kOhm). Als deze door veroudering sterk is veranderd (bijv. meer dan 250 kOhm), vervang deze dan door een nieuwe of een vaste weerstand (probeer maar). Elko's zijn meestal nog prima.
-
-


Voer de stappen in omgekeerde volgorde uit om het apparaat weer in elkaar te zetten.
Voer de stappen in omgekeerde volgorde uit om het apparaat weer in elkaar te zetten.
İptal et: Bu kılavuzu tamamlamadım.
8 farklı kişi bu kılavuzu tamamladı.
Bu çevirmenlere özel teşekkürler:
100%


Bu çevirmenler dünyayı onarmamıza yardım ediyor! Katkıda bulunmak ister misiniz?
Çeviriye Başlayın ›
4 Yorum
hello. how to remove that stupid plastic
Hat jemand eine Lösung gefunden, die Plastikgussmasse zu entfernen ?
Carefully and slowly push a sharp, small screwdriver (or a small knife) into the plastic and remove the first mm in the depth; start away from the electrical components, that you see. Remove milimeter by milimeter into the deep. There is nothing underneeth, that you can destroy (like a printed circuit - it’s all on the other side). Anyway, be careful - no brute force.
When you see some light color, you are at the printed board; from here it’s easy to remove more.
Just get the Poti free from the plastic and exchange it (100k)
Adjust the new Poti to the rpm that the driller had before.
Since I damaged the Elko next to the Poti, I took all the values (in case you want to exchange them):
1x 1µF (upper right - could not read voltage - its probably a 25V due to the size)
1x 4,7µF (next to the Poti - since I could not read the value, I put a 50V to be on the save side)
1x 10µF / 25V (lower left)
1x 22µF / 25V (up in the middle)
1x 33µF / 35V (upper left)
and the 100k Poti (contact size 1 x 7mm / 0,04"" x 0,28"" (B x L) )