Ana içeriğe geç

Replacement of the W670SZQ1 BIOS Battery

Arşivlenmiş Kılavuz
Bu kılavuz sadece arşivsel amaçlarla muhafaza edilmiştir. Onarımınızı gerçekleştirmek için kılavuzun güncel halini kullanın.

Neye ihtiyacın var

  1. Replacement of the W670SZQ1 BIOS Battery, accumulator: adım 1, 3 resimden 1. Replacement of the W670SZQ1 BIOS Battery, accumulator: adım 1, 3 resimden 2. Replacement of the W670SZQ1 BIOS Battery, accumulator: adım 1, 3 resimden 3.
    • Open the latch of the accumulator on the left side.

    • Open the battery latch on the right side.

    • Remove the accumulator by simultaneously holding the right-hand latch open.

  2. Replacement of the W670SZQ1 BIOS Battery, Access to the most important components: adım 2, 3 resimden 1. Replacement of the W670SZQ1 BIOS Battery, Access to the most important components: adım 2, 3 resimden 2. Replacement of the W670SZQ1 BIOS Battery, Access to the most important components: adım 2, 3 resimden 3.
    • Use the Philips screwdriver to remove the two screws at the bottom of the cover.

    • Lift the cover at the bottom right with the iFixit Opening Tool

    • Lift the cover at the bottom left with the iFixit Opening Tool

    • Finally, remove the cover to gain access to the most important components.

  3. Replacement of the W670SZQ1 BIOS Battery, BIOS battery: adım 3, 1 resimden 1.
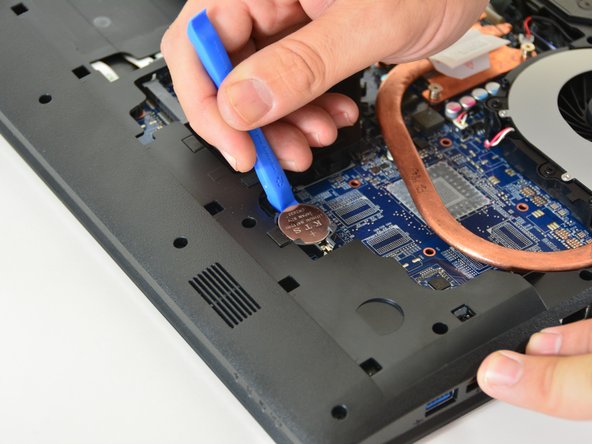
    • Be careful removing the BIOS battery from its holder.

    • Please do not throw the battery in the garbage. In Switzerland, the electrical shops are obliged to accept all batteries and accumulators for disposal.

Sonuç

Replacing the W670SZQ1 BIOS Battery

Bu çevirmenlere özel teşekkürler:

de en

100%

Corey Meyer dünyayı onarmamıza yardım ediyor! Katkıda bulunmak ister misiniz?
Çeviriye Başlayın ›

Felice Suglia

Üyelik tarihi: 06/15/13

30.884 İtibar

263 adet Kılavuz yazıldı

0 Yorum

Yorum Ekle

İstatistikleri Görüntüle:

Son 24 Saat: 0

Son 7 gün: 0

Son 30 gün: 0

Her zaman: 68