Giriş
This guide is still a WIP. The Arduino + NeoPixels are not compatible with Klipper as is. Instead Pawel Drylenko has developed a script that runs on the Pi. This guide doesn’t go through the full conversion of a Duet 2 WiFi to the Fysetc Spider. I hope to complete a wiring diagram shortly.
There are a number of methods to install Klipper. After a number of botched installs I found this method to be the most consistent and easiest.
You can use virtually any RPI model but it’s recommended to use Raspberry Pi 4. You’ll need at least a Class-10 8gb SD card. If a UHS(Ultra High Speed) is available, you’ll want at least a UHS-1.
For my setup I’m using a Raspberry Pi 4 8GB and a SanDisk 64GB USB3.1 Flash Drive.
I’m using a Raspberry Pi4 8GB because I had a spare one laying around and I wanted to be able to connect to 5G wifi.
I’ve also chosen to use a flash drive instead of a SD card because the date transfer rate is 3-4x faster.
I’m powering the RPI with a Raspberry Pi Foundation approved power adapter
3DWork’s complete guide on the FYSETC Spider
FYSETC Spider bootloader
Videoya Genel Bakış
-
-
During this guide the only thing that will be connected to your Spider is the 24v PSU, USB-C cable and jumpers.
-
Do not insert your stepper drivers or plug in any additional components unless you're told to do so.
-
-
-
Download and extract the latest version of Mainsail from their Github
-
Open the Raspberry Pi Imager
-
Select Operating System > Use custom > Select the Mainsail OS you downloaded.
-
Select Storage > Select your SD.
-
Bring up the Advanced Settings menu by pressing the settings cog.
-
Here you can setup your WiFi, locale, enable SSH and numerous other options.
-
Write > Yes to confirm
-
After imaging is complete the SD is automatically ejected. Insert it into the RPI and power it on.
-
-
-
In the box you should've received
-
Fysetc Spider v2.2
-
USB-C cable
-
USART cables
-
Ziploc of jumpers and connector for 24/48v stepper socket.
-
There's 2 options to upload the bootloader. The preferred method is to upload by micro SD. However first we need to upload the bootloader with the stm32cubeprogrammer found on FYSETC Github.
-
Download and run the program.
-
-
-
Due to historical reasons, FYSETC provides two versions of bootloaders that can be downloaded here:
-
Older motherboards shipped prior to June 23 2021 use a 64k bootloader: Bootloader_FYSETC_SPIDER_10000.hex
-
Current motherboards shipped after June 23 2021 use a 32k bootloader: Bootloader_FYSETC_SPIDER.hex
-
Go to the FYSETC github. You need to download the bootloader. Right click on the file and select "save link as..." and save the .hex file
-
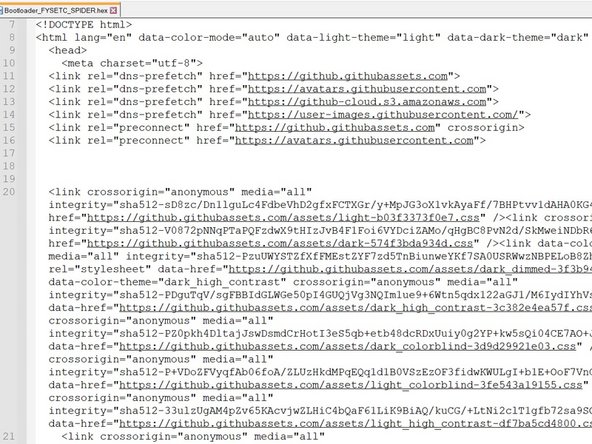
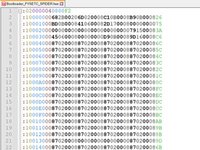
Open the .hex file in Notepad++ and you see it downloads the html data instead of the .hex file.
-
On the Github page click on Bootloader_FYSETC_SPIDER.hex
-
Select "Raw". Copy the data in the web browser and paste it into the .hex file in Notepad++ and save it.
-
-
-
Download and run the programmer app.
-
Place a jumper on BT0 and 3.3v
-
Make sure the 5v jumper is on the DC5V pin
-
Plug the USB-C cable into your PC and connect 12-24v to the board.
-
-
-
-
Select the refresh button
-
When the USB port shows next to the Port drop down select connect.
-
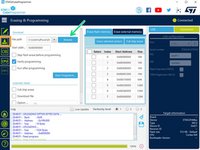
Make sure you're on the Erasing & Programming tab
-
Select Browse and select the "Bootloader_FYSETC_SPIDER.hex" file from earlier.
-
Click Start Programming.
-
It should only take a few seconds to program the board.
-
Disconnect the power and USB-C cable. Remove the jumper on BT0 and 3.3v
-
-
-
With the Raspberry Pi connected to the Fysetc Spider via USB and the Spider with 24v, power on the RPI.
-
You can find the IP address of the Pi by looking at the connected client list in your router or by opening cmd.exe on your PC and running
-
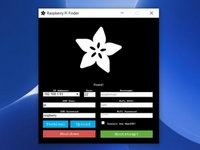
You can also find the IP by using the Adafruit Pi Finder App
-
If you changed your hostname in the Advanced Settings when you imaged the USB/SD card you need to try to ping that hostname. ping YOURHOSTNAME -4
-
In a webpage enter http://YOURHOSTNAME or your printers IP address
-
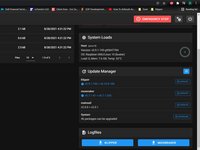
Navigate to the Machine tab on the left.
-
Select Upgrade to update the RPI image and Update to install updates for Klipper, Mainsail and Moonraker. Once the updates are complete reboot the RPI
-
-
-
After updating mainsail and all core components, SSH into the RPI.
-
Place a jumper on BT0 and 3.3v and press the reset button on the board to put it in DFUtil mode
-
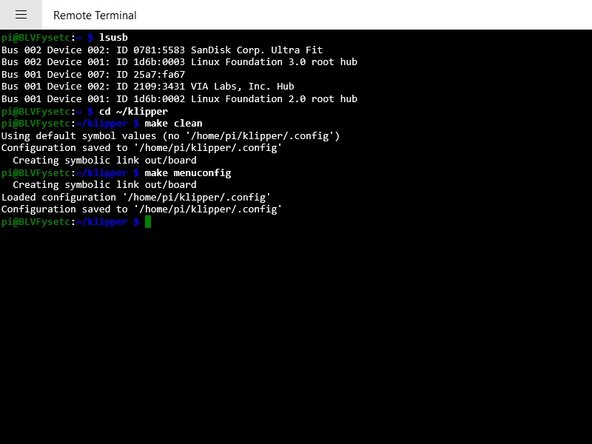
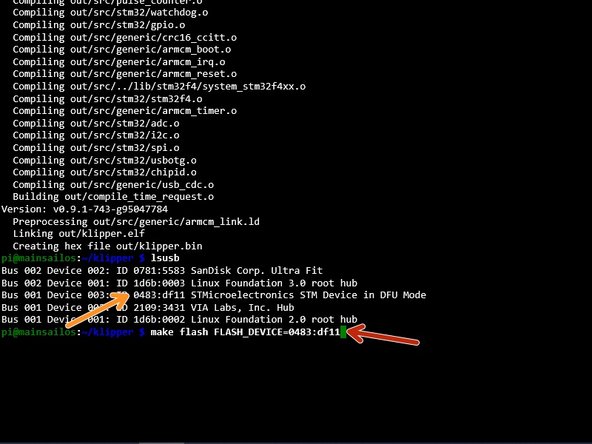
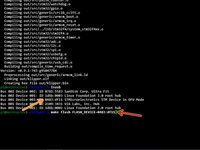
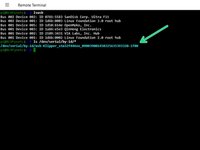
Send the following to verify the Pi can communicate with the Spider and notate the ID for DFU Mode
-
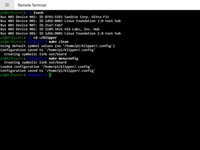
lsusb
-
Next you need to build the firmware binary file. Run the following
-
cd ~/klipper
-
make clean
-
make menuconfig
-
-
-
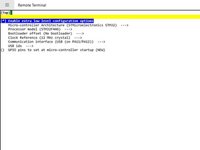
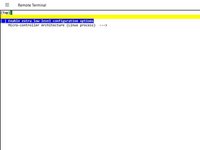
In the menu structure, select the following:
-
Select “Enable extra low-level configuration options”.
-
Set the micro-controller architecture is set to STMicroelectronics STM32.
-
Set the Processor model to STM32F446.
-
Because we uploaded the hex file in a previous step set the bootloader offset to no bootloader
-
Set the Clock Reference to 12 MHz crystal.
-
Set the Communication interface to USB (on PA11/PA12).
-
Press the escape key on your keyboard and enter Y to save the config.
-
-
-
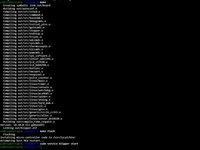
Run the following:
-
make
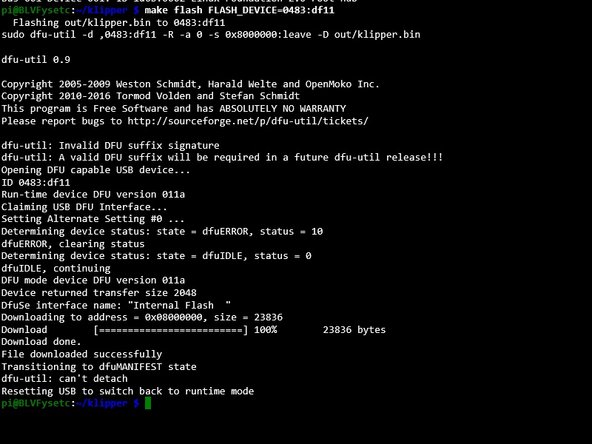
-
make flash FLASH_DEVICE=####:####
-
Using the ID you notated earlier in place of ####:####
-
Power off the Spider. Remove the jumper and press the reset button on the board.
-
Run the following
-
ls /dev/serial/by-id/* or lsusb
-
-
-
SSH back into the RPI
-
Enter the following commands
-
cd ~/klipper/
-
sudo cp "./scripts/klipper-mcu-start.sh" /etc/init.d/klipper_mcu
-
sudo update-rc.d klipper_mcu defaults
-
make clean
-
make menuconfig
-
Micro-Controller Architecture > Linux Process. Press esc than Y
-
-
-
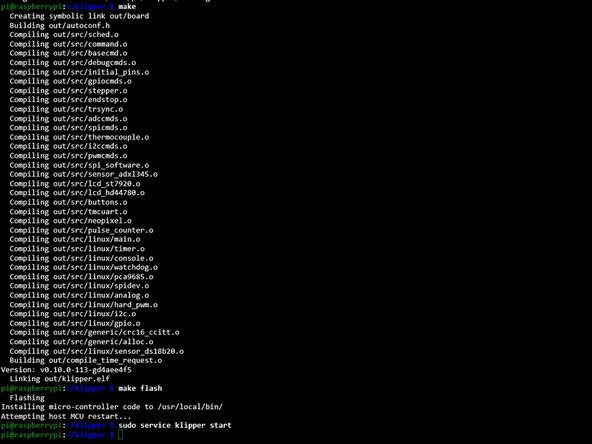
Run the following:
-
sudo service klipper stop
-
make
-
make flash
-
sudo service klipper start
-
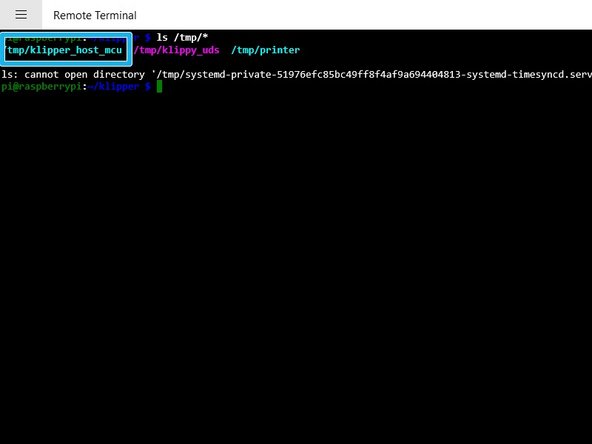
Verify klipper_host_mcu is in the tmp directory with ls /tmp/*
-
Add the pi to the TTY group
-
sudo usermod -a -G tty pi
-
-
-
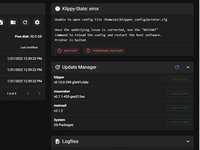
In your web browser you'll see Klippy-State error because printer.cfg isn't loaded.
-
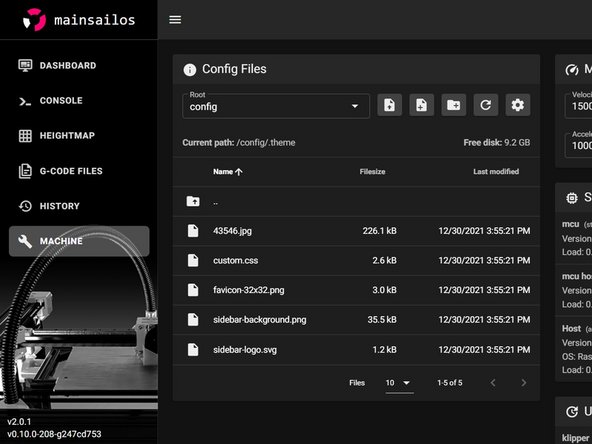
Navigate to Machine tab
-
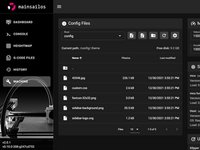
Upload printer.cfg, macros.cfg and moonraker.conf from my github.
-
serial: /dev/serial/by-id/usb-Klipper********************
-
-
-
Power off the Pi and the board. Next insert your stepper drivers and plug in all the wiring. Make sure you have the connector for the stepper power connected. If you don't have the jumper wire or the 48v connector depending on your setup when 24v is applied to the board you can blow your stepper drivers.
-
Remove the jumper on BT0 and 3.3v
-
Power on your Pi and Spider. If you're using 48v for your stepper drivers make sure the 48v PSU powers on with your 24v PSU
-
You should see the 3 voltage LEDs lit
-
And FAN0 is probably lit
-
For whatever reason FAN0 wouldn't turn off until I heated the nozzle to 50c and shut it off. Once the hotend cooled below 40c the fan shutoff
-
-
-
Download the file and extract.
-
Under "machine" menu, click on the Gear icon and select the checkbox for "show hidden files".
-
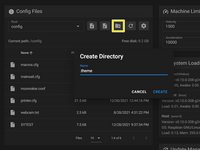
Select "Create Directory".
-
In the name field enter “.theme” and select CREATE.
-
it has to be named as seen in the screenshot.
-
Select the newly created ".theme" folder. Upload all the files from the zip archive into .theme folder.
-
hit Ctrl+F5 and Enjoy.
-


I wasn’t paid to write these guides. Ben asked me to do it as a favor to him. Considering all that he’s done for our community I felt it was the least I could do. To be honest even though it took about 2 months to build and document, I had a lot of fun doing it. It forced me to write guides in a manner that was easy for everyone to understand and cleanup my Github so I could share any files that were used that aren’t part of the original download. You’re not obligated but if you would like, feel free to donate.
I wasn’t paid to write these guides. Ben asked me to do it as a favor to him. Considering all that he’s done for our community I felt it was the least I could do. To be honest even though it took about 2 months to build and document, I had a lot of fun doing it. It forced me to write guides in a manner that was easy for everyone to understand and cleanup my Github so I could share any files that were used that aren’t part of the original download. You’re not obligated but if you would like, feel free to donate.
İptal et: Bu kılavuzu tamamlamadım.
2 farklı kişi bu kılavuzu tamamladı.