Bu sürüm, hatalı düzenlemeler içerebilir. En son doğrulanmış bellek kopyası dönün.
Neye ihtiyacın var
-
Bu adım çevrilmemiş. Çevrilmesine yardım edin
-
Remove the four tri-point Y00 screws from the back panel of the Joy-Con.
-
-
Bu adım çevrilmemiş. Çevrilmesine yardım edin
-
Insert an opening pick under the lower side of the back panel (opposite the R and ZR buttons).
-
Slide the flat edge of an opening pick up the side of the Joy-Con.
-
-
Bu adım çevrilmemiş. Çevrilmesine yardım edin
-
Open the Joy-Con like a book, with the charging rail facing away from you.
-
-
Bu adım çevrilmemiş. Çevrilmesine yardım edin
-
Use a spudger to gently pry the battery connector from its socket on the motherboard. This will keep the Joy-Con from powering on during the repair.
-
-
Bu adım çevrilmemiş. Çevrilmesine yardım edin
-
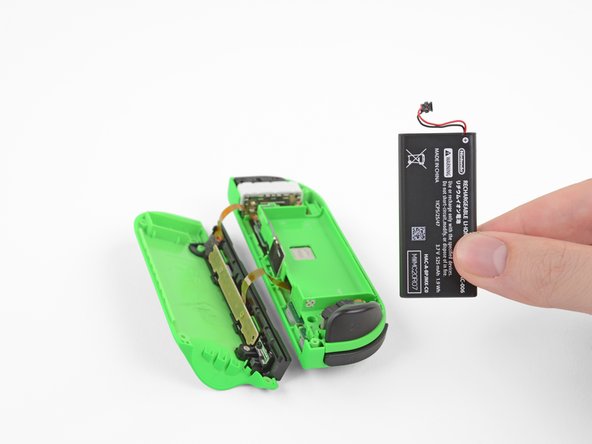
Insert an opening pick between the battery and the Joy-Con housing. Gently pry out the battery, which is lightly taped in place.
-
-
-
Bu adım çevrilmemiş. Çevrilmesine yardım edin
-
Carefully de-thread the upper half of the grey antenna cable out of the battery cavity.
-
-
Bu adım çevrilmemiş. Çevrilmesine yardım edin
-
Pry up with the pointy end of a spudger to disconnect the antenna cable's coaxial connector from the motherboard.
-
Remove the grey antenna cable.
-
-
Bu adım çevrilmemiş. Çevrilmesine yardım edin
-
Remove the three 3.5 mm Phillips #00 screws on midframe.
-
-
Bu adım çevrilmemiş. Çevrilmesine yardım edin
-
Carefully flip the midframe over and away from the motherboard.
-
-
Bu adım çevrilmemiş. Çevrilmesine yardım edin
-
The ZR button cable is locked in place by a small ZIF connector on the motherboard. Use tweezers or a spudger to flip up the ZIF connector lock.
-
Use tweezers to gently pull the ZR button flex cable out of the ZIF connector socket. The midframe is now disconnected and can be removed.
-
If you choose to leave the cable connected, be careful. Work slowly and do your best to keep the midframe from moving around as you perform the last few steps to avoid damaging the cable.
-
-
Bu adım çevrilmemiş. Çevrilmesine yardım edin
-
The joystick cable is also locked into place by a ZIF connector. Use tweezers or a spudger to flip the ZIF lock upward and carefully disconnect the cable.
-
-
Bu adım çevrilmemiş. Çevrilmesine yardım edin
-
Remove the two 3.5 mm Phillips #00 screws from the joystick.
-


İptal et: Bu kılavuzu tamamlamadım.
424 farklı kişi bu kılavuzu tamamladı.

Ekip

59 Yorum
A good guide though for the antenna instead of disconnecting the cable it would be easier to simply slide out the plate and wire from the side of the battery tray
The antenna and battery don’t need to be disconnected, you can easily move them out of the way.
When reassembling, reconnecting the ribbon cable for the RL button is fiddly, easier if you can avoid disconnecting it as well. Just rotate the plastic battery plate a quarter turn counterclockwise to get it out of the way and access the analog stick.
You can test the controller immediately after seating the joystick to make sure the ribbon cable is properly connected.
In agreement with the others, antenna definitely doesn’t need to be removed. Also noticed that the Y000 bit worked a lot better than the Y00 for the outside screws.
Hello I have followed the guide succesfully for the most part, however the joy con doesn’t seem to power up after reconnecting the battery and the anthenna. I even tried swapping the batteries between joy- cons and battery from the right one does work in the left one. The right joy con doesn’t turn on even with the other battery inserted. Any ideas?