Giriş
Quick guide on how to completely disassemble iRobot's Roomba 650 wheel module in order to clean all the internal dust/fiber buildup. The module was not designed to be easily cleaned. This guide involves some force and possibly even damaging the wheel housing
Neye ihtiyacın var
-
-
With the Roomba upside down and turned off, use the Phillip's 02 screwdriver to remove the one 3.5 mm screw from the center of the side-brush.
-
Set the screw aside and pull the brush out.
-
-
-
Unscrew the four screws that hold the bottom panel using the Phillips 02 screwdriver.
-
Once you are sure that all the screws have been loosened as much as possible, then lift the bottom panel up off the Roomba.
-
-
-
Unscrew the six 12mm screws holding the side wheels on using a Phillips 00 screwdriver. There should be 3 on each side.
-
Remove the wheels by pulling them out.
-
-
-
Remove the shock spring to keep the wheel from jumping off when you remove the bolts
-
-
-
-
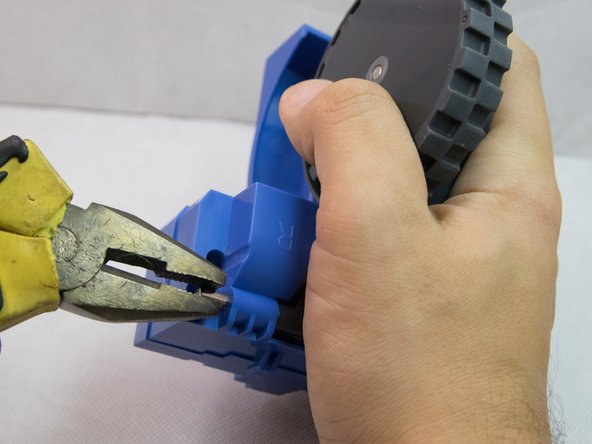
Push the pin that acts as the pivot point for the suspension. I got away with just pushing with a screwdriver
-
Use pliers to pull from the other end to remove the pin completely
-
Unscrew all the remaining bolts
On a Roomba 510 right now I cant get past this point. Pin wont budge
I also couldn't remove the pin. However, the blue housing was flexible enough to gently push to the side to be able to access all the screws
-
-
-
Unscrew the housing bolts
-
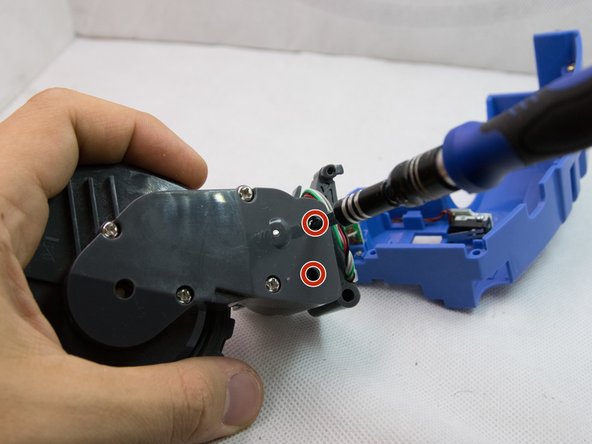
Unscrew the two bolts that keep the motor in place
-
Remove the plastic stopper that keeps the motor wires in place
-
You should be able to take the motor out now
-
-
-
With the motor out of the equation, try to move the wheel. If it's still stuck, than the problem is most likely the fibre buildup inside the wheel housing - as expected
-
All the gears should slide right off. Except the last one - the one that actually drives the wheel.
-
-
-
Remove the main gear using a flathead screwdriver. This is the most difficult step - unfortunately the part was definitely not designed to be serviceable.
Hi friend. Thank you for your help. But I cant remove this gear :( how did you do this? Only with a screwdriver?
Hey buddy. Yes, a flat screwdriver did the trick. I guess the trick is to apply pressure to as close to the shaft as possible. I know it’s not easy and I had to battle for a few minutes but it came loose in the end
Used an L shape pick tool to get under the last gear, that pull it off pretty easily.
Hi, nothing mentioned here worked for me, I even managed to get under the gear with steel string, but no success. Next day I tried different approach - pushed the shaft out from opposite side with hammer. It was like hammering a nail into reinforced concrete wall, but only possible solution for me - I wasn’t able to loose the small gear from shaft even after disassembling the wheel.
Hello, I noticed that the gear pins had been taken out to make room for the screwdriver blade, but I did see how. My gear would not budge either. I gently pried from the wheel side in between the wheel well housing and the wheel with a flat blade screw driver to pull the gear off. I had an idea afterwards to use a can (soup, tomato, etc) in between the wheelwell and the wheel, then use a C clamp to push the axel through from the other side, just a thought.
Eric T - Oct 14 21
Forgot to say thank you for the advice. So Thank You! fAnd thanks for showing the steps you used, it really helped!
-
-
-
With the main gear out of the way the wheel should slide right off. In my case I had to wiggle it around a bit due to the fibre buildup
I did it on both R and L sides and the pin wouldn’t come off (lots of hair build-up). Given the limited leverage available to push the pin, I ended up inserting 2 flat pieces of plastic between the body and the wheel (it works with large flat screwdrivers too) and prying the wheel from the body. I also had to re-hammer the pin into the wheel as it had been pushed out of it by a significant amount.
That is an awesome advice - thanks. A few years since I wrote this manual and the other wheel needs the same work. I might try what you suggested
I don't think its hair build-up that makes this wheel difficult to come out. Its the ribbed shaft that is designed to grab onto the last gear. They are slightly bigger than the hole on the housing.
I also used 2 flat blade screw driver 180 degrees apart and that pried it off well.
When inserting back in and putting on the first gear. I had to use a lot of force on a couple of wheels. A socket can be used push it back on.
-
-
-
Remove all the gross hair buildup from the axle. Should come right off.
-
-
-
Much better! As you can see the only thing that keeps the wheel in place is the main gear. there is no problem of the gear slipping because the axle is splined. If you want you can use some threadlock to help securing the gear.
-


To reassemble your device, follow these instructions in reverse order.
To reassemble your device, follow these instructions in reverse order.
İptal et: Bu kılavuzu tamamlamadım.
28 farklı kişi bu kılavuzu tamamladı.
17 Yorum
I could not get the hinge pin to slide out at all on the 650, so I just disassembled the plastic bits around the wheel enough to get at all the screws on the gear housing.
If you are wondering if this will solve your problem: I confirmed that this was causing a problem because I saw that the metal axle at the center of the wheel was recessed back from being flush the surface of the wheel “hub”. The hair and plastic tag strings had slowly forced the wheel off that shaft so it was rubbing against the side of it’s space and wouldn’t turn properly.
Same here. The hair had slowly pushed the pin out and the wheel was rubbing and getting stuck.
laurent -
Same here also. Easy enough fix!
I agree with the wheel removal. I never actually got it all thee way off. I did get it slid out enough to get my wife’s bra strap out though. So for me, this guide is a thumbs up!
It should. I have a 960 and the instructions worked just fine, the only difference being that the carrier plastic is gray vs. blue.
The replacement wheel modules sold by iRobot are supposed to work for “500, 600, 700, 800 and 900 Series models”, so they should all be the same.
laurent -
866 Ok!
A big “thankyou” to Nuno Covas.
I have to admit, anyway, that these robots seem to be built to be easily repaired. I experienced the same problem with a Samsung Robot and it was 10x more difficult (flat cables, hidden screws, some parts made to be disassembled…once….)
True, apart from that final gear, everything else is pretty simple and straightforward.
I was not able to apply enough leverage to remove the final gear, but this guide got me close enough. I was still able to cut and remove a shoestring that got pulled between where the inner & outer wheel met. Thanks!
Great! Removed a ton of hair from my 880’s wheels.
This is very helpful, thank you! Does anyone know the reference of the various screws taken out in step 5? I lost one and have no idea what to order for replacement.
Yeah thumbs up to this guide. In my case after I disengaged the motor the wheel was moving freely so I think the engine has an issue. Claiming the guarantee to get a new wheel module
This guide works for the i/e/j series as well. I was having an issue with i7+ right wheel rubbing against the chassis causing it to veer slightly to one side and not being able to dock properly. Like Tim in the first comment, cleaning that hair bundle between the wheel and housing fixed it.
Regarding step 8 - I could not get that gear off and as noted I suspect many break or damage it attempting removal. My solution was to use a bench vise with a small nail centered on the wheel side to punch the shaft out. So unlike in the instructions where you pull the wheel + shaft out as one, you are pulling the shaft + gear out as one. The wheel hub itself is also splined so reassembly is pretty much the opposite - put everything back together and line up the splines and push the wheel on just enough to get started. Then back into the vise and slowly crank down till shaft is flush with the outside of the wheel. Much easier and very little chance of damage.
That is an excellent tip, although at the time I didn’t have access to a bench vise with enough clearance to fit the whole assembly, so I haven’t even tried that route, and also because I (incorrectly) assumed the wheel and shaft were actually glued together.