Ana içeriğe geç
Onarım Topluluğuna Katılın - Hesap Oluşturun

Samsung Chromebook 4 Plus XE350XBA-K05US Device Screen Replacement

    1. Samsung Chromebook 4 Plus XE350XBA-K05US Device Screen Replacement, Battery: adım 1, 3 resimden 1. Samsung Chromebook 4 Plus XE350XBA-K05US Device Screen Replacement, Battery: adım 1, 3 resimden 2. Samsung Chromebook 4 Plus XE350XBA-K05US Device Screen Replacement, Battery: adım 1, 3 resimden 3.
      • Hold the power button on the keyboard until the device powers off.

      • Close the device and flip it over.

      • Remove the four rubber sockets on each corner of the device with your fingers.

      • Remove the four 4.6 mm screws with a Phillips #00 screwdriver.

      FixBot'a Sor

      Yorum Ekle

    2. Samsung Chromebook 4 Plus XE350XBA-K05US Device Screen Replacement: adım 2, 2 resimden 1. Samsung Chromebook 4 Plus XE350XBA-K05US Device Screen Replacement: adım 2, 2 resimden 2.
      • Starting near the hinges, use a metal spudger to gently pry the back off. Continue along the edges until the back is completely detached.

      FixBot'a Sor

      Yorum Ekle

    3. Samsung Chromebook 4 Plus XE350XBA-K05US Device Screen Replacement: adım 3, 2 resimden 1. Samsung Chromebook 4 Plus XE350XBA-K05US Device Screen Replacement: adım 3, 2 resimden 2.
      • Locate a long gray box labeled “Laptop Battery.”

      • Remove the two 4 mm screws with a Phillips #00 screwdriver.

      • After removing the screws, remove the gray piece labeled “bracket battery BA61 - 03983A.” This piece is located over the golden band connecting the battery and the motherboard.

      FixBot'a Sor

      Yorum Ekle

    4. Samsung Chromebook 4 Plus XE350XBA-K05US Device Screen Replacement: adım 4, 1 resimden 1.
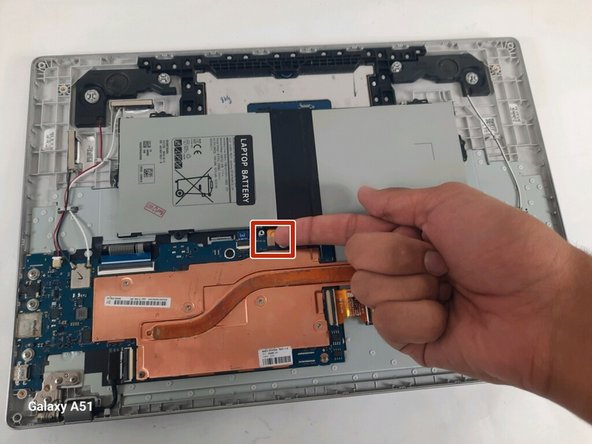
      • Unplug the golden band that connects the battery to the motherboard.

      • Use the Phillips #000 screwdriver to remove the four 4 mm screws holding the battery in place.

      FixBot'a Sor

      Yorum Ekle

    1. Samsung Chromebook 4 Plus XE350XBA-K05US Device Screen Replacement, Screen: adım 5, 2 resimden 1. Samsung Chromebook 4 Plus XE350XBA-K05US Device Screen Replacement, Screen: adım 5, 2 resimden 2.
      • Face the hinge side towards you.

      • Remove three 4.6 mm Phillips #000 screws from the left and right hinges

      • Pull out the black film connected to the motherboard in the white slot.

      FixBot'a Sor

      Yorum Ekle

    2. Samsung Chromebook 4 Plus XE350XBA-K05US Device Screen Replacement: adım 6, 2 resimden 1. Samsung Chromebook 4 Plus XE350XBA-K05US Device Screen Replacement: adım 6, 2 resimden 2.
      • Open up the Chromebook.

      • Hold onto the hinges as you open to make it easier.

      • Separate the keyboard and screen and put the keyboard off to the side.

      • Use the iFixit opening tool to pop the outer edge of the screen up.

      FixBot'a Sor

      Yorum Ekle

    3. Samsung Chromebook 4 Plus XE350XBA-K05US Device Screen Replacement: adım 7, 2 resimden 1. Samsung Chromebook 4 Plus XE350XBA-K05US Device Screen Replacement: adım 7, 2 resimden 2.
      • Remove the four 3mm Phillips #000 screws.

      • Lift the screen up slowly.

      • Find the black wire on the back and lift the metal clamp.

      • Pull the black film to remove the wire.

      FixBot'a Sor

      Yorum Ekle

Sonuç

To reassemble your device, follow these instructions in reverse order.

İptal et: Bu kılavuzu tamamlamadım.

2 farklı kişi bu kılavuzu tamamladı.

Katherine Vu

Üyelik tarihi: 09/08/23

378 İtibar

3 adet Kılavuz yazıldı

0Kılavuz Yorumları

Yorum Ekle

İstatistikleri Görüntüle:

Son 24 Saat: 1

Son 7 gün: 8

Son 30 gün: 32

Her zaman: 730