Ana içeriğe geç

Samsung Galaxy A10 Charging Port Replacement

Videoya Genel Bakış

  1. Samsung Galaxy A10 Charging Port Replacement, Remove the back cover: adım 1, 3 resimden 1. Samsung Galaxy A10 Charging Port Replacement, Remove the back cover: adım 1, 3 resimden 2. Samsung Galaxy A10 Charging Port Replacement, Remove the back cover: adım 1, 3 resimden 3.
    • Remove the SIM Tray.

    • Use plastic tools to separate the back cover.

  2. Samsung Galaxy A10 Charging Port Replacement: adım 2, 3 resimden 1. Samsung Galaxy A10 Charging Port Replacement: adım 2, 3 resimden 2. Samsung Galaxy A10 Charging Port Replacement: adım 2, 3 resimden 3.
    • Remove the silver Phillips screws to be able to disassemble the motherboard shields.

  3. Samsung Galaxy A10 Charging Port Replacement: adım 3, 3 resimden 1. Samsung Galaxy A10 Charging Port Replacement: adım 3, 3 resimden 2. Samsung Galaxy A10 Charging Port Replacement: adım 3, 3 resimden 3.
    • Disconnect the battery.

    • Remove the screws and the charging board shield.

  4. Samsung Galaxy A10 Charging Port Replacement, Remove the charging board: adım 4, 2 resimden 1. Samsung Galaxy A10 Charging Port Replacement, Remove the charging board: adım 4, 2 resimden 2.
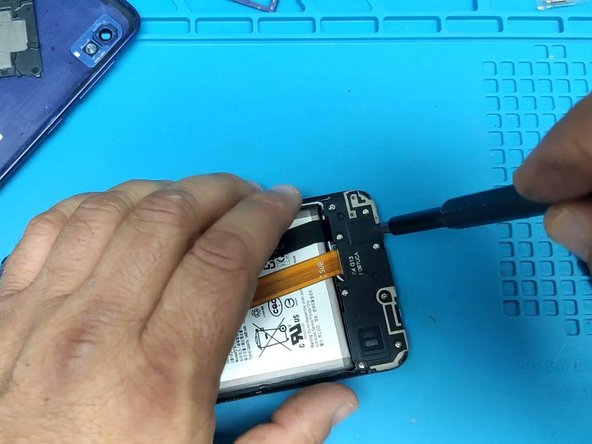
    • Disconnect the Main flex cable and the coaxial antenna cables and remove the charging board.

  5. Samsung Galaxy A10 Charging Port Replacement: adım 5, 3 resimden 1. Samsung Galaxy A10 Charging Port Replacement: adım 5, 3 resimden 2. Samsung Galaxy A10 Charging Port Replacement: adım 5, 3 resimden 3.
    • Cover the microphone hole to prevent microphone damage.

    • Use hot air to remove the Micro USB connector.

  6. Samsung Galaxy A10 Charging Port Replacement: adım 6, 3 resimden 1. Samsung Galaxy A10 Charging Port Replacement: adım 6, 3 resimden 2. Samsung Galaxy A10 Charging Port Replacement: adım 6, 3 resimden 3.
    • Clean the tin and install the new charging connector.

  7. Samsung Galaxy A10 Charging Port Replacement: adım 7, 2 resimden 1. Samsung Galaxy A10 Charging Port Replacement: adım 7, 2 resimden 2.
    • Clean the board and test the device.

Sonuç

To reassemble your device, follow these instructions in reverse order.

11 farklı kişi bu kılavuzu tamamladı.

ZFix

Üyelik tarihi: 12/09/13

191.341 İtibar

330 adet Kılavuz yazıldı

Ekip

Master Techs Master Techs üyesi

Community

322 Üyeler

2.540 adet Kılavuz yazıldı

Bir Yorum

Waste of time unless you're obsessed with soldering. Just buy a complete board. Cheaper, easier and quicker.

[deleted] - Yanıt

Yorum Ekle

İstatistikleri Görüntüle:

Son 24 Saat: 7

Son 7 gün: 41

Son 30 gün: 207

Her zaman: 7,095