Ana içeriğe geç
Onarım Topluluğuna Katılın - Hesap Oluşturun

Samsung Galaxy Camera Capture button Replacement

Neye ihtiyacın var

    1. Samsung Galaxy Camera Capture button Replacement, Screen: adım 1, 1 resimden 1.
      • Begin removing the 3/16" screws for the device.

      FixBot'a Sor

      Yorum Ekle

    2. Samsung Galaxy Camera Capture button Replacement: adım 2, 1 resimden 1.
      • Turn the device and remove the additional 3/16" screws.

      FixBot'a Sor

      Yorum Ekle

    3. Samsung Galaxy Camera Capture button Replacement: adım 3, 1 resimden 1.
      • Turn the device and remove the additional 3/16" screw.

      FixBot'a Sor

      Yorum Ekle

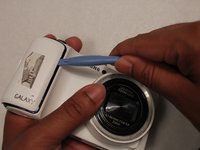
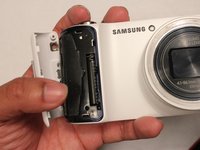
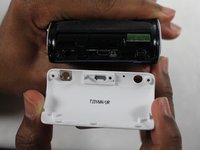
    4. Samsung Galaxy Camera Capture button Replacement: adım 4, 3 resimden 1. Samsung Galaxy Camera Capture button Replacement: adım 4, 3 resimden 2. Samsung Galaxy Camera Capture button Replacement: adım 4, 3 resimden 3.
      • Take the white cover plate off.

      FixBot'a Sor

      Yorum Ekle

    5. Samsung Galaxy Camera Capture button Replacement: adım 5, 1 resimden 1.
      • Using the plastic opening tools, pry open the camera from the bottom.

      • This may require a moderate use of force because of the sealing glue.

      FixBot'a Sor

      Yorum Ekle

    6. Samsung Galaxy Camera Capture button Replacement: adım 6, 1 resimden 1.
      • Gently pull the connector away from the motherboard.

      FixBot'a Sor

      Yorum Ekle

    1. Samsung Galaxy Camera Capture button Replacement, Lens and Motherboard: adım 7, 1 resimden 1.
      • Unscrew the motherboard's screws. There are 4 3/32" screws and 3 5/32" screws.

      FixBot'a Sor

      Yorum Ekle

    2. Samsung Galaxy Camera Capture button Replacement: adım 8, 1 resimden 1.
      • Unscrew the lens' screws. There are 1 black 4/32" screw, 3 3/16" black screws, and 2 white 5/32" screws.

      FixBot'a Sor

      Yorum Ekle

    3. Samsung Galaxy Camera Capture button Replacement: adım 9, 1 resimden 1.
      • Pull these connectors away from motherboard.

      FixBot'a Sor

      Yorum Ekle

    4. Samsung Galaxy Camera Capture button Replacement: adım 10, 1 resimden 1.
      • Lift the motherboard and lens out of the case.

      FixBot'a Sor

      Yorum Ekle

    1. Samsung Galaxy Camera Capture button Replacement, Unscrew: adım 11, 1 resimden 1.
      • Remove all the screws circled. There is 1 1/8" screw by the flash, 1 9/32" screw that holds the flash button, 2 5/32" screw that is on the grey frame for the flash, and 2 5/32" screws that holds the cable frames on the top left.

      FixBot'a Sor

      Yorum Ekle

    2. Samsung Galaxy Camera Capture button Replacement: adım 12, 1 resimden 1.
      • Unscrew the 3 5/32" screws that cover the battery plate.

      FixBot'a Sor

      Yorum Ekle

    3. Samsung Galaxy Camera Capture button Replacement: adım 13, 1 resimden 1.
      • The black plates on the other side can be removed after these screws.

      FixBot'a Sor

      Yorum Ekle

    4. Samsung Galaxy Camera Capture button Replacement: adım 14, 1 resimden 1.
      • Pull the flash and battery case out of the device.

      FixBot'a Sor

      Yorum Ekle

    1. Samsung Galaxy Camera Capture button Replacement, Capture button: adım 15, 1 resimden 1.
      • Unscrew the 2 5/32" screws on the grey plate.

      FixBot'a Sor

      Yorum Ekle

    2. Samsung Galaxy Camera Capture button Replacement: adım 16, 1 resimden 1.
      • Pull the plate aside and unscrew 2 1/8" screws on the button.

      FixBot'a Sor

      Yorum Ekle

    3. Samsung Galaxy Camera Capture button Replacement: adım 17, 1 resimden 1.
      • The Capture button can now be removed.

      FixBot'a Sor

      Yorum Ekle

Sonuç

To reassemble your device, follow these instructions in reverse order.

İptal et: Bu kılavuzu tamamlamadım.

10 farklı kişi bu kılavuzu tamamladı.

Richard Hicks

Üyelik tarihi: 01/13/15

1.280 İtibar

4 adet Kılavuz yazıldı

Ekip

USF Tampa, Team 1-3, Sullivan Winter 2015 USF Tampa, Team 1-3, Sullivan Winter 2015 üyesi

USFT-SULLIVAN-W15S1G3

3 Üyeler

8 adet Kılavuz yazıldı

6Kılavuz Yorumları

Thank you very much for these instructions - they enabled me to fix the camera after four repair places refused to.

(the two screws holding the shutter button in place had come loose - the button had fallen off and the loose screws inside were interfering with the zoom switch, sending the camera always to safe mode)

A couple of things: It is not necessary to remove the black screws at step 8. They hold something in place in the lens assembly, but don't prevent you from moving to step 10. Also, it is not necessary to remove the screws at step 11 - only the leftmost one in the image. If you are careful of the wires, the battery case can be folded back giving adequate access to the shutter assembly.

Also - when reassembling, be careful at step 17 that the zoom lever is positioned to be engaged with (hooked over) the lever on the brown circuit board.

danridleyellis - Yanıt Paylaş

It's a good and detailed instruction, but it also has mistakes (see my comments to steps 8, 11 and 15).

NOVOMOTION J. H. - Yanıt Paylaş

Thank You so much for the help! I would have never been able to replace the button without these instructions. You are a lifesaver.

Karen Rose - Yanıt Paylaş

Dis assembly has been educational and all ,but where do I get my new button???????

Paul Rice - Yanıt Paylaş

I realize the I wouldn't have been able to get this camara apart without the instructions. Very helpful and I do thank you Mr. Hicks. But I didn't want to take it apart. I want to fix it… and put it back together….and use it…perhaps just maybe take a photo or two. So please may I ask for information on obtaining a replacement capture/ zoom button assembly/ parts?????

Paul Rice - Yanıt Paylaş

Yorum Ekle

İstatistikleri Görüntüle:

Son 24 Saat: 2

Son 7 gün: 13

Son 30 gün: 70

Her zaman: 3,693