Ana içeriğe geç

Bu kılavuzda güncel değişiklikler var. En son onaylanmamış sürüme geçin.

Samsung Galaxy Grand Prime Micro USB Port Replacement

Neye ihtiyacın var

  1. Samsung Galaxy Grand Prime Micro USB Port Replacement, Battery: adım 1, 3 resimden 1. Samsung Galaxy Grand Prime Micro USB Port Replacement, Battery: adım 1, 3 resimden 2. Samsung Galaxy Grand Prime Micro USB Port Replacement, Battery: adım 1, 3 resimden 3.
    • Remove the back cover of phone by lifting up on the back cover tab with the blue plastic opening tool.

    • Go around the edge of the back cover to completely remove it.

  2. Samsung Galaxy Grand Prime Micro USB Port Replacement, Remove the battery.: adım 2, 3 resimden 1. Samsung Galaxy Grand Prime Micro USB Port Replacement, Remove the battery.: adım 2, 3 resimden 2. Samsung Galaxy Grand Prime Micro USB Port Replacement, Remove the battery.: adım 2, 3 resimden 3.
    • Remove the old battery by lifting up on the thumb tab.

    • Periodically clean the brass terminals on the battery and the phone. Place a minute amount of ISO on a Q-tip and gingerly clean the connections.

  3. Samsung Galaxy Grand Prime Micro USB Port Replacement, Midframe: adım 3, 3 resimden 1. Samsung Galaxy Grand Prime Micro USB Port Replacement, Midframe: adım 3, 3 resimden 2. Samsung Galaxy Grand Prime Micro USB Port Replacement, Midframe: adım 3, 3 resimden 3.
    • Remove the nine 4mm screws screws from the midframe with a Phillips #000 screwdriver.

  4. Samsung Galaxy Grand Prime Micro USB Port Replacement: adım 4, 2 resimden 1. Samsung Galaxy Grand Prime Micro USB Port Replacement: adım 4, 2 resimden 2.
    • Wedge the blue plastic opening tool in between the front and side panel.

    • Move the blue plastic opening tool around the edges between the front and side panel.

  5. Samsung Galaxy Grand Prime Micro USB Port Replacement: adım 5, 2 resimden 1. Samsung Galaxy Grand Prime Micro USB Port Replacement: adım 5, 2 resimden 2.
    • Make sure that you detach the mid-frame from the inside too.

  6. Samsung Galaxy Grand Prime Micro USB Port Replacement, Headphone Jack/Speaker Assembly: adım 6, 2 resimden 1. Samsung Galaxy Grand Prime Micro USB Port Replacement, Headphone Jack/Speaker Assembly: adım 6, 2 resimden 2.
    • Unhook the ribbon cable clip with the plastic opening tool and remove the audio jack.

  7. Samsung Galaxy Grand Prime Micro USB Port Replacement, Earpiece Speaker: adım 7, 2 resimden 1. Samsung Galaxy Grand Prime Micro USB Port Replacement, Earpiece Speaker: adım 7, 2 resimden 2.
    • Use the plastic opening tool to unhook the ribbon cable clip.

  8. Samsung Galaxy Grand Prime Micro USB Port Replacement: adım 8, 2 resimden 1. Samsung Galaxy Grand Prime Micro USB Port Replacement: adım 8, 2 resimden 2.
    • Gently pull on the connector with the tweezers until the speaker comes off.

  9. Samsung Galaxy Grand Prime Micro USB Port Replacement, Motherboard: adım 9, 2 resimden 1. Samsung Galaxy Grand Prime Micro USB Port Replacement, Motherboard: adım 9, 2 resimden 2.
    • Unhook the other ribbon cable clip to the screen with the blue plastic opening tool.

  10. Samsung Galaxy Grand Prime Micro USB Port Replacement: adım 10, 3 resimden 1. Samsung Galaxy Grand Prime Micro USB Port Replacement: adım 10, 3 resimden 2. Samsung Galaxy Grand Prime Micro USB Port Replacement: adım 10, 3 resimden 3.
    • Unhook the ribbon cable clip to the front camera.

    • Lift the motherboard up and out of the device.

  11. Samsung Galaxy Grand Prime Micro USB Port Replacement: adım 11, 2 resimden 1. Samsung Galaxy Grand Prime Micro USB Port Replacement: adım 11, 2 resimden 2.
    • Remove the motherboard and unhook the ribbon cable clip to the back camera.

  12. Samsung Galaxy Grand Prime Micro USB Port Replacement, Micro USB Port: adım 12, 3 resimden 1. Samsung Galaxy Grand Prime Micro USB Port Replacement, Micro USB Port: adım 12, 3 resimden 2. Samsung Galaxy Grand Prime Micro USB Port Replacement, Micro USB Port: adım 12, 3 resimden 3.
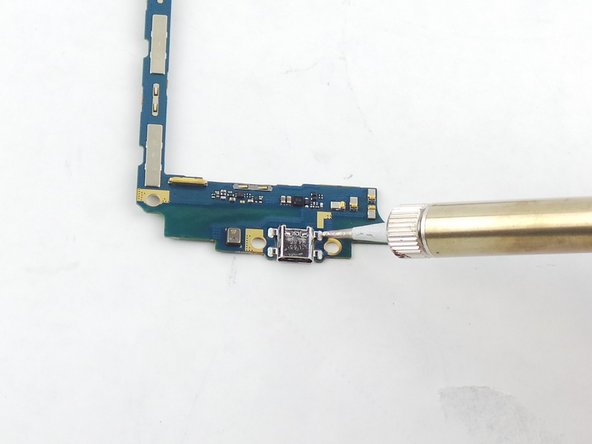
    • Using a soldering iron to solder off the charging port.

    • Be careful soldering iron gets extremely hot.

Sonuç

To reassemble your device, follow these instructions in reverse order.

33 farklı kişi bu kılavuzu tamamladı.

Kyle Ruff

Üyelik tarihi: 02/04/16

6.725 İtibar

5 adet Kılavuz yazıldı

Ekip

USF Tampa, Team 17-3, Blackwell Winter 2016 USF Tampa, Team 17-3, Blackwell Winter 2016 üyesi

USFT-BLACKWELL-W16S17G3

3 Üyeler

12 adet Kılavuz yazıldı

0 Yorum

Yorum Ekle

İstatistikleri Görüntüle:

Son 24 Saat: 2

Son 7 gün: 14

Son 30 gün: 41

Her zaman: 34,759