Ana içeriğe geç

Samsung Galaxy J7 Midframe Replacement

Neye ihtiyacın var

  1. Samsung Galaxy J7 Midframe Replacement, Back Cover: adım 1, 2 resimden 1. Samsung Galaxy J7 Midframe Replacement, Back Cover: adım 1, 2 resimden 2.
    • Locate the Tab: Find the tab at the top left corner of the back cover. (highlighted by red square)

    • Insert the tool: Use a fingernail or a plastic opening tool to lift the tab gently

    • Pry open the cover: Carefully work around the edges to remove the back cover completely

    • If the cover is stuck do not force it open use a plastic opening tool to avoid scratching the case.

  2. Samsung Galaxy J7 Midframe Replacement, Battery: adım 2, 2 resimden 1. Samsung Galaxy J7 Midframe Replacement, Battery: adım 2, 2 resimden 2.
    • Locate the Battery slot: Find the small slit at the bottom right corner of the battery (highlighted by red square)

    • Remove Battery: Gently pop out the edge and carefully pull out the battery.

    • Tip: Ensure the battery is disconnected from the motherboard before removing it.

  3. Samsung Galaxy J7 Midframe Replacement, Midframe: adım 3, 1 resimden 1.
    • Using the Phillips #000 screwdriver, remove the ten 4.2 mm screws around the edge of the midframe.

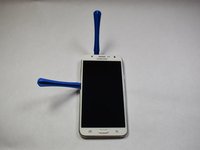
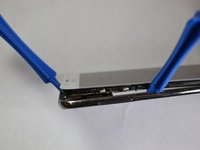
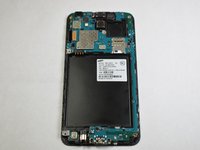
  4. Samsung Galaxy J7 Midframe Replacement: adım 4, 3 resimden 1. Samsung Galaxy J7 Midframe Replacement: adım 4, 3 resimden 2. Samsung Galaxy J7 Midframe Replacement: adım 4, 3 resimden 3.
    • Lift up the back of the device with the iFixit opening tool and disconnect it from the front.

    • If the back panel is difficult to remove, gently heat the edges using a hair dryer or heat gun to soften the adhesive.

Sonuç

To reassemble your device, follow these instructions in reverse order.

2 farklı kişi bu kılavuzu tamamladı.

0Kılavuz Yorumları

Yorum Ekle

İstatistikleri Görüntüle:

Son 24 Saat: 1

Son 7 gün: 5

Son 30 gün: 40

Her zaman: 1,360