Ana içeriğe geç
Onarım Topluluğuna Katılın - Hesap Oluşturun

Samsung Galaxy Nexus Screen Replacement

Neye ihtiyacın var

  1. Samsung Galaxy Nexus Screen Replacement, Back of Phone: adım 1, 1 resimden 1.
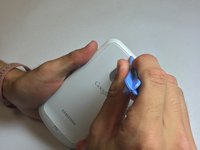
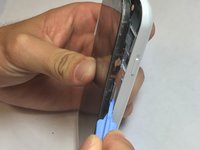
    • You must open the back of the phone to access the battery. To do this use the plastic opening tools or your fingernail and insert it into the divot.

    FixBot'a Sor

    Yorum Ekle

  2. Samsung Galaxy Nexus Screen Replacement, Removal of Back Cover: adım 2, 3 resimden 1. Samsung Galaxy Nexus Screen Replacement, Removal of Back Cover: adım 2, 3 resimden 2. Samsung Galaxy Nexus Screen Replacement, Removal of Back Cover: adım 2, 3 resimden 3.
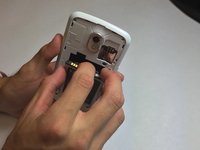
    • Remove the back cover of the phone by moving the prying tool or your fingernail away from the phone while it is still in the divot.

    FixBot'a Sor

    Yorum Ekle

  3. Samsung Galaxy Nexus Screen Replacement, Removal of Battery: adım 3, 3 resimden 1. Samsung Galaxy Nexus Screen Replacement, Removal of Battery: adım 3, 3 resimden 2. Samsung Galaxy Nexus Screen Replacement, Removal of Battery: adım 3, 3 resimden 3.
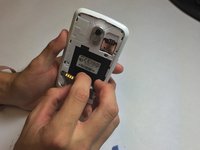
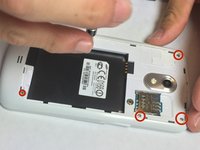
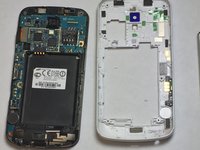
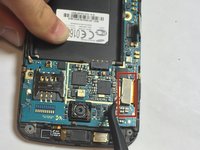
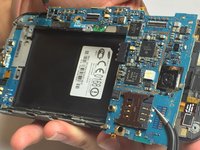
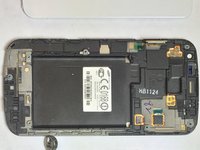
    • Insert your finger into the divot of the battery and pull the battery towards yourself to remove.

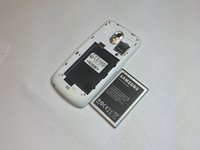
    • This is when a new battery will be inserted.

    FixBot'a Sor

    Yorum Ekle

  4. Samsung Galaxy Nexus Screen Replacement, Motherboard: adım 4, 3 resimden 1. Samsung Galaxy Nexus Screen Replacement, Motherboard: adım 4, 3 resimden 2. Samsung Galaxy Nexus Screen Replacement, Motherboard: adım 4, 3 resimden 3.
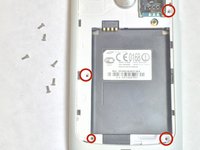
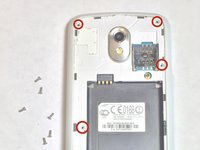
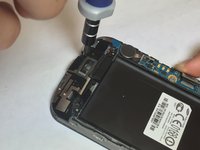
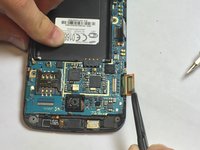
    • Remove 4.4 mm screws using a PH # 000 as indicated on the picture.

    FixBot'a Sor

    Yorum Ekle

  5. Samsung Galaxy Nexus Screen Replacement: adım 5, 3 resimden 1. Samsung Galaxy Nexus Screen Replacement: adım 5, 3 resimden 2. Samsung Galaxy Nexus Screen Replacement: adım 5, 3 resimden 3.
    • After removing the screws be sure to turn the phone right side up.

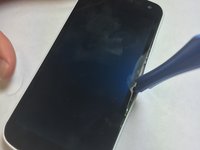
    • Insert your plastic opening tool between the screen and the outer case. Move the opening tool around the phone without removing it from in between the screen and the shell of the phone.

    • Pop the screen out of the outer shell. Be cautious not to damage the control board or the screen.

    FixBot'a Sor

    Yorum Ekle

  6. Samsung Galaxy Nexus Screen Replacement, Removing Control Board: adım 6, 2 resimden 1. Samsung Galaxy Nexus Screen Replacement, Removing Control Board: adım 6, 2 resimden 2.
    • Unscrew 4.4mm with a PH #000 marked screw.

    FixBot'a Sor

    Yorum Ekle

  7. Samsung Galaxy Nexus Screen Replacement: adım 7, 2 resimden 1. Samsung Galaxy Nexus Screen Replacement: adım 7, 2 resimden 2.
    • With the flat head screw driver pull up the blue connector.

    FixBot'a Sor

    Yorum Ekle

  8. Samsung Galaxy Nexus Screen Replacement: adım 8, 3 resimden 1. Samsung Galaxy Nexus Screen Replacement: adım 8, 3 resimden 2. Samsung Galaxy Nexus Screen Replacement: adım 8, 3 resimden 3.
    • With you finger or prying tool pull back bottom module.

    FixBot'a Sor

    Yorum Ekle

  9. Samsung Galaxy Nexus Screen Replacement: adım 9, 3 resimden 1. Samsung Galaxy Nexus Screen Replacement: adım 9, 3 resimden 2. Samsung Galaxy Nexus Screen Replacement: adım 9, 3 resimden 3.
    Bu adımda kullanılan alet:
    Tweezers
    $4.99
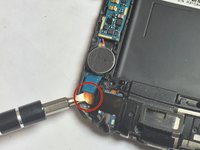
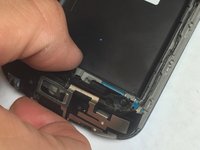
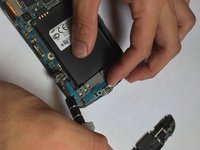
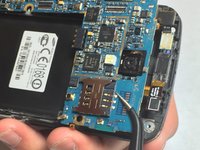
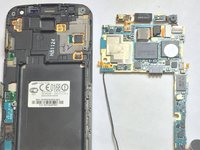
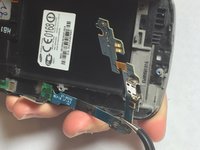
    • Remove the internal battery using tweezers or your flat head screw driver.

    • There is glue at the bottom keeping battery and chassis stuck together.

    FixBot'a Sor

    Yorum Ekle

  10. Samsung Galaxy Nexus Screen Replacement: adım 10, 2 resimden 1. Samsung Galaxy Nexus Screen Replacement: adım 10, 2 resimden 2.
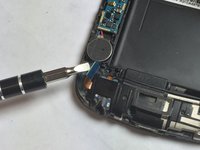
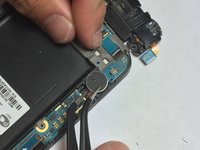
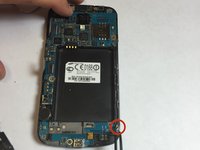
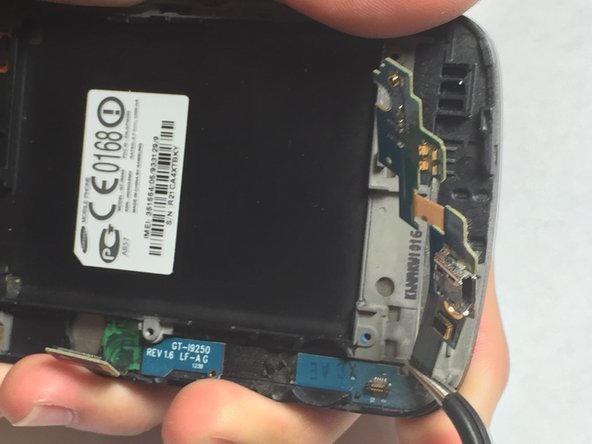
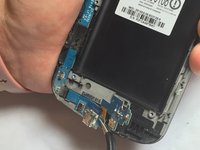
    • Peel the display connector strip off the main circuit board using the tweezers.

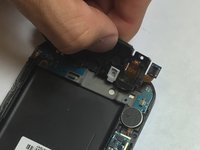
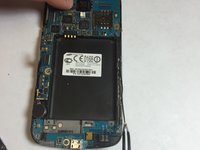
    • Peel the USB connector strip off the main circuit board using the tweezers.

    FixBot'a Sor

    Yorum Ekle

  11. Samsung Galaxy Nexus Screen Replacement: adım 11, 3 resimden 1. Samsung Galaxy Nexus Screen Replacement: adım 11, 3 resimden 2. Samsung Galaxy Nexus Screen Replacement: adım 11, 3 resimden 3.
    • Remove the antenna using either your fingers or tweezers.

    FixBot'a Sor

    Yorum Ekle

  12. Samsung Galaxy Nexus Screen Replacement: adım 12, 3 resimden 1. Samsung Galaxy Nexus Screen Replacement: adım 12, 3 resimden 2. Samsung Galaxy Nexus Screen Replacement: adım 12, 3 resimden 3.
    • Using tweezers, pull the top circuit board off.

    • Depending on your model, there may be ribbon cable connectors attached to the underside of the board. Be careful not to rip them out of the sockets when removing the board.

    FixBot'a Sor

    Yorum Ekle

  13. Samsung Galaxy Nexus Screen Replacement, Screen Replacement: adım 13, 3 resimden 1. Samsung Galaxy Nexus Screen Replacement, Screen Replacement: adım 13, 3 resimden 2. Samsung Galaxy Nexus Screen Replacement, Screen Replacement: adım 13, 3 resimden 3.
    Bu adımda kullanılan alet:
    Tweezers
    $4.99
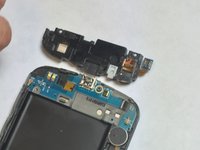
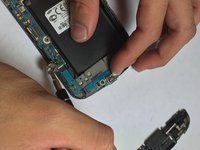
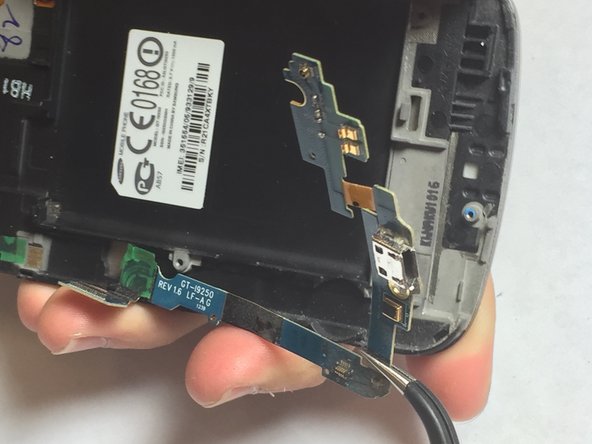
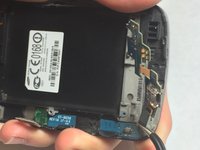
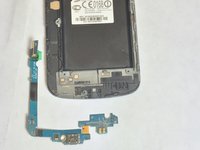
    • With your tweezers remove the bottom circuit from the screen.

    FixBot'a Sor

    Yorum Ekle

  14. Samsung Galaxy Nexus Screen Replacement: adım 14, 2 resimden 1. Samsung Galaxy Nexus Screen Replacement: adım 14, 2 resimden 2.
    • Now you are left with just the screen of the phone.

    FixBot'a Sor

    Yorum Ekle

Sonuç

To reassemble your device, follow these instructions in reverse order.

İptal et: Bu kılavuzu tamamlamadım.

6 farklı kişi bu kılavuzu tamamladı.

stewilli

Üyelik tarihi: 09/22/14

1.500 İtibar

7 adet Kılavuz yazıldı

0Kılavuz Yorumları

Yorum Ekle

İstatistikleri Görüntüle:

Son 24 Saat: 2

Son 7 gün: 13

Son 30 gün: 56

Her zaman: 5,466