Bu kılavuzda güncel değişiklikler var. En son onaylanmamış sürüme geçin.
Giriş
The micro USB port is used to connect the charger. Over time, it can become damaged or worn. This could cause the tablet to have trouble recognizing the charger, which could result in the device having trouble charging. In this case, the micro USB port has to be replaced. This guide shows you how to replace it.
Neye ihtiyacın var
-
-
Work your way around the entire device by carefully prying and sliding the plastic opening tool.
-
-
-
Remove the 8 Phillips#00 3-mm screws holding the battery in place.
The photo highlighting the screws is incorrect, the highlight in the upper right side is a plastic tab, whereas the actual 8th screw to remove is on the bottom (but that's fairly easy to identify when performing the fix).
-
-
-
-
Gently grasp and lift up the white connector located at the bottom right corner of the battery. It is connected to the battery by two blue and two red wires.
the white battery connectory also has 2 black wires, so 2 blue/2red/2black
There is some sort of safe unit in the upper left corner. It is a connector that opens when you lift off the backside. The safe was not in properly fit when I closed the back. In fact, the most difficult step was to get the safe unit properly in place while closing the backside.
Thanks @henriknaslund for note on the "Safe Unit" I succesfully managed to hold it in pace with a little basic sticky tape. Did the job.
Piece of cake. Entire procedure took just 15 minutes. Thank you, Joel & Co., for making this so easy!
why is this under galaxy note 8? the note 8 is not a tablet??? Please respond to my comment as I will check back. I need to fix my NOTE 8 POWER BUTTON…does not work properly. Makes a “short” sound…as in electrical.
HELP!!
The Galaxy Note 8 was the designation for the 8 inch WiFi tablet long before Samsung confused everyone with the Note 8 phone. When Im looking for items for the tablet I usually only get things for the phone.
’
”
”
When the Galaxy Note 8 Battery is replaced is all data, contact info,
downloads, photos etc lost ??
-
-
-
Remove the two 4.5-mm Phillips head screws from the micro USB Port using a Phillips #00 screwdriver.
-
Remove the silver 3-mm Phillips head screw from the silver metal strip using a Phillips #00 screwdriver. This strip covers the connection to the mother board and will be removed in a later step.
-
-
-
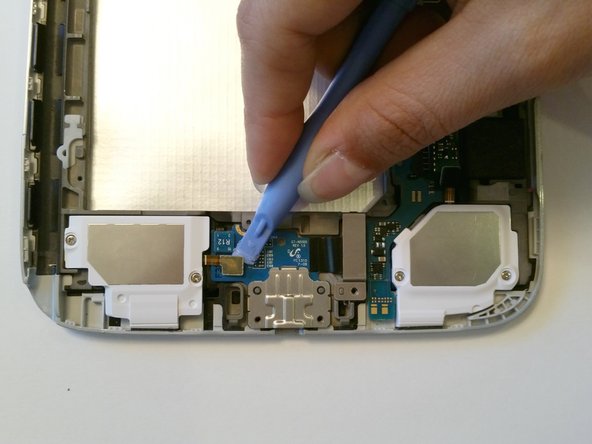
Gently lift up the teal connector on the left side of the board.
What is the name of this part aside from silver plate, the model number, or where to purchase this “silver plate.”
-
-
-
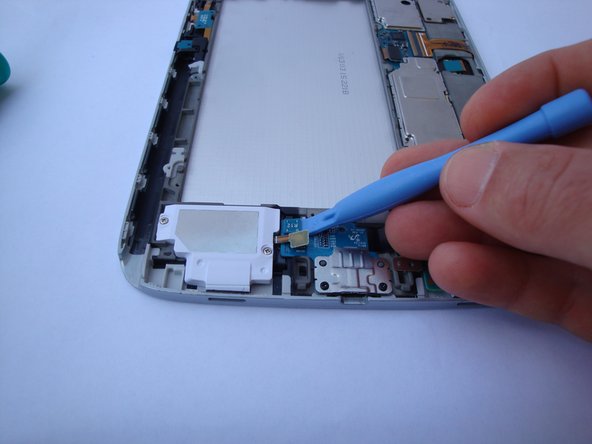
Gently pry off the silver plate.
-
-
-
Remove micro USB Port from its housing.
The silver plate was not included in delivery. I removed it from the original usb port and added it to the new. It was glued onto the board.
-


To reassemble your device, follow these instructions in reverse order.
To reassemble your device, follow these instructions in reverse order.
İptal et: Bu kılavuzu tamamlamadım.
55 farklı kişi bu kılavuzu tamamladı.
Ekip

USF Tampa, Team 12-2, Blackwell Fall 2014 USF Tampa, Team 12-2, Blackwell Fall 2014 üyesi
USFT-BLACKWELL-F14S12G2
4 Üyeler
16 adet Kılavuz yazıldı
13 Yorum
I found this guide extremely useful, although i need a new port i didn't have the time to wait for delivery so i followed the guide hoping if i cleaned the part of any dust etc it might charge again temporarily and it did! It wasn't dusty but i did notice the flat plate inside the port wasn't straight so i wedged a flathead in to level it out. I think that was my problem.
Grateful i haven't had to spend unnecessary fees on repair.
Thank You!!!
Thanks! The flat plate inside the connector was bent over to one side. I bent it back like you did and now it works fine. I was ready to trash it. Thank you, thank you.
ddolin1 -
Hi! How do you guys know if it's the USB port that's broken, and not the battery? My Tab wont turn on... :(
the most difficult, is to open the plastic shell...
Cool tuto !
Hello, I hope someone can help me. I recently changed the module of charging port of my Note 8.0 and worked. The tablet charges without failures or false contacts, but when disconnecting the charger it stops recognizing it. That is, I connect the charger to the tablet and it works, I disconnect it, then reconnect it and it no longer recognizes it. It only works again if I disconnect the flex with pins of the module of charging port and plug it in again, but it only works once, and I have to repeat the operation if I disconnect the charger.
Any idea how to fix it? Will be some defect of the module? Voltage changes?
Thanks again for a well laid out tutorial. I especially like the red doughnut highlights of fasteners.
Take apart some more things and show others how to do it correctly!
Kind regards,
PMH
It IS a note 8 which is what Samsung named their Note 8inch tablet when it came out in 2013. What you thought it was is the cell phone note 8? Samsung have a bad habit of using the same names for different products ….. confusing.
I totally agree with you Albert about Samsung reusing the same name for different devices. Makes it a lot harder than it should be when trying to search for solutions to a device problem and more so when searching for parts. This is more prevalent when you have an older Note 8.0 tablet and the search results predominantly display Note 8 phone returns. If I had any hair left I would likely pull it all out.
I appreciate the time taken to create this repair tutorial Joel. Many thanks!
These instructions were spot on. However, after the last step, I would include that if the replacement micro USB port does NOT come with the metal shielding (as was the case with a 3rd party distributor), then this needs to be removed from the old port and installed on the new port BEFORE screwing the new one onto the board. When prying off the metal shielding from the old port, do so from the sides and lift up from the port end since it pivots from the back of the port module.
It went so well the first time I did it on June 19 that I decided to do the other tablet since we have a matching set. Once again, it went well. It took 20 total minutes flat from setting up to cleaning up.