Ana içeriğe geç

Samsung Galaxy Note II Rear Facing Camera Assembly Replacement

Neye ihtiyacın var

  1. Samsung Galaxy Note II Rear Facing Camera Assembly Replacement, Stylus: adım 1, 2 resimden 1. Samsung Galaxy Note II Rear Facing Camera Assembly Replacement, Stylus: adım 1, 2 resimden 2.
    • Grasp the end of the stylus and remove it from its slot in the midframe.

  2. Samsung Galaxy Note II Rear Facing Camera Assembly Replacement, Rear Case: adım 2, 2 resimden 1. Samsung Galaxy Note II Rear Facing Camera Assembly Replacement, Rear Case: adım 2, 2 resimden 2.
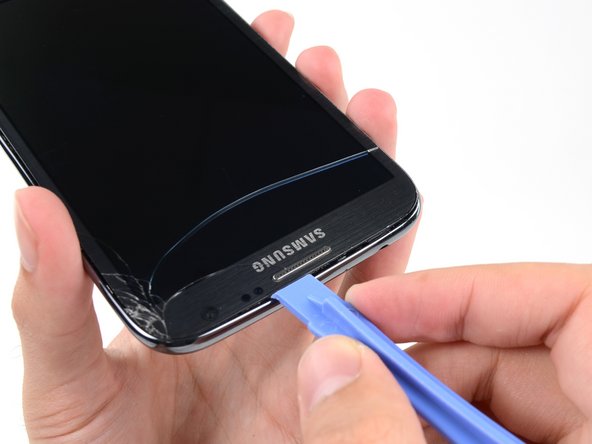
    • Pry with a plastic opening tool, or your fingernail, in the divot to the left of the rear-facing camera, near the power button.

  3. Samsung Galaxy Note II Rear Facing Camera Assembly Replacement: adım 3, 3 resimden 1. Samsung Galaxy Note II Rear Facing Camera Assembly Replacement: adım 3, 3 resimden 2. Samsung Galaxy Note II Rear Facing Camera Assembly Replacement: adım 3, 3 resimden 3.
    • Lift the rear case by the corner nearest the divot and remove it from the phone.

  4. Samsung Galaxy Note II Rear Facing Camera Assembly Replacement, MicroSD Card: adım 4, 3 resimden 1. Samsung Galaxy Note II Rear Facing Camera Assembly Replacement, MicroSD Card: adım 4, 3 resimden 2. Samsung Galaxy Note II Rear Facing Camera Assembly Replacement, MicroSD Card: adım 4, 3 resimden 3.
    • If you have an SD card inserted, use the flat end of a spudger, or your fingernail, to press the microSD card slightly deeper into its slot until you hear a click.

    • After the click, release the card and it will pop out of its slot.

    • Remove the microSD card.

    • For reassembly, push the microSD card into the slot until it clicks in place.

  5. Samsung Galaxy Note II Rear Facing Camera Assembly Replacement, Battery: adım 5, 2 resimden 1. Samsung Galaxy Note II Rear Facing Camera Assembly Replacement, Battery: adım 5, 2 resimden 2.
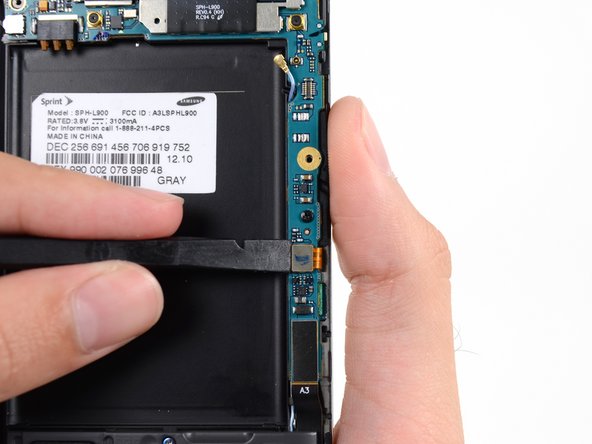
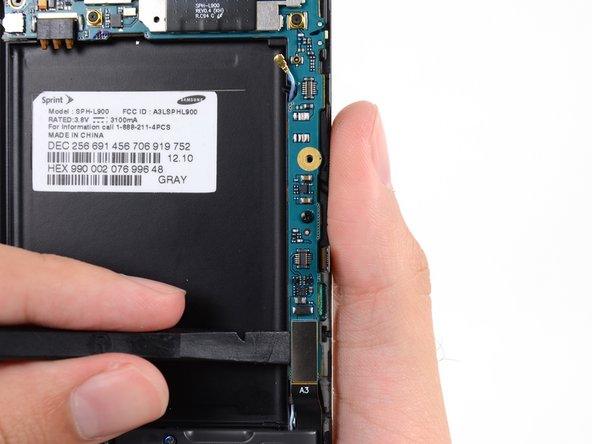
    • Insert a plastic opening tool, or your finger, into the notch of the battery compartment and lift the battery upward.

  6. Samsung Galaxy Note II Rear Facing Camera Assembly Replacement: adım 6, 1 resimden 1.
    • Remove the battery from the midframe.

  7. Samsung Galaxy Note II Rear Facing Camera Assembly Replacement, Midframe: adım 7, 1 resimden 1.
    • Remove the eleven 4.0 mm Phillips #00 screws securing the midframe to the display assembly.

  8. Samsung Galaxy Note II Rear Facing Camera Assembly Replacement: adım 8, 3 resimden 1. Samsung Galaxy Note II Rear Facing Camera Assembly Replacement: adım 8, 3 resimden 2. Samsung Galaxy Note II Rear Facing Camera Assembly Replacement: adım 8, 3 resimden 3.
    • Insert your plastic opening tool between the midframe and front panel assembly on the side of the phone.

    • Slide the plastic opening tool down the seam.

  9. Samsung Galaxy Note II Rear Facing Camera Assembly Replacement: adım 9, 3 resimden 1. Samsung Galaxy Note II Rear Facing Camera Assembly Replacement: adım 9, 3 resimden 2. Samsung Galaxy Note II Rear Facing Camera Assembly Replacement: adım 9, 3 resimden 3.
    • Continue to run the plastic opening tool down the seam.

  10. Samsung Galaxy Note II Rear Facing Camera Assembly Replacement: adım 10, 2 resimden 1. Samsung Galaxy Note II Rear Facing Camera Assembly Replacement: adım 10, 2 resimden 2.
    • Carefully pry around the corner with a plastic opening tool.

  11. Samsung Galaxy Note II Rear Facing Camera Assembly Replacement: adım 11, 2 resimden 1. Samsung Galaxy Note II Rear Facing Camera Assembly Replacement: adım 11, 2 resimden 2.
    • Pry along the top of the phone with a plastic opening tool.

  12. Samsung Galaxy Note II Rear Facing Camera Assembly Replacement: adım 12, 2 resimden 1. Samsung Galaxy Note II Rear Facing Camera Assembly Replacement: adım 12, 2 resimden 2.
    • Push the plastic opening tool down to free the corner of the midframe from the display assembly.

  13. Samsung Galaxy Note II Rear Facing Camera Assembly Replacement: adım 13, 2 resimden 1. Samsung Galaxy Note II Rear Facing Camera Assembly Replacement: adım 13, 2 resimden 2.
    • Free the clips along the power button side of the phone.

    • Lastly, free the two clips along the top and bottom edge of battery compartment.

  14. Samsung Galaxy Note II Rear Facing Camera Assembly Replacement: adım 14, 2 resimden 1. Samsung Galaxy Note II Rear Facing Camera Assembly Replacement: adım 14, 2 resimden 2.
    • Lift the display assembly out of the midframe.

  15. Samsung Galaxy Note II Rear Facing Camera Assembly Replacement, Motherboard Assembly: adım 15, 3 resimden 1. Samsung Galaxy Note II Rear Facing Camera Assembly Replacement, Motherboard Assembly: adım 15, 3 resimden 2. Samsung Galaxy Note II Rear Facing Camera Assembly Replacement, Motherboard Assembly: adım 15, 3 resimden 3.
    • Use a spudger to disconnect the vibrator/power button assembly cable connector.

    • Disconnect the antenna cable connector.

    • Disconnect the display cable connector.

  16. Samsung Galaxy Note II Rear Facing Camera Assembly Replacement: adım 16, 3 resimden 1. Samsung Galaxy Note II Rear Facing Camera Assembly Replacement: adım 16, 3 resimden 2. Samsung Galaxy Note II Rear Facing Camera Assembly Replacement: adım 16, 3 resimden 3.
    • Disconnect the front-facing camera cable connector.

    • Disconnect the headphone jack cable connector.

    • Disconnect the digitizer cable connector.

  17. Samsung Galaxy Note II Rear Facing Camera Assembly Replacement: adım 17, 3 resimden 1. Samsung Galaxy Note II Rear Facing Camera Assembly Replacement: adım 17, 3 resimden 2. Samsung Galaxy Note II Rear Facing Camera Assembly Replacement: adım 17, 3 resimden 3.
    • Use the spudger to disconnect the antenna cable connector from the motherboard.

    • Disconnect the soft button cable connector.

    • Disconnect the USB board cable connector.

  18. Samsung Galaxy Note II Rear Facing Camera Assembly Replacement: adım 18, 1 resimden 1.
    • Remove the 3 mm Phillips #00 screw securing the motherboard to the display assembly.

  19. Samsung Galaxy Note II Rear Facing Camera Assembly Replacement: adım 19, 2 resimden 1. Samsung Galaxy Note II Rear Facing Camera Assembly Replacement: adım 19, 2 resimden 2.
    • Gently remove the motherboard.

    • Hold the motherboard by its edges to prevent ESD damage. Be careful not to snag it on any cables as you extract it from the display assembly.

  20. Samsung Galaxy Note II Rear Facing Camera Assembly Replacement, Rear Facing Camera Assembly: adım 20, 1 resimden 1.
    • Use a spudger to disconnect the rear-facing camera assembly cable connector.

  21. Samsung Galaxy Note II Rear Facing Camera Assembly Replacement: adım 21, 1 resimden 1.
    • Use tweezers, or your fingers, to remove the rear-facing camera assembly.

Sonuç

To reassemble your device, follow these instructions in reverse order.

13 farklı kişi bu kılavuzu tamamladı.

Sam Goldheart

Üyelik tarihi: 10/18/12

465.647 İtibar

538 adet Kılavuz yazıldı

Ekip

iFixit iFixit üyesi

Staff

135 Üyeler

16.732 adet Kılavuz yazıldı

0 Yorum

Yorum Ekle

İstatistikleri Görüntüle:

Son 24 Saat: 0

Son 7 gün: 0

Son 30 gün: 4

Her zaman: 12,086