Bu sürüm, hatalı düzenlemeler içerebilir. En son doğrulanmış bellek kopyası dönün.
Neye ihtiyacın var
-
Bu adım çevrilmemiş. Çevrilmesine yardım edin
-
Prepare an iOpener and apply it to the left edge of the rear cover for one minute.
-
-
Bu adım çevrilmemiş. Çevrilmesine yardım edin
-
Apply a suction cup to the heated edge of the rear cover, as close to the edge as possible.
-
Pull up on the suction cup with strong, steady force to create a gap between the rear cover and the frame.
-
Insert the point of an opening pick into the gap.
-
-
Bu adım çevrilmemiş. Çevrilmesine yardım edin
-
Slide the opening pick along the left edge towards the bottom left corner to slice the adhesive.
-
Leave the pick inserted in the bottom left corner to prevent the adhesive from re-sealing.
-
-
Bu adım çevrilmemiş. Çevrilmesine yardım edin
-
Repeat the previous heating and cutting procedure for the remaining three sides of the phone.
-
Leave an opening pick on each side as you continue to the next to prevent the adhesive from resealing.
-
-
Bu adım çevrilmemiş. Çevrilmesine yardım edin
-
Use a Phillips screwdriver to remove the five 4 mm screws securing the wireless charging coil.
-
-
Bu adım çevrilmemiş. Çevrilmesine yardım edin
-
Use a pair of tweezers to lift up and flip back the metal shield covering the battery connector.
-
-
Bu adım çevrilmemiş. Çevrilmesine yardım edin
-
While holding the metal shield up and out of the way, use the pointed end of a spudger to pry up the battery connector to disconnect it.
-
-
Bu adım çevrilmemiş. Çevrilmesine yardım edin
-
Use the pointed end of a spudger to disconnect the wireless charging coil connector from the motherboard.
-
-
-
Bu adım çevrilmemiş. Çevrilmesine yardım edin
-
Tilt the metal shielding up so you can grip it with your fingers.
-
Peel the wireless charging coil up and away from the device.
-
Remove the wireless charging coil.
-
-
Bu adım çevrilmemiş. Çevrilmesine yardım edin
-
Use a Phillips screwdriver to remove the five 4 mm screws securing the loudspeaker.
-
-
Bu adım çevrilmemiş. Çevrilmesine yardım edin
-
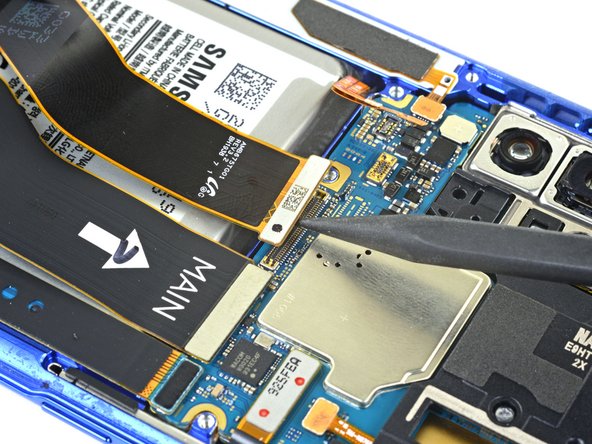
Use the pointed end of a spudger to disconnect the display cable from the motherboard.
-
-
Bu adım çevrilmemiş. Çevrilmesine yardım edin
-
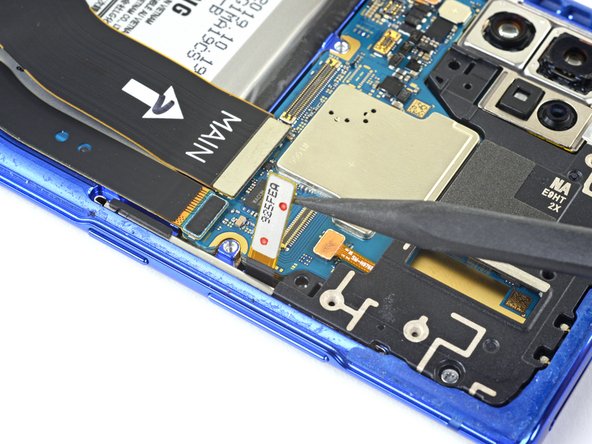
Use the pointed end of a spudger to disconnect the S-Pen touch layer cable connector from the motherboard.
-
-
Bu adım çevrilmemiş. Çevrilmesine yardım edin
-
Prepare an iOpener and apply it to the left edge of the display for one minute.
-
-
Bu adım çevrilmemiş. Çevrilmesine yardım edin
-
Apply a suction cup to the heated edge of the display, as close to the edge as possible.
-
Pull up on the suction cup with strong, steady force to create a gap between the display and the frame.
-
Insert the point of an opening pick into the gap.
-
-
Bu adım çevrilmemiş. Çevrilmesine yardım edin
-
Slide the opening pick along the left side towards the bottom left corner to slice the adhesive.
-
Leave the pick inserted in the bottom left corner to prevent the adhesive from re-sealing.
-
-
Bu adım çevrilmemiş. Çevrilmesine yardım edin
-
Insert a second opening pick and slide it along the left side towards the top left corner to slice the adhesive.
-
Leave the pick inserted in the top left corner to prevent the adhesive from re-sealing.
-
-
Bu adım çevrilmemiş. Çevrilmesine yardım edin
-
Prepare an iOpener and apply it to the bottom edge of the phone for one minute.
-
-
Bu adım çevrilmemiş. Çevrilmesine yardım edin
-
Insert a third opening pick into the gap on the bottom edge of the phone.
-
Slide the opening pick to the bottom right corner, slicing the adhesive.
-
Leave the pick inserted in the bottom right corner to prevent the adhesive from re-sealing.
-
-
Bu adım çevrilmemiş. Çevrilmesine yardım edin
-
Prepare an iOpener and apply it to the top edge of the phone for one minute.
-
-
Bu adım çevrilmemiş. Çevrilmesine yardım edin
-
Insert a fourth opening pick into the gap on the top edge of the phone.
-
Slide the opening pick to the top right corner, slicing the adhesive.
-
Leave the pick inserted in the top right corner to prevent the adhesive from re-sealing.
-
-
Bu adım çevrilmemiş. Çevrilmesine yardım edin
-
Prepare an iOpener and apply it to the right edge of the phone for one minute.
-
-
Bu adım çevrilmemiş. Çevrilmesine yardım edin
-
Slide the opening pick from the top right corner down towards the bottom right corner of the phone to slice the adhesive.
-
Slide an opening pick back and forth around the entire perimeter of the phone to release any missed adhesive, reheating if you find any extra-stubborn adhesive.
-
-
Bu adım çevrilmemiş. Çevrilmesine yardım edin
-
Thread the display and S-Pen touch layer cables through their cutouts on the phone frame.
-
Remove the display.
-
Remove any leftover adhesive before installing a new display.
-
Be sure to test your repairs before installing new adhesives.
-


İptal et: Bu kılavuzu tamamlamadım.
24 farklı kişi bu kılavuzu tamamladı.


9 Yorum
Thanks for the hard work that was put into this so are able to fix our own phones. Very much appreciated!
How do you take the front glass screen off the OLED display/ screen? I couldn't find anything on this site. You would think they would because you can buy just glass screen that goes on the front of the OLED display.
Hi Austin,
Removing the front glass requires slicing through the LOCA (liquid optically clear adhesive), which is pretty tricky to complete and requires specialty tools. The screen glass part by itself is bought primarily by refurbishment/repair shop companies that have the necessary tools to complete that kind of repair.
Hello, does fingerprint sensor and face recognition works after replacing display+frame assembly? New part is original, not OEM.