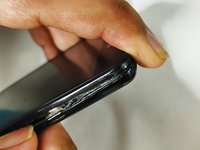
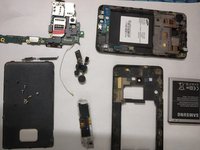
Ana içeriğe geç

Samsung Galaxy S II Screen Replacement

Neye ihtiyacın var

  1. Samsung Galaxy S II Screen Replacement, Remove back cover: adım 1, 1 resimden 1.
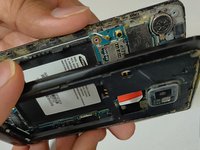
    • Gently remove the back cover starting from the slot given on the right side.

  2. Samsung Galaxy S II Screen Replacement, Remove battery: adım 2, 1 resimden 1.
    • Use a Phillips #00 screwdriver to remove the battery from the slot.

    • Carefully place the battery away from some hot object or fire.

  3. Samsung Galaxy S II Screen Replacement, Remove back case screws: adım 3, 1 resimden 1.
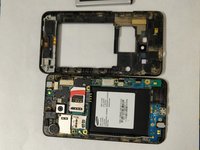
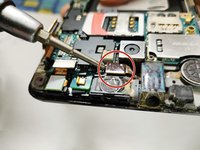
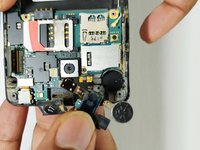
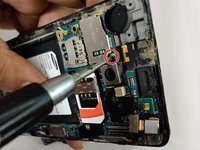
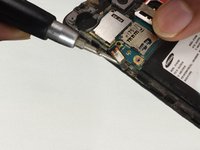
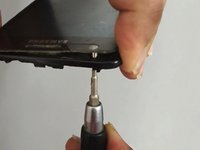
    • Use a magnetic philips #0 head screw driver to open the 7 x 1/16 in (1.6 mm) philips head screws shown in the image.

    • Place the screws carefully in a box.

  4. Samsung Galaxy S II Screen Replacement: adım 4, 3 resimden 1. Samsung Galaxy S II Screen Replacement: adım 4, 3 resimden 2. Samsung Galaxy S II Screen Replacement: adım 4, 3 resimden 3.
    • Gently unlock the snap locks starting from the top left corner and progressing along the perimeter to remove the back case.

    • To unlock the snaps, apply force close to the snap in order to avoid cracking of the plastic cover.

    • Remove the plastic cover carefully and place on the white paper.

  5. Samsung Galaxy S II Screen Replacement: adım 5, 2 resimden 1. Samsung Galaxy S II Screen Replacement: adım 5, 2 resimden 2.
    • Use a screwdriver or another pointed tool to disconnect the screen connector.

    • Lift the cable out of the slot.

    • Gently handle the cable to avoid damage to the cable or the connector.

  6. Samsung Galaxy S II Screen Replacement: adım 6, 2 resimden 1. Samsung Galaxy S II Screen Replacement: adım 6, 2 resimden 2.
    • Remove the connector for the speaker and audio jack carefully.

    • Gently lift the cable to avoid damage to the cable or the connector.

  7. Samsung Galaxy S II Screen Replacement: adım 7, 3 resimden 1. Samsung Galaxy S II Screen Replacement: adım 7, 3 resimden 2. Samsung Galaxy S II Screen Replacement: adım 7, 3 resimden 3.
    • Use a screwdriver to gently lift the speaker which is fixed to the base with double side tape.

    • Gently lift the earpiece using a flat screwdriver.

  8. Samsung Galaxy S II Screen Replacement: adım 8, 3 resimden 1. Samsung Galaxy S II Screen Replacement: adım 8, 3 resimden 2. Samsung Galaxy S II Screen Replacement: adım 8, 3 resimden 3.
    • Unplug the secondary camera connector carefully and lift the cable.

    • Then unplug the connector that receives the input from the screen.

    • Remove the connection for the charging port using a screw driver.

    • Handle carefully to avoid tearing off the cable.

  9. Samsung Galaxy S II Screen Replacement: adım 9, 2 resimden 1. Samsung Galaxy S II Screen Replacement: adım 9, 2 resimden 2.
    • Remove the two 1.6 mm black head screws using the Phillips #00 screwdriver.

  10. Samsung Galaxy S II Screen Replacement: adım 10, 2 resimden 1. Samsung Galaxy S II Screen Replacement: adım 10, 2 resimden 2.
    • Disconnect the antennae from both the ends by removing the connections using flat screwdriver.

    • Carefully pull out the antennae cable from the slot.

  11. Samsung Galaxy S II Screen Replacement: adım 11, 2 resimden 1. Samsung Galaxy S II Screen Replacement: adım 11, 2 resimden 2.
    • Gently peel off the power button fixed with double adhesive tape.

    • Carefully lift the button out of the slot.

    • Try to keep the double side tape on the button and handle the cable carefully to avoid tearing the ribbon.

  12. Samsung Galaxy S II Screen Replacement, Disassemble volume up/down button: adım 12, 2 resimden 1. Samsung Galaxy S II Screen Replacement, Disassemble volume up/down button: adım 12, 2 resimden 2.
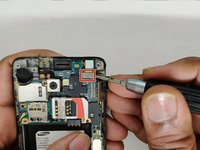
    • Repeat the same procedure from step 15 to remove the volume up down button.

  13. Samsung Galaxy S II Screen Replacement, Remove main board: adım 13, 2 resimden 1. Samsung Galaxy S II Screen Replacement, Remove main board: adım 13, 2 resimden 2.
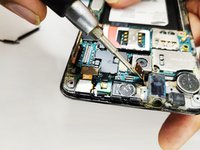
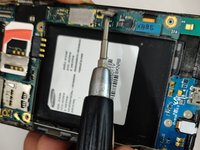
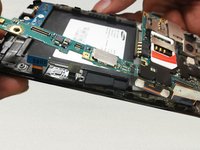
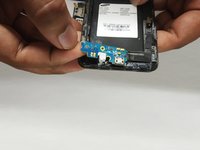
    • Now the main board is free. Carefully lift it up and place on the workbench gently.

  14. Samsung Galaxy S II Screen Replacement, Lift charging port connecting cable: adım 14, 2 resimden 1. Samsung Galaxy S II Screen Replacement, Lift charging port connecting cable: adım 14, 2 resimden 2.
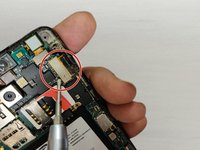
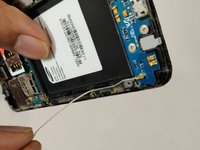
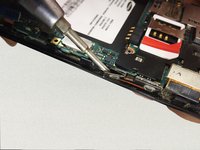
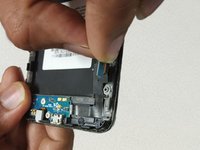
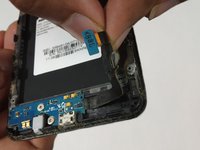
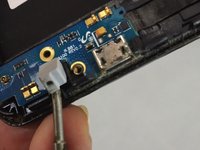
    • Peel off the ribbon cable connecting the charging port and microphone by hand.

  15. Samsung Galaxy S II Screen Replacement, Unscrew charging module: adım 15, 1 resimden 1.
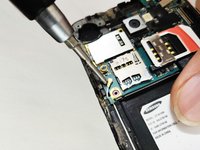
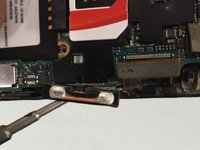
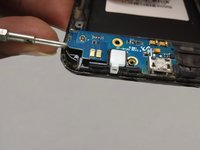
    • Remove the two 2.0 mm screws using the Phillips #0 screwdriver.

  16. Samsung Galaxy S II Screen Replacement, Disassemble charging port module: adım 16, 3 resimden 1. Samsung Galaxy S II Screen Replacement, Disassemble charging port module: adım 16, 3 resimden 2. Samsung Galaxy S II Screen Replacement, Disassemble charging port module: adım 16, 3 resimden 3.
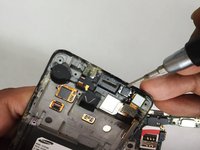
    • Lift the microphone gently.

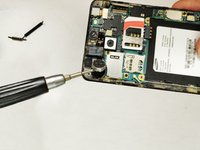
    • Lift the board out from the metal casing and place on the workbench.

  17. Samsung Galaxy S II Screen Replacement, Remove screen and replace with new screen: adım 17, 3 resimden 1. Samsung Galaxy S II Screen Replacement, Remove screen and replace with new screen: adım 17, 3 resimden 2. Samsung Galaxy S II Screen Replacement, Remove screen and replace with new screen: adım 17, 3 resimden 3.
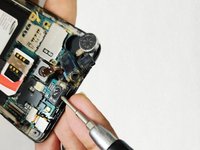
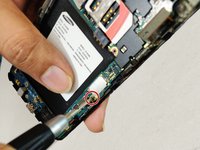
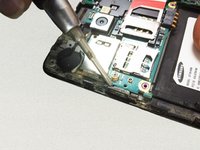
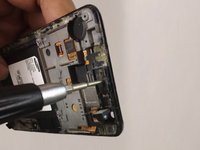
    • Finally push the screen out applying force through the screwdriver at the highlighted locations.

    • Take out the screen, clean the remaining double side tape and adhesive.

    • Install the new screen and follow the same steps in reverse order to re assemble the phone.

Sonuç

To reassemble your device, follow these instructions in reverse order.

3 farklı kişi bu kılavuzu tamamladı.

Bir Yorum

My Samsung Galaxy s2 is an AT&T phone

Anthony Godoy - Yanıt

Yorum Ekle

İstatistikleri Görüntüle:

Son 24 Saat: 0

Son 7 gün: 3

Son 30 gün: 34

Her zaman: 1,760