Ana içeriğe geç

Samsung Galaxy S III SIM Card Replacement

Neye ihtiyacın var

  1. Samsung Galaxy S III SIM Card Replacement, Rear Case: adım 1, 2 resimden 1. Samsung Galaxy S III SIM Card Replacement, Rear Case: adım 1, 2 resimden 2.
    • The following four steps can be accomplished without a plastic opening tool. However, it's recommended to use a tool to best avoid breaking any clips along the perimeter of the rear case.

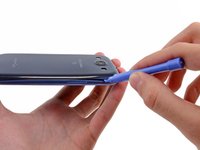
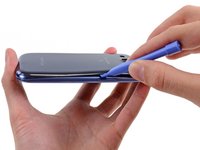
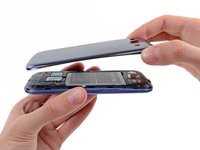
    • Insert a plastic opening tool or fingernail into the notch in the gap between the rear case and the rest of the phone, located at the top of the device.

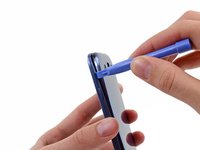
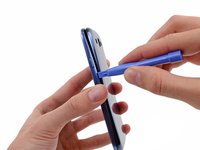
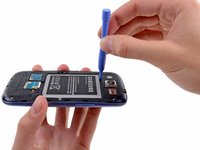
    • Gently twist the opening tool to disconnect the clips securing the top of the rear case.

  2. Samsung Galaxy S III SIM Card Replacement: adım 2, 2 resimden 1. Samsung Galaxy S III SIM Card Replacement: adım 2, 2 resimden 2.
    • Slide the plastic opening tool left along the top edge and repeat the twisting motion to widen the gap between the rear case and the phone.

  3. Samsung Galaxy S III SIM Card Replacement: adım 3, 2 resimden 1. Samsung Galaxy S III SIM Card Replacement: adım 3, 2 resimden 2.
    • Continue to move the plastic opening tool around the perimeter of the top left corner, gently prying up along the rear case.

  4. Samsung Galaxy S III SIM Card Replacement: adım 4, 2 resimden 1. Samsung Galaxy S III SIM Card Replacement: adım 4, 2 resimden 2.
    • Pry along the top right side, and continue prying down the right side of the rear case.

  5. Samsung Galaxy S III SIM Card Replacement: adım 5, 2 resimden 1. Samsung Galaxy S III SIM Card Replacement: adım 5, 2 resimden 2.
    • Lift up and remove the rear case from the phone.

    • You may need to peel the case up to separate it from any clips still holding it to the bottom of the phone.

  6. Samsung Galaxy S III SIM Card Replacement, Battery: adım 6, 2 resimden 1. Samsung Galaxy S III SIM Card Replacement, Battery: adım 6, 2 resimden 2.
    • This step can be accomplished without the need of a plastic opening tool. Just use your finger if you want to.

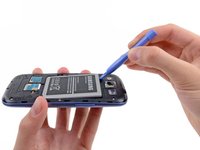
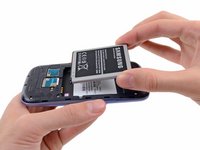
    • Wedge a plastic opening tool into the small notch above the battery.

    • Pry the battery up out of its recess.

  7. Samsung Galaxy S III SIM Card Replacement: adım 7, 2 resimden 1. Samsung Galaxy S III SIM Card Replacement: adım 7, 2 resimden 2.
    • Remove the battery.

  8. Samsung Galaxy S III SIM Card Replacement, SIM Card: adım 8, 3 resimden 1. Samsung Galaxy S III SIM Card Replacement, SIM Card: adım 8, 3 resimden 2. Samsung Galaxy S III SIM Card Replacement, SIM Card: adım 8, 3 resimden 3.
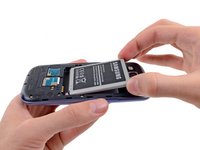
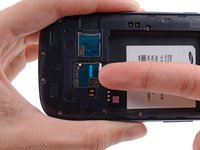
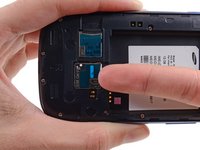
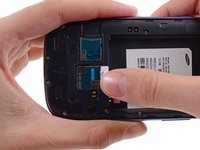
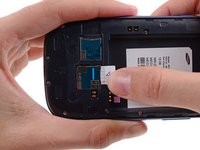
    • Using your fingernail, push the SIM card slightly deeper into its slot, until you hear a click.

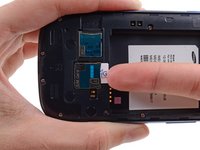
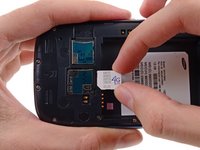
    • After the click, release the card and it will pop out of its slot.

    • For reassembly, push the SIM card into the slot until it clicks in place.

  9. Samsung Galaxy S III SIM Card Replacement: adım 9, 3 resimden 1. Samsung Galaxy S III SIM Card Replacement: adım 9, 3 resimden 2. Samsung Galaxy S III SIM Card Replacement: adım 9, 3 resimden 3.
    • Use your thumb to slide enough of the SIM card out of its slot to grab ahold of it.

    • Grasp and remove the SIM card away from the phone.

Sonuç

To reassemble your device, follow these instructions in reverse order.

41 farklı kişi bu kılavuzu tamamladı.

3 Yorum

My Samsung Galaxy S III does not seem to have a sim card. I bought it through Sprint around 2011 time frame. Do you know if it has an internal sim card that can not be replaced?

Joe - Yanıt

Sprint and Verizon are CDMA (embedded SIM) while AT&T and T-Mobile is GSM.

J Fors -

i was trying to find the sims card and insted i pulled the slot loose from the phone can it be fixed or replaced

sylviahinkle - Yanıt

Yorum Ekle

İstatistikleri Görüntüle:

Son 24 Saat: 1

Son 7 gün: 8

Son 30 gün: 49

Her zaman: 87,466