Bu sürüm, hatalı düzenlemeler içerebilir. En son doğrulanmış bellek kopyası dönün.
Neye ihtiyacın var
-
-
Tırnağınızı ya da bir adet plastik açma aletini arka kameranın sol tarafındaki çukura yerleştirin.
-
Esnek arka kapağı, hafifçe kaldırıp bükerek telefonun arkasından ayırın.
-
-
-
Pilin sağ al köşesinde bulunan boşluğa, tırnağınızı ya da bir adet plastik açma aletini sokup yukarıya doğru kaldırın.
-
Pili telefondan ayırın.
-
-
Bu adım çevrilmemiş. Çevrilmesine yardım edin
-
Using a fingertip, pull the microSD card straight down out of its slot.
-
Remove the microSD card from the phone.
-
-
Bu adım çevrilmemiş. Çevrilmesine yardım edin
-
Use a plastic opening tool to pry up the plastic midframe connector panel.
-
Remove the connector panel with a pair of tweezers.
-
-
Bu adım çevrilmemiş. Çevrilmesine yardım edin
-
Use the sharp tip of a spudger to pry the home button cable connector straight up off its socket.
-
-
Bu adım çevrilmemiş. Çevrilmesine yardım edin
-
Place a heated iOpener on the left side of the phone for at least 90 seconds.
-
Reheat the iOpener and place it on the right half of the phone.
-
-
Bu adım çevrilmemiş. Çevrilmesine yardım edin
-
Insert the edge of an opening pick underneath the bottom right side of the front glass.
-
-
Bu adım çevrilmemiş. Çevrilmesine yardım edin
-
Slide the opening pick up along the right side of the display.
-
-
Bu adım çevrilmemiş. Çevrilmesine yardım edin
-
Carefully slide the pick around the corner, stopping before the speaker grille at the top of the phone.
-
-
Bu adım çevrilmemiş. Çevrilmesine yardım edin
-
Slide the opening pick across the top of the phone, being very careful not to insert the pick too deeply.
-
-
Bu adım çevrilmemiş. Çevrilmesine yardım edin
-
Carefully slide the pick around the upper left corner.
-
-
-
Bu adım çevrilmemiş. Çevrilmesine yardım edin
-
Slide the opening pick down along the left half of the phone stopping at the lower left corner.
-
-
Bu adım çevrilmemiş. Çevrilmesine yardım edin
-
Slide the opening pick all the way to the bottom left corner of the phone, making sure it is securely placed.
-
-
Bu adım çevrilmemiş. Çevrilmesine yardım edin
-
Place a reheated iOpener over the bottom portion of the display assembly.
-
-
Bu adım çevrilmemiş. Çevrilmesine yardım edin
-
Slide the very end of the opening pick across the bottom edge of the display to separate the last of the remaining adhesive.
-
-
Bu adım çevrilmemiş. Çevrilmesine yardım edin
-
Twist the opening pick to detach the glass from the phone.
-
-
Bu adım çevrilmemiş. Çevrilmesine yardım edin
-
Insert an opening pick under the soft button icons on the display and pry the button cables down off the inside of the front panel.
-
-
Bu adım çevrilmemiş. Çevrilmesine yardım edin
-
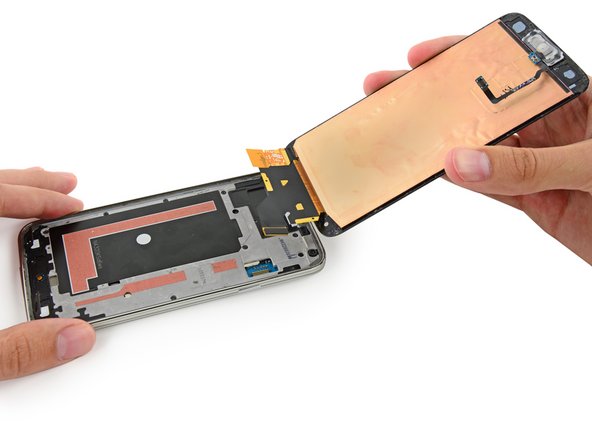
Slightly lift, but do not remove, the home button end of display assembly.
-
-
Bu adım çevrilmemiş. Çevrilmesine yardım edin
-
Use the sharp tip of a spudger to lift the front panel assembly cable connector straight up off its socket on the motherboard.
-
Safely remove the front panel assembly from phone.
-
-
Bu adım çevrilmemiş. Çevrilmesine yardım edin
-
Remove the ten 3.4 mm Phillips #000 screws from the display side of the midframe.
-
-
Bu adım çevrilmemiş. Çevrilmesine yardım edin
-
Two 4.4 mm Phillips #000 screws near the USB port on the battery side of the phone
-
One 4.4 mm Phillips #000 screw
-
-
Bu adım çevrilmemiş. Çevrilmesine yardım edin
-
Gently run a plastic opening tool down along the left inner side of the interior frame to separate the three white plastic clips.
-
-
Bu adım çevrilmemiş. Çevrilmesine yardım edin
-
Gently pull the long sides of the silver bezel out away from the phone to separate the two halves of the midframe.
-
-
Bu adım çevrilmemiş. Çevrilmesine yardım edin
-
Continue on to the right side of the silver bezel, pulling away from the interior section of the midframe to separate the two halves.
-
-
Bu adım çevrilmemiş. Çevrilmesine yardım edin
-
Use a plastic opening tool to pry any remaining corners out of the silver bezel.
-
-
Bu adım çevrilmemiş. Çevrilmesine yardım edin
-
Carefully remove the interior midframe/motherboard assembly from the white inner midframe.
-
-
Bu adım çevrilmemiş. Çevrilmesine yardım edin
-
Carefully wedge the tip of a spudger underneath the antenna cable connector.
-
Delicately lift the spudger directly upwards to disconnect the antenna connector off its socket on the motherboard.
-
-
Bu adım çevrilmemiş. Çevrilmesine yardım edin
-
Remove the single 3.0 mm Phillips #000 screw securing the motherboard to the midframe.
-
-
Bu adım çevrilmemiş. Çevrilmesine yardım edin
-
Pull, but do not remove, the camera end of the motherboard up from the midframe to allow access to the connectors on the rear.
-
-
Bu adım çevrilmemiş. Çevrilmesine yardım edin
-
Use the flat end of a spudger to pry the daughterboard connector straight up off its socket on the motherboard.
-
-
Bu adım çevrilmemiş. Çevrilmesine yardım edin
-
Use the flat end of a spudger to carefully peel the soft button cables up off the interior midframe.
-
-
Bu adım çevrilmemiş. Çevrilmesine yardım edin
-
Remove the single 2.5 mm Phillips #000 screw securing the Micro-USB port daughterboard to the midframe.
-
-
Bu adım çevrilmemiş. Çevrilmesine yardım edin
-
Gently slide the flat end of a spudger in between the daughterboard cable and the interior midframe to begin to separate the adhesive holding it down.
-
-
Bu adım çevrilmemiş. Çevrilmesine yardım edin
-
Rotate the midframe/motherboard assembly and reinsert the spudger between the daughterboard and interior midframe.
-
Twist the spudger to separate the last of the adhesive between the daughterboard and interior midframe.
-
Remove the daughterboard from the interior midframe.
-


İptal et: Bu kılavuzu tamamlamadım.
176 farklı kişi bu kılavuzu tamamladı.


40 Yorum
Since replacing the part I cannot register on the network, Wifi works, cellular says full signal but selected network unavailable. Sim works in another phone and another sim doesn't work in this phone.
Adam -
Make sure you reatach the tiny connector that was taken off in step 28. That is crucial to reception and can easily fail to click into place. It seems very likely that that is the problem.
Adam, did you make sure you replaced with the exact same model?
my apple -