Ana içeriğe geç

Samsung Galaxy S5 Rear Facing Camera Replacement

Neye ihtiyacın var

  1. Samsung Galaxy S5 Rear Facing Camera Replacement, Rear Case: adım 1, 3 resimden 1. Samsung Galaxy S5 Rear Facing Camera Replacement, Rear Case: adım 1, 3 resimden 2. Samsung Galaxy S5 Rear Facing Camera Replacement, Rear Case: adım 1, 3 resimden 3.
    • Insert a fingernail or plastic opening tool into the divot to the left of the rear-facing camera.

    • Gently pry and twist the flexible rear cover off the back of the phone.

  2. Samsung Galaxy S5 Rear Facing Camera Replacement, Battery: adım 2, 3 resimden 1. Samsung Galaxy S5 Rear Facing Camera Replacement, Battery: adım 2, 3 resimden 2. Samsung Galaxy S5 Rear Facing Camera Replacement, Battery: adım 2, 3 resimden 3.
    • Insert a fingernail or plastic opening tool into the recess in the bottom right corner of the battery and lift upward.

    • Remove the battery away from the phone.

  3. Samsung Galaxy S5 Rear Facing Camera Replacement, microSD Card: adım 3, 2 resimden 1. Samsung Galaxy S5 Rear Facing Camera Replacement, microSD Card: adım 3, 2 resimden 2.
    • Using a fingertip, pull the microSD card straight down out of its slot.

    • Remove the microSD card from the phone.

  4. Samsung Galaxy S5 Rear Facing Camera Replacement, SIM Card: adım 4, 1 resimden 1.
    • Repeat the above procedure to remove the SIM card.

  5. Samsung Galaxy S5 Rear Facing Camera Replacement, Display Assembly: adım 5, 3 resimden 1. Samsung Galaxy S5 Rear Facing Camera Replacement, Display Assembly: adım 5, 3 resimden 2. Samsung Galaxy S5 Rear Facing Camera Replacement, Display Assembly: adım 5, 3 resimden 3.
    • Use a plastic opening tool to pry up the plastic midframe connector panel.

    • Remove the connector panel with a pair of tweezers.

    • There should be enough adhesive to readhere the panel upon reassembly, otherwise use a small amount of double-stick tape.

  6. Samsung Galaxy S5 Rear Facing Camera Replacement: adım 6, 2 resimden 1. Samsung Galaxy S5 Rear Facing Camera Replacement: adım 6, 2 resimden 2.
    • Use the sharp tip of a spudger to pry the home button cable connector straight up off its socket.

  7. Samsung Galaxy S5 Rear Facing Camera Replacement: adım 7, 2 resimden 1. Samsung Galaxy S5 Rear Facing Camera Replacement: adım 7, 2 resimden 2.
    • In the following steps you will be using an iOpener to warm the adhesive affixing the display assembly to the rest of the phone. This will allow for a safer, easier screen removal. For proper iOpener use, follow our iOpener heating guide, make sure to pay attention to all warnings.

    • Place a heated iOpener on the left side of the phone for at least 90 seconds.

    • Reheat the iOpener and place it on the right half of the phone.

  8. Samsung Galaxy S5 Rear Facing Camera Replacement: adım 8, 2 resimden 1. Samsung Galaxy S5 Rear Facing Camera Replacement: adım 8, 2 resimden 2.
    • In the following steps you will be using an opening pick to separate the adhesive securing the front panel glass. Only pry where directed. If you experience resistance, stop sliding the opening pick and reapply heat.

    • Insert the edge of an opening pick underneath the bottom right side of the front glass.

  9. Samsung Galaxy S5 Rear Facing Camera Replacement: adım 9, 3 resimden 1. Samsung Galaxy S5 Rear Facing Camera Replacement: adım 9, 3 resimden 2. Samsung Galaxy S5 Rear Facing Camera Replacement: adım 9, 3 resimden 3.
    • Slide the opening pick up along the right side of the display.

  10. Samsung Galaxy S5 Rear Facing Camera Replacement: adım 10, 3 resimden 1. Samsung Galaxy S5 Rear Facing Camera Replacement: adım 10, 3 resimden 2. Samsung Galaxy S5 Rear Facing Camera Replacement: adım 10, 3 resimden 3.
    • Carefully slide the pick around the corner, stopping before the speaker grille at the top of the phone.

  11. Samsung Galaxy S5 Rear Facing Camera Replacement: adım 11, 3 resimden 1. Samsung Galaxy S5 Rear Facing Camera Replacement: adım 11, 3 resimden 2. Samsung Galaxy S5 Rear Facing Camera Replacement: adım 11, 3 resimden 3.
    • The adhesive securing the top of the phone is only a narrow strip above the earpiece speaker. Slide the pick along the top of the speaker to avoid damaging internal components.

    • Slide the opening pick across the top of the phone, being very careful not to insert the pick too deeply.

  12. Samsung Galaxy S5 Rear Facing Camera Replacement: adım 12, 3 resimden 1. Samsung Galaxy S5 Rear Facing Camera Replacement: adım 12, 3 resimden 2. Samsung Galaxy S5 Rear Facing Camera Replacement: adım 12, 3 resimden 3.
    • Carefully slide the pick around the upper left corner.

    • If you encounter any resistance from cooling adhesive, reapply a heated iOpener to the left side of the phone.

  13. Samsung Galaxy S5 Rear Facing Camera Replacement: adım 13, 3 resimden 1. Samsung Galaxy S5 Rear Facing Camera Replacement: adım 13, 3 resimden 2. Samsung Galaxy S5 Rear Facing Camera Replacement: adım 13, 3 resimden 3.
    • Slide the opening pick down along the left half of the phone stopping at the lower left corner.

  14. Samsung Galaxy S5 Rear Facing Camera Replacement: adım 14, 2 resimden 1. Samsung Galaxy S5 Rear Facing Camera Replacement: adım 14, 2 resimden 2.
    • Slide the opening pick all the way to the bottom left corner of the phone, making sure it is securely placed.

    • In the following step you will be placing an iOpener over the home button end of the phone, you won't want your opening pick to slip out.

  15. Samsung Galaxy S5 Rear Facing Camera Replacement: adım 15, 1 resimden 1.
    • Place a reheated iOpener over the bottom portion of the display assembly.

    • There are delicate components in this portion of the phone, you want to ensure the adhesive is warm and easy to loosen to protect the phone.

  16. Samsung Galaxy S5 Rear Facing Camera Replacement: adım 16, 3 resimden 1. Samsung Galaxy S5 Rear Facing Camera Replacement: adım 16, 3 resimden 2. Samsung Galaxy S5 Rear Facing Camera Replacement: adım 16, 3 resimden 3.
    • The bottom end of the phone contains the soft button and home button ribbon cables. If you insert the opening pick too far into the phone you risk cutting these cables.

    • Slide the very end of the opening pick across the bottom edge of the display to separate the last of the remaining adhesive.

  17. Samsung Galaxy S5 Rear Facing Camera Replacement: adım 17, 2 resimden 1. Samsung Galaxy S5 Rear Facing Camera Replacement: adım 17, 2 resimden 2.
    • Twist the opening pick to detach the glass from the phone.

    • If the front panel does not detach easily, it may require additional adhesive cutting.

  18. Samsung Galaxy S5 Rear Facing Camera Replacement: adım 18, 2 resimden 1. Samsung Galaxy S5 Rear Facing Camera Replacement: adım 18, 2 resimden 2.
    • If the front panel is not easily freed, the adhesive on the soft button cable may need to be separated.

    • These cables are thin and easily damaged, therefore be certain you are only peeling them off the display assembly and not lacerating them.

    • Insert an opening pick under the soft button icons on the display and pry the button cables down off the inside of the front panel.

  19. Samsung Galaxy S5 Rear Facing Camera Replacement: adım 19, 2 resimden 1. Samsung Galaxy S5 Rear Facing Camera Replacement: adım 19, 2 resimden 2.
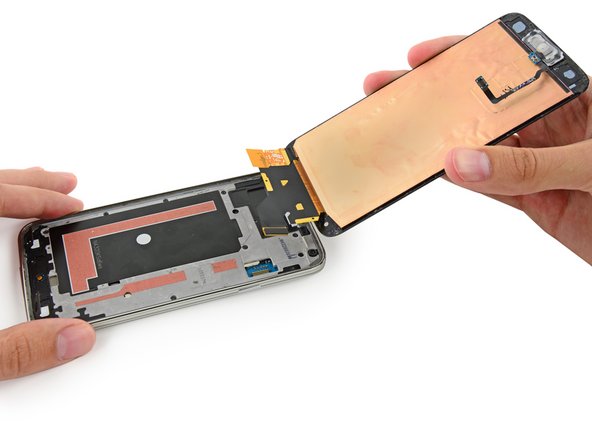
    • Slightly lift, but do not remove, the home button end of display assembly.

    • Do not remove the front panel entirely. It is still attached by a connector.

    • If you are reusing the home button flex cable, be careful not to sever the cable from the home button. Adhesive can cause the cable to rip apart from the home button. While the home button will still work, the fingerprint scanner will not.

  20. Samsung Galaxy S5 Rear Facing Camera Replacement: adım 20, 3 resimden 1. Samsung Galaxy S5 Rear Facing Camera Replacement: adım 20, 3 resimden 2. Samsung Galaxy S5 Rear Facing Camera Replacement: adım 20, 3 resimden 3.
    • Use the sharp tip of a spudger to lift the front panel assembly cable connector straight up off its socket on the motherboard.

    • Safely remove the front panel assembly from phone.

    • If your replacement display did not come with a home button, follow our Home Button Assembly guide to transfer your old button over to the new display, or install a new button.

  21. Samsung Galaxy S5 Rear Facing Camera Replacement, Interior Midframe Assembly: adım 21, 1 resimden 1.
    • Remove the ten 3.4 mm Phillips #000 screws from the display side of the midframe.

  22. Samsung Galaxy S5 Rear Facing Camera Replacement: adım 22, 1 resimden 1.
    • Flip the phone over and remove the following screws from the battery side of the midframe:

    • Two 4.4 mm Phillips #000 screws near the USB port on the battery side of the phone

    • One 4.4 mm Phillips #000 screw

  23. Samsung Galaxy S5 Rear Facing Camera Replacement: adım 23, 3 resimden 1. Samsung Galaxy S5 Rear Facing Camera Replacement: adım 23, 3 resimden 2. Samsung Galaxy S5 Rear Facing Camera Replacement: adım 23, 3 resimden 3.
    • Gently run a plastic opening tool down along the left inner side of the interior frame to separate the three white plastic clips.

  24. Samsung Galaxy S5 Rear Facing Camera Replacement: adım 24, 2 resimden 1. Samsung Galaxy S5 Rear Facing Camera Replacement: adım 24, 2 resimden 2.
    • The midframe is composed of two halves that encase the motherboard.

    • Gently pull the long sides of the silver bezel out away from the phone to separate the two halves of the midframe.

    • It may be helpful to gently push in from the inside of the battery compartment, but be careful not to flex the interior half of the midframe, as the motherboard is mounted to it.

  25. Samsung Galaxy S5 Rear Facing Camera Replacement: adım 25, 2 resimden 1. Samsung Galaxy S5 Rear Facing Camera Replacement: adım 25, 2 resimden 2.
    • Continue on to the right side of the silver bezel, pulling away from the interior section of the midframe to separate the two halves.

  26. Samsung Galaxy S5 Rear Facing Camera Replacement: adım 26, 2 resimden 1. Samsung Galaxy S5 Rear Facing Camera Replacement: adım 26, 2 resimden 2.
    • Use a plastic opening tool to pry any remaining corners out of the silver bezel.

  27. Samsung Galaxy S5 Rear Facing Camera Replacement: adım 27, 2 resimden 1. Samsung Galaxy S5 Rear Facing Camera Replacement: adım 27, 2 resimden 2.
    • Carefully remove the interior midframe/motherboard assembly from the white inner midframe.

  28. Samsung Galaxy S5 Rear Facing Camera Replacement, Motherboard Assembly: adım 28, 1 resimden 1.
    • Remove the single 3.0 mm Phillips #00 screw securing the motherboard to the midframe.

  29. Samsung Galaxy S5 Rear Facing Camera Replacement: adım 29, 3 resimden 1. Samsung Galaxy S5 Rear Facing Camera Replacement: adım 29, 3 resimden 2. Samsung Galaxy S5 Rear Facing Camera Replacement: adım 29, 3 resimden 3.
    • Pull, but do not remove, the motherboard away from the midframe to allow access to the connectors on the rear.

    • Do not attempt to fully remove the motherboard as it is still attached to the interior midframe by the Micro-USB port daughterboard connector.

    • Lay the motherboard on a clean flat surface and support the interior midframe with one hand, leaving the other hand free to work on the motherboard assembly.

  30. Samsung Galaxy S5 Rear Facing Camera Replacement, Rear Facing Camera: adım 30, 3 resimden 1. Samsung Galaxy S5 Rear Facing Camera Replacement, Rear Facing Camera: adım 30, 3 resimden 2. Samsung Galaxy S5 Rear Facing Camera Replacement, Rear Facing Camera: adım 30, 3 resimden 3.
    • Use the flat end of a spudger to disconnect the rear-facing camera connector straight up from its socket on the motherboard.

    • Remove the rear-facing camera from the motherboard using a pair of tweezers.

Sonuç

To reassemble your device, follow these instructions in reverse order.

38 farklı kişi bu kılavuzu tamamladı.

Sam Goldheart

Üyelik tarihi: 10/18/12

465.243 İtibar

538 adet Kılavuz yazıldı

Ekip

iFixit iFixit üyesi

Staff

136 Üyeler

16.562 adet Kılavuz yazıldı

11 Yorum

has any one replaced the camera and now you get the warning camera filled and the led light fails each time you click the app?

Aaron - Yanıt

did you ever figure out how to fix that, i have the same problem

Stuart Orellana -

Outstanding guide!! My rear facing camera got smashed in a bike accident (key in the same pocket as phone - dumb...) and the impact didn't totally disable it, but it lost the ability to properly focus at any but really close distances. This guide made the replacement process completely straightforward and if not "easy" at least a whole lot less daunting. Especially helpful were all the warnings and advice about dealing with the little itty bitty cables at the touch and home buttons at the bottom of the screen.

One item that I might add to this guide - I found it helpful to use multiple opening picks to keep the already cut adhesive around the edges of the display from re-sticking itself as I continued to slowly heat and cut and heat and cut. It's very tenacious adhesive and it really likes to cling back to itself, cool and re-solidify before you get done cutting it all.

Most importantly, after doing this repair, my phone is back to 100% with a perfectly working camera and all functions normal. YAY!!!

Edward Williams - Yanıt

... and, here's the actual repair - https://youtu.be/Q2oj6zpJmTQ compressed to just under two minutes

Edward Williams -

I got a phone from someone and the camera was broken, so I replaced it. After that it still doesn't worked, so I wiped the cache, made a factory reset, etc, still nothing. Does this happened to someone else here? What else can affect the proper function of the camera?

Csongor Bakos - Yanıt

Yorum Ekle

İstatistikleri Görüntüle:

Son 24 Saat: 0

Son 7 gün: 4

Son 30 gün: 22

Her zaman: 112,659