Bu sürüm, hatalı düzenlemeler içerebilir. En son doğrulanmış bellek kopyası dönün.
Neye ihtiyacın var
-
-
Telefonu başlatma düğmesinin olduğu tarafta bulunan SIM kart yerindeki deliğe bir adet ataş ya da SIM çıkartma aleti yerleştirin.
-
SIM kart tepsisini çıkarmak için bastırın.
-
-
Bu adım çevrilmemiş. Çevrilmesine yardım edin
-
Fill a pot or pan with enough water to fully submerge an iOpener.
-
Heat the water to a boil. Turn off the heat.
-
Place an iOpener into the hot water for 2-3 minutes. Make sure the iOpener is fully submerged in the water.
-
Use tongs to extract the heated iOpener from the hot water.
-
Thoroughly dry the iOpener with a towel.
-
Your iOpener is ready for use! If you need to reheat the iOpener, heat the water to a boil, turn off the heat, and place the iOpener in the water for 2-3 minutes.
-
-
-
iOpener'ı panelin üzerine koyun ve cam köşelerinin etrafındaki yapıştırıcıyı gevşetmesi için yaklaşık 60 saniye boyunca bekletin.
-
Kalan alanı da ısıtması için, iOpener'ı o tarafa kaydırın ve yine bir 60 saniye kadar bekleyin.
-
-
-
Ara çerçeveyi telefona sabitleyen 13 adet 3.5mm Phillips #00 vidayı sökün.
-
-
-
Tornavidanın düz ucunu kullanarak pil bağlantısını anakarttaki yerinden ayırın.
-
-
-
Pil ile kasa arasına plastik bir açma aparatı yerleştirin.
-
Pili telefondan ayırmak için aparatı ileriye doğru itin.
-
-
-
-
Ana kart üzerinde bulunan Bluetooth ve Wi-Fi antenleri kablo konnektörlerini soketlerinden ayırmak için, Spudger'ın (plastik kanırtma aparatı) sivri ucunu kullanın.
-
-
-
iOpener'ı ısıtın.
-
iOpener'ı, S6'nın ekranı boyunca yatırın. 30 saniye sonra, iOpener'ı ekranın diğer yarısına kaydırın.
-
-
-
Ekran konnektörünü destek olarak kullanarak, plastik çerçeveyi sağ tarafından tutup kaldırmaya devam edin.
-
Çerçeveyi, 90 derecelik açıdan biraz fazla olacak şekilde kaldırdıktan sonra sayısallaştırıcı kabloyu ekran çerçevesindeki deliğinden geçirin ve çerçeveyi ekran düzeneğinden ayırın.
-
-
Bu adım çevrilmemiş. Çevrilmesine yardım edin
-
Use the pointed edge of the spudger to lift the earpiece speaker assembly from the display frame.
-
-
Bu adım çevrilmemiş. Çevrilmesine yardım edin
-
Use tweezers to lift the assembly out once it's been pried loose.
-
-
Bu adım çevrilmemiş. Çevrilmesine yardım edin
-
Pry the vibrator up from the display assembly with the point of a spudger.
-
Push to pry up the vibrator and its spring-contact connector.
-
-
Bu adım çevrilmemiş. Çevrilmesine yardım edin
-
Remove the single 3.0mm Phillips #00 screw securing the daughterboard to the display frame.
-
-
Bu adım çevrilmemiş. Çevrilmesine yardım edin
-
Insert the pointed edge of the spudger into the groove next to the right soft button LED cable.
-
Gently lift the LED cable off the display frame.
-
-
Bu adım çevrilmemiş. Çevrilmesine yardım edin
-
Insert the pointed edge of the spudger into the groove above the left soft button LED cable.
-
Lift the left soft button LED cable off the plastic frame.
-
-
Bu adım çevrilmemiş. Çevrilmesine yardım edin
-
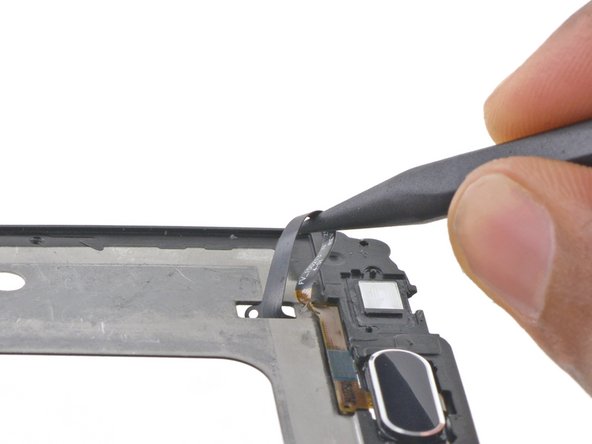
Use the pointed edge of the spudger to separate the home button ribbon cable from the display frame.
-
-
Bu adım çevrilmemiş. Çevrilmesine yardım edin
-
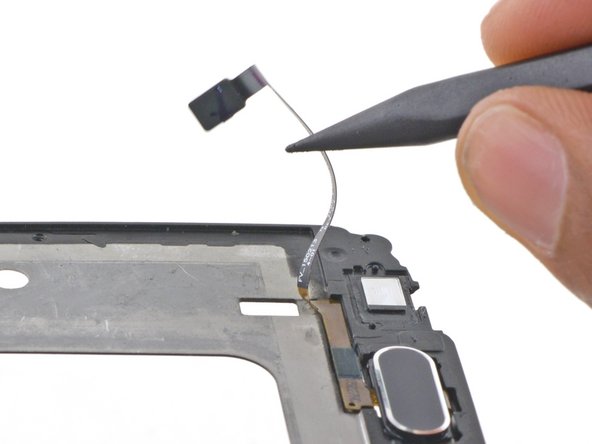
Use the pointed end of a spudger to push the home button cable through the display frame.
-
-
Bu adım çevrilmemiş. Çevrilmesine yardım edin
-
Flip the display frame over and use the pointed end of a spudger to pull the home button cable completely through the hole.
-
-
Bu adım çevrilmemiş. Çevrilmesine yardım edin
-
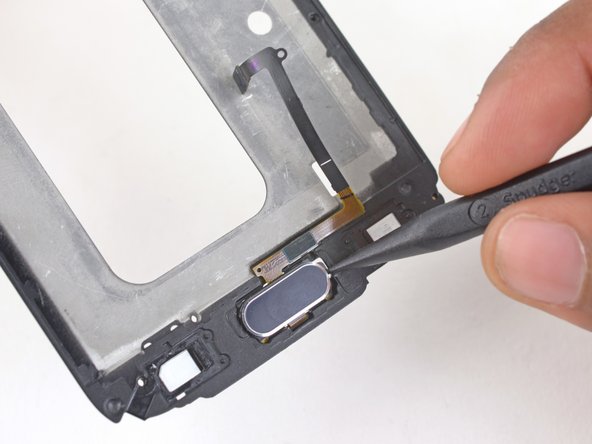
Slide the spudger under the cable to continue separating it from the frame.
-
-
Bu adım çevrilmemiş. Çevrilmesine yardım edin
-
Once the cable is entirely separated from the frame, use a spudger to push the home button to the far left of its bracket.
-
Use a spudger to push the home button up and out of its bracket.
-


İptal et: Bu kılavuzu tamamlamadım.
8 farklı kişi bu kılavuzu tamamladı.
