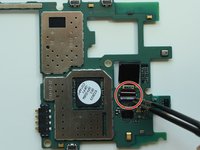
Ana içeriğe geç

Samsung Galaxy Sol Rear Camera Replacement

Neye ihtiyacın var

  1. Samsung Galaxy Sol Rear Camera Replacement, Battery: adım 1, 1 resimden 1.
    • Remove the back case of the phone by using an opening tool or fingernail to lift the divot on the top left side.

  2. Samsung Galaxy Sol Rear Camera Replacement: adım 2, 1 resimden 1.
    • Remove the battery by lifting from the bottom up with an opening tool or a small flat tool such as a credit card.

  3. Samsung Galaxy Sol Rear Camera Replacement, Rear Camera: adım 3, 1 resimden 1.
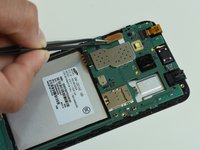
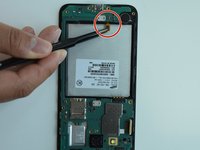
    • Remove the grey back of the phone by unscrewing all ten 0.4mm screws with a Phillips #00 screw bit.

  4. Samsung Galaxy Sol Rear Camera Replacement: adım 4, 1 resimden 1.
    • After you have removed all the screws, take a credit card or plastic tool to lift the screen. You will go all around the border of the phone.

  5. Samsung Galaxy Sol Rear Camera Replacement: adım 5, 3 resimden 1. Samsung Galaxy Sol Rear Camera Replacement: adım 5, 3 resimden 2. Samsung Galaxy Sol Rear Camera Replacement: adım 5, 3 resimden 3.
    • After removing the grey part of the phone, you will need to remove the motherboard by detaching all the chips.

  6. Samsung Galaxy Sol Rear Camera Replacement: adım 6, 1 resimden 1.
    • Once you detach the chips, remove the hard drive to access the rear camera.

  7. Samsung Galaxy Sol Rear Camera Replacement: adım 7, 2 resimden 1. Samsung Galaxy Sol Rear Camera Replacement: adım 7, 2 resimden 2.
    • To remove the rear camera, flip the tab upward and then pull the camera straight out.

Sonuç

To reassemble your device, follow these instructions in reverse order.

0 Yorum

Yorum Ekle

İstatistikleri Görüntüle:

Son 24 Saat: 1

Son 7 gün: 4

Son 30 gün: 4

Her zaman: 472