Ana içeriğe geç

Samsung Galaxy Tab 4 8.0 Verizon Rear Facing Camera Replacement

Neye ihtiyacın var

  1. Samsung Galaxy Tab 4 8.0 Verizon Rear Facing Camera Replacement, Rear Case: adım 1, 3 resimden 1. Samsung Galaxy Tab 4 8.0 Verizon Rear Facing Camera Replacement, Rear Case: adım 1, 3 resimden 2. Samsung Galaxy Tab 4 8.0 Verizon Rear Facing Camera Replacement, Rear Case: adım 1, 3 resimden 3.
    • Before disassembling your Samsung Galaxy Tab 4 8.0, be sure it is powered off and you remove the SIM and Micro SD cards.

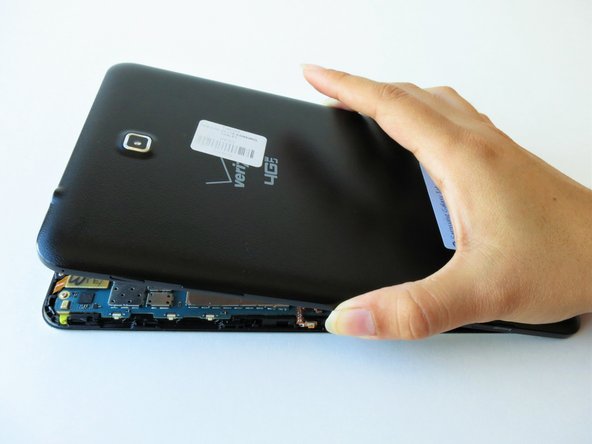
    • At the top of the tablet, nudge the blue plastic opening tool between the back plastic casing and the front panel's metal rim.

    • Do not use excessive force when prying the clips, fastening the casing together, open because they can easily break.

  2. Samsung Galaxy Tab 4 8.0 Verizon Rear Facing Camera Replacement: adım 2, 2 resimden 1. Samsung Galaxy Tab 4 8.0 Verizon Rear Facing Camera Replacement: adım 2, 2 resimden 2.
    • Continue prying the blue plastic opening tool along the perimeter of the tablet to separate the back plastic casing from the front assembly panel.

    • As right-handers, we found it easiest to move clockwise and use more pressure around the corners to facilitate the process.

    • You might hear several popping noises caused by the plastic clips coming undone.

  3. Samsung Galaxy Tab 4 8.0 Verizon Rear Facing Camera Replacement: adım 3, 2 resimden 1. Samsung Galaxy Tab 4 8.0 Verizon Rear Facing Camera Replacement: adım 3, 2 resimden 2.
    • To avoid damaging the screen, gently set the tablet with the LCD screen faced down.

    • Firmly grasp the back plastic casing and lift it away from the front assembly panel.

  4. Samsung Galaxy Tab 4 8.0 Verizon Rear Facing Camera Replacement, Rear Facing Camera: adım 4, 2 resimden 1. Samsung Galaxy Tab 4 8.0 Verizon Rear Facing Camera Replacement, Rear Facing Camera: adım 4, 2 resimden 2.
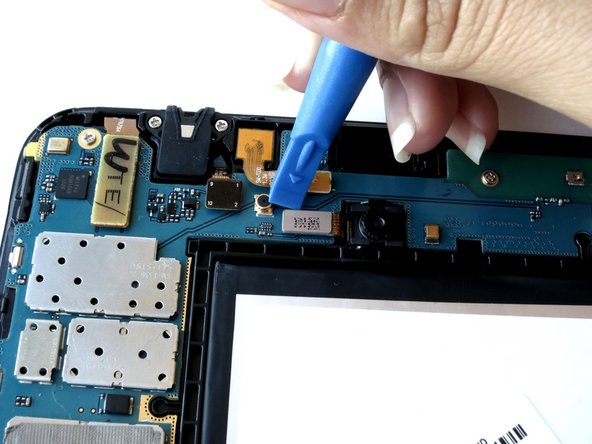
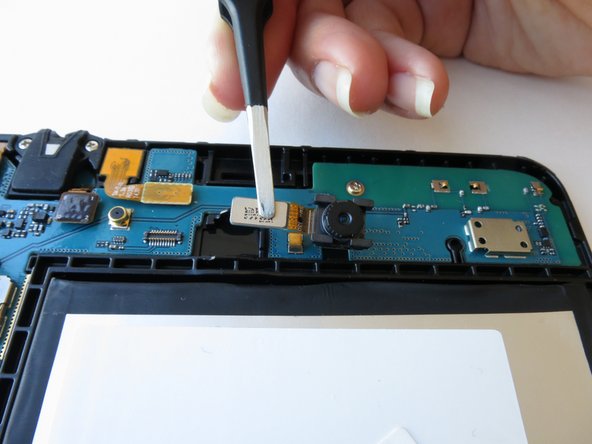
    • The back camera will be located near the top of the tablet in the center above the battery.

    • Carefully insert the flat end of the blue plastic opening tool under the metal rectangular end of the back camera’s cable connector.

  5. Samsung Galaxy Tab 4 8.0 Verizon Rear Facing Camera Replacement: adım 5, 1 resimden 1.
    • Slightly apply pressure and move the blue plastic opening tool downwards to pop the back camera’s metallic rectangular connector from its socket on the logic board.

  6. Samsung Galaxy Tab 4 8.0 Verizon Rear Facing Camera Replacement: adım 6, 2 resimden 1. Samsung Galaxy Tab 4 8.0 Verizon Rear Facing Camera Replacement: adım 6, 2 resimden 2.
    • Squeeze the metallic rectangular piece with the tweezers to gently lift it from it's pit.

Sonuç

To reassemble your device, follow these instructions in reverse order.

2 farklı kişi bu kılavuzu tamamladı.

Yuly Flores

Üyelik tarihi: 09/14/15

747 İtibar

1 Kılavuz yazıldı

Ekip

CSU Fullerton, Team 1-3, Bruce Fall 2015 CSU Fullerton, Team 1-3, Bruce Fall 2015 üyesi

CSUF-BRUCE-F15S1G3

4 Üyeler

12 adet Kılavuz yazıldı

0 Yorum

Yorum Ekle

İstatistikleri Görüntüle:

Son 24 Saat: 0

Son 7 gün: 3

Son 30 gün: 5

Her zaman: 916