Ana içeriğe geç

Samsung Galaxy Tab A 9.7 Button Replacement

Neye ihtiyacın var

  1. Samsung Galaxy Tab A 9.7 Button Replacement, Back Cover: adım 1, 1 resimden 1.
    • Insert a metal spudger between the back case and the screen of the device.

    • The back cover is attached to the device by a series of snaps. The snaps are positioned about an inch from each other.

    • Move the spudger along the perimeter of the device while it is in between the back case and the screen to open each snap.

    • There will be an audible click every time a snap releases.

  2. Samsung Galaxy Tab A 9.7 Button Replacement, Speakers: adım 2, 2 resimden 1. Samsung Galaxy Tab A 9.7 Button Replacement, Speakers: adım 2, 2 resimden 2.
    • Remove the two 2.8 mm Phillips #000 screws from the speakers.

  3. Samsung Galaxy Tab A 9.7 Button Replacement: adım 3, 1 resimden 1.
    • Each speaker is now only connected to the main device by small plastic snaps.

    • Pry the speakers from the device at these two points using the heavy duty spudger.

  4. Samsung Galaxy Tab A 9.7 Button Replacement, Charging Port: adım 4, 3 resimden 1. Samsung Galaxy Tab A 9.7 Button Replacement, Charging Port: adım 4, 3 resimden 2. Samsung Galaxy Tab A 9.7 Button Replacement, Charging Port: adım 4, 3 resimden 3.
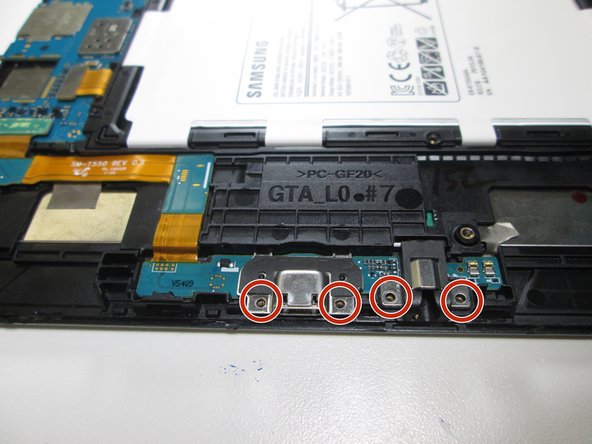
    • Remove the four 2.8mm #000 Phillips screws that hold the charging port and headphone jack in place.

  5. Samsung Galaxy Tab A 9.7 Button Replacement: adım 5, 1 resimden 1.
    • Disconnect the green square connector from the motherboard. To do so, put the flat end of the plastic opening tool underneath the connector and push down.

    • During reassembly, two clicks signify the charging board is completely attached to the motherboard.

  6. Samsung Galaxy Tab A 9.7 Button Replacement: adım 6, 1 resimden 1.
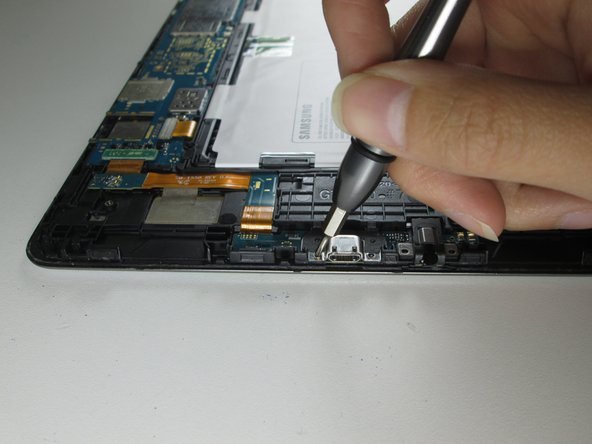
    • Place the heavy duty spudger underneath the charging port and push down to remove the charging port.

    • To reinsert the charging port, angle the port downwards towards the battery. Then press down the outside edge of the charging port.

  7. Samsung Galaxy Tab A 9.7 Button Replacement: adım 7, 1 resimden 1.
    • Peel the charging assembly from the device to completely remove the charging port from the device.

  8. Samsung Galaxy Tab A 9.7 Button Replacement, Button: adım 8, 1 resimden 1.
    • Using a plastic spudger, work around the edge of the screen, prying the screen away from the devise.

    • Once the the cover is removed, set it aside.

  9. Samsung Galaxy Tab A 9.7 Button Replacement: adım 9, 2 resimden 1. Samsung Galaxy Tab A 9.7 Button Replacement: adım 9, 2 resimden 2.
    • Using the tweezers or a plastic spudger, press on the back of the button until it pops out.

Sonuç

To reassemble your device, follow these instructions in reverse order.

0 Yorum

Yorum Ekle

İstatistikleri Görüntüle:

Son 24 Saat: 0

Son 7 gün: 2

Son 30 gün: 16

Her zaman: 949