Bu kılavuzda güncel değişiklikler var. En son onaylanmamış sürüme geçin.
Giriş
The Samsung Gear 2 Neo comes equipped with protective features like Corning Gorilla ® Glass 3 to protect its AMOLED display from damage, but, if you learned anything from Jurassic Park, you'll know that no system is foolproof and the Gear 2 Neo is no exception.
Fortunately, the display is not all that difficult to access, however, the danger lies in the method by which the display is affixed to the watch. Follow along closely, and you'll have your Gear 2 Neo back up and running in 20 to 30 minutes.
Neye ihtiyacın var
-
-
To remove the Gear 2 Neo's watch band, start by locating the small metal levers on either end of the band.
-
Using your finger, push downward on the lever to release the band locking mechanism.
-
Continue to hold the lever down and pull the end of the band away from the watch to completely detach it.
-
Repeat this process for the other side of the band to fully release it.
-
-
-
Start by removing the four Torx T5 Security Screws from the back panel of the Watch Assembly.
-
-
-
Once the four Torx screws have been removed from the Watch Assembly, using a spudger, gently pry the front and back halves of the watch away from each other. This is best accomplished by placing the head of the spudger in the space between the two halves and rotating the head until the two halves split apart.
-
Once the two halves have separated simply lift the back half up and away from the front half to complete this step.
-
-
-
-
Once separated, the front half of the device is easily distinguished from the back by the blue mainboard. Take a moment to familiarize yourself with the important components presented in this half of the device before continuing.
-
AMOLED display connector
-
Heart Rate Sensor
-
Front button assembly
-
Infrared Blaster
-
-
-
Using a pair of precision tweezers, gently grip and disconnect the AMOLED display connector from the mainboard.
-
-
-
The mainboard is secured in place by a shaped snap-fit plastic bracket. Simply apply pressure under the mainboard using a spudger to free it.
-
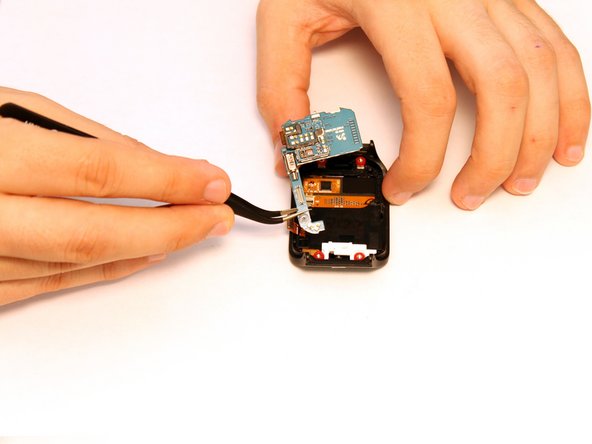
Once the mainboard is released from the bracket, use a pair of precision tweezers to remove the mainboard completely.
-
-
-
The AMOLED display is secured to the front watch assembly with adhesive in two different ways; one being an adhesive ring around the edge, and two being a small adhesive application between the display and front watch assembly.
-
In order to free the display, use a spudger to gently apply pressure to the back of the AMOLED panel until the top half the the display separates from the front panel.
-
Once the top half of the display has been separated from the front panel, use a spudger to clear the adhesive from the underside of the display.
-
When the underside of the display has been cleared of adhesive, continue to apply pressure with the spudger until the display comes free of the front watch assembly.
-


To reassemble your device, follow these instructions in reverse order.
To reassemble your device, follow these instructions in reverse order.
İptal et: Bu kılavuzu tamamlamadım.
Bir başkası bu kılavuzu tamamladı.

2 Yorum
Can replace a sreen of gear neo on a galaxy gear 2?
My watch is fine, but the actual case broke where the wristband goes. Is there a way to replace the actual case where the wristband is attached to?