Bu sürüm, hatalı düzenlemeler içerebilir. En son doğrulanmış bellek kopyası dönün.
Neye ihtiyacın var
-
Bu adım çevrilmemiş. Çevrilmesine yardım edin
-
Press and hold down the button on the bottom side of the phone with your finger.
-
-
Bu adım çevrilmemiş. Çevrilmesine yardım edin
-
While holding the button down, remove the back cover of the phone.
-
-
Bu adım çevrilmemiş. Çevrilmesine yardım edin
-
Remove the four screws from the back of the phone using a Phillips #00 screwdriver.
-
-
Bu adım çevrilmemiş. Çevrilmesine yardım edin
-
Remove the two 7.3 mm screws from the camera and the speaker at the bottom back plate of the phone using a Phillips #00 screwdriver.
-
-
Bu adım çevrilmemiş. Çevrilmesine yardım edin
-
Locate the USB port (where the charger can be plugged in). Using the iFixit opening tool, open the phone cover.
-
-
Bu adım çevrilmemiş. Çevrilmesine yardım edin
-
Remove the 5.5 mm screws from both sides of the camera/speaker with a Phillips #00 screwdriver.
-
-
-
Bu adım çevrilmemiş. Çevrilmesine yardım edin
-
Use the iFixit opening tool to remove the camera/speaker from the motherboard.
-
-
Bu adım çevrilmemiş. Çevrilmesine yardım edin
-
Use the iFixit opening tool to gently pry the camera/speaker off.
-
-
Bu adım çevrilmemiş. Çevrilmesine yardım edin
-
Use the iFixit opening tool to remove the yellow tab on the motherboard.
-
-
Bu adım çevrilmemiş. Çevrilmesine yardım edin
-
Use the iFixit opening tool to remove the other orange tab to free the motherboard.
-
-
Bu adım çevrilmemiş. Çevrilmesine yardım edin
-
To completely remove the motherboard, use the iFixit opening tool to leverage it up, then use your fingers to pull it out.
-
-
Bu adım çevrilmemiş. Çevrilmesine yardım edin
-
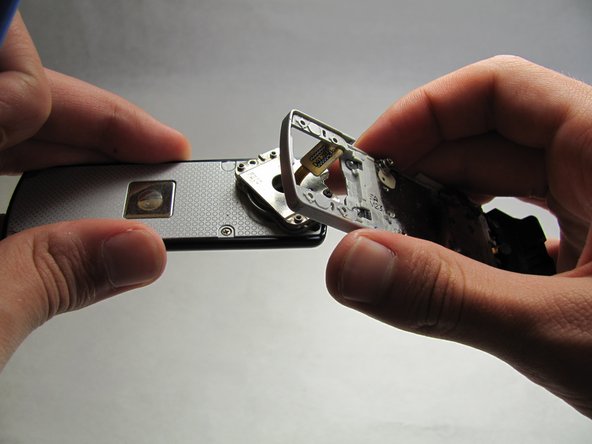
Open/swivel the phone so the back of the LCD panel is visible.
-
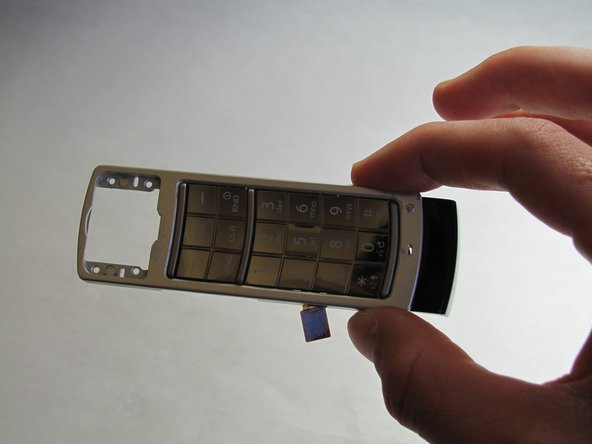
Use the iFixit opening tool to pry the keypad from the hinge on the back of the device.
-
-
Bu adım çevrilmemiş. Çevrilmesine yardım edin
-
Using your fingernail, remove the stickers covering the screws on the back of the LCD casing.
-
Remove six 3.5 mm screws from the back of the device using a Phillips #00 screwdriver.
-
-
Bu adım çevrilmemiş. Çevrilmesine yardım edin
-
Using a generous amount of force, use your hands to pry loose the casing from the LCD panel.
-
-
Bu adım çevrilmemiş. Çevrilmesine yardım edin
-
Using the iFixit opening tool, remove the click wheel from the board.
-
After you have freed the edges, use the spudger to release the clip holding it flush to the board.
-
-
Bu adım çevrilmemiş. Çevrilmesine yardım edin
-
Unlock the ribbon connection by pressing down on the black clip.
-
Carefully pull the click wheel away from the device.
-
-
Bu adım çevrilmemiş. Çevrilmesine yardım edin
-
Using tweezers, grip the red and blue wires that attach the audio earpiece to the outer casing and pull.
-


İptal et: Bu kılavuzu tamamlamadım.
2 farklı kişi bu kılavuzu tamamladı.
Ekip

Cal Poly, Team 6-18, Maness Spring 2010 Cal Poly, Team 6-18, Maness Spring 2010 üyesi
CPSU-MANESS-S10S6G18
3 Üyeler
12 adet Kılavuz yazıldı