Ana içeriğe geç

Samsung SGH-X495 Speakers Replacement

Neye ihtiyacın var

  1. Samsung SGH-X495 Speakers Replacement, Face Plate: adım 1, 1 resimden 1.
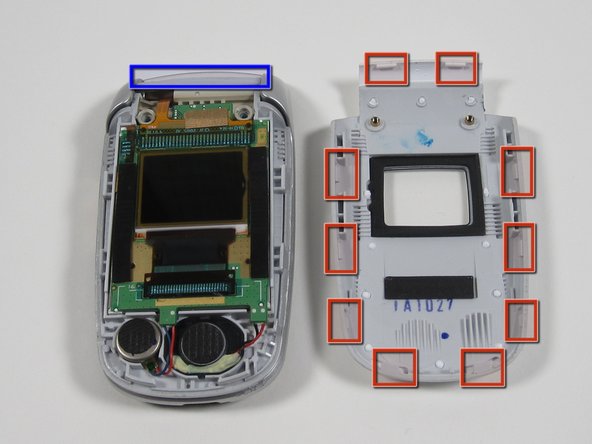
    • First, remove the 2 silver stickers (as indicated by the circles) with a a safety or push pin to reveal 2 screws.

  2. Samsung SGH-X495 Speakers Replacement: adım 2, 1 resimden 1.
    • Remove the 2 (5.6 mm) philips head screws with your safety or push pin.

  3. Samsung SGH-X495 Speakers Replacement: adım 3, 2 resimden 1. Samsung SGH-X495 Speakers Replacement: adım 3, 2 resimden 2.
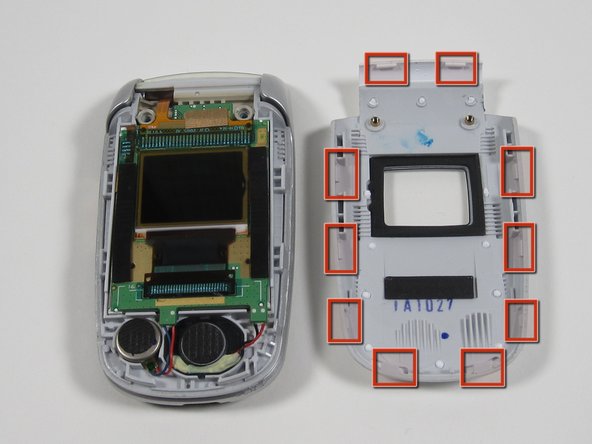
    • As shown above, with a plastic pry tool, begin working at the top corner and down each side. The face plate has 10 tabs that hook into the phone's body.

    • Before removing the 2 tabs on the bottom, the 3 tabs on either side must be free first.

    • Note: The bottom 2 are the most challenging to remove.

    • Note: When reassembling start with the bottom two tabs.

  4. Samsung SGH-X495 Speakers Replacement: adım 4, 2 resimden 1. Samsung SGH-X495 Speakers Replacement: adım 4, 2 resimden 2.
    • Continue down each side toward the bottom with your pry tool.

    • Note: It may help to use multiple pry tools to help hold it open.

    • Second photo: location of the tabs.

  5. Samsung SGH-X495 Speakers Replacement: adım 5, 2 resimden 1. Samsung SGH-X495 Speakers Replacement: adım 5, 2 resimden 2.
    • With 8 tabs released, the face plate is nearly free.

    • With the phone in your left hand, gently wiggle the face plate from side to side and push the face place upward.

    • Note: A strip of double sided tape holds the faceplate, so expect some resistance

  6. Samsung SGH-X495 Speakers Replacement, Speakers: adım 6, 2 resimden 1. Samsung SGH-X495 Speakers Replacement, Speakers: adım 6, 2 resimden 2.
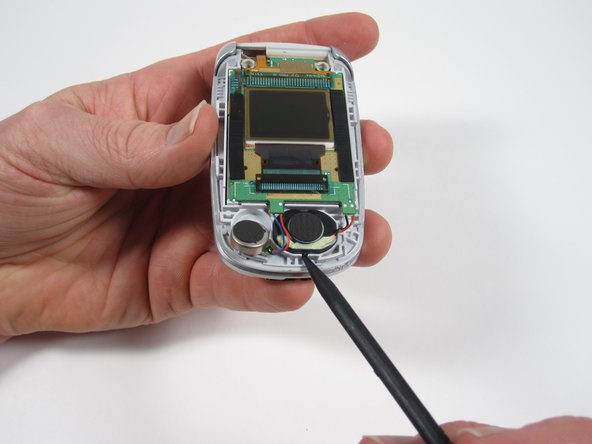
    • Remove the 2 speakers by gently prying them up.

    • The speakers are attached with double sided tape.

  7. Samsung SGH-X495 Speakers Replacement: adım 7, 1 resimden 1.
    • With the speakers free from the phones body the screen is loose as well.

    • The desired solder joint can be accessed to attach a new speaker.

Sonuç

To reassemble your device, follow these instructions in reverse order.

Bir başkası bu kılavuzu tamamladı.

Matthew Hove

Üyelik tarihi: 01/05/11

1.031 İtibar

10 adet Kılavuz yazıldı

Ekip

Cal Poly, Team 3-40, Regan Winter 2011 Cal Poly, Team 3-40, Regan Winter 2011 üyesi

CPSU-REGAN-W11S3G40

4 Üyeler

20 adet Kılavuz yazıldı

0 Yorum

Yorum Ekle

İstatistikleri Görüntüle:

Son 24 Saat: 0

Son 7 gün: 0

Son 30 gün: 2

Her zaman: 1,752